

 Jana has a sunny, happy story about Retro Renovating her sunny, happy yellow kitchen. My husband taught me, “Good. Fast. Cheap. Pick Any Two.” Jana had time… so she was able to finish the kitchen Good and Cheap. For $1,268, to be exact. And that includes new flooring, a vintage Sears Coldspot refrigerator, and the gorgeous 30″ vintage Westinghouse stove peeking out from behind her. 30″ vintage stoves = a rarity. Read on for her story, resources, and lots more photos.
Jana writes:
Hi Pam,
I have received so much inspiration, information and so many good ideas from your blog and the family of readers that I thought I would share my story. I became a first time homeowner late in life (in my mid 40’s), so my journey into retro wonderland has been a labor of love. It took me a year of house hunting, and my 1969 mid century modest ranch actually found me. When my realtor was showing me a house (that I was thoroughly unimpressed with, because the inside had been totally updated and it had lost all of its charm)… there came a knock at the door. The neighbor across the street asked my realtor if she could talk to her about listing their house because she and her husband had been trying to sell it on their own with little luck. I glanced across the street at the house with the For Sale by Owner sign and was immediately intrigued. The woman asked if we would like to come in and see the house on the inside — my realtor was hesitant, but my curiosity led the way and we were marching across the street before we knew it.
I am a college teacher who specializes in working with at risk students, so I am used to spotting possibilities and eyeing that student who is a diamond in the rough that will shine with some attention and TLC. The house was no different. The good news was that all of the fixtures and all of the cabinets were original along with the flooring, wood paneling and the 1969 Coldspot Avocado refrigerator. The bad news was that the roof, heating/air were 10 plus years old, the windows were original single pane with no screens and the interior was in pretty rough shape. Being a renter most of my life, I was used to living in “cosmetically challenged” older homes, so I was not immediately put off by the condition of the interior. It was a small, solid brick/block ranch with a carport I really wasn’t put off when I heard the price they were asking and that day I made an offer, it was accepted and 45 days later I closed. I was now a homeowner! That was 10 years ago and during that time, I have been steadily working on one project a year as my pocketbook would allow me. I decided to start my list with some of the “big stuff”.
The first major renovation I did was to rip up the smelly RED carpeting that was in every room except the kitchen, laundry room and bathrooms. (Yes, it was that color of red that reminded you of Miss Kitty’s Saloon and smelled like it too). Before I moved into the house, myself and 3 friends ripped up the carpenting, scraped the cement slab and put down Bruce oak tongue’n’groove flooring. (real wood, not laminate). I found a great deal at Home Depot on the flooring and already had the tools and the mitre saw. My dad was a DIY guru, so growing up, he taught my sister and I many valuable home maintenance/remodeling skills when we used to help him with his “puttering” projects.
PROJECT NOTE: I chose the “peel and stick” kind of flooring because I didn’t want to mess with the adhesive. It is very easy to work with, but it is also very time consuming. The peel and stick stuck just fine, however, because the flooring was a lock in tongue and groove, it took three times longer than I anticipated and it needed to be a two person job to lay each board to make sure it laid & adhered evenly. I had to use extra vacation days from work to finish the job. That took an exhausting week of 14 hour days, but it looks great now that it is done .
During the next few years, the roof was replaced (after damage from 3 hurricanes in 6 weeks), new energy efficient windows were installed (with screens), and now I’m working on the heating/ac.
Now that a lot of the major issues were addressed, it was time to address the interior and start with the kitchen. Not having sufficient funds for a major re-do, I decided to focus on the details and work with what I had. I wanted to re create a kitchen that reminded me of our home when I was growing up. My parents were very thrifty and nothing ever got thrown away, so we grew up with an eclectic mixture of furniture and decor from the 40’s 50’s 60’s and 70’s. As an adult, I find that I really like the interest and variety of mixing the decades.
The house was small and the kitchen cabinets were a dark walnut veneer that had peeled off in some places and was chewed off by the previous owner’s Jack Russell in others. I wanted to lighten up the kitchen, so I filled in the chew spots with wood putty, sanded them down and painted the cabinets a bright yellow to coordinate with the harvest gold laminate counter top.
The next decision was what hardware to use? I needed 36 pulls so I figured vintage was out of the question. I looked at several reproduction lines, but they were pricey. Did I say vintage was out of the question? I found some cool, vintage NOS red bakelite handles from the restored hardware division of Rejuvenation. The pulls were from the 30’s, but they are the bomb! I wanted some curved half shelves for the cabinets and couldn’t find any, so I went to the craft store and found some unfinished wood pieces and made some. I painted them red to contrast with the yellow cabinets.
The red checked wallpaper was glued directly to the sheetrock, so I didn’t want to take it off. I saw a cute 1940’s wallpaper border on Ebay and had the winning bid. I had never worked with wall paper paste before, but it wasn’t too messy to put up the border.
The next problem was what to do about the north wall of the kitchen which was covered in dark walnut paneling. It was scratched, had lots of nail holes and was well… dark. Not being a fan of paneling, I decided to paint it yellow to coordinate with the cabinets. I wasn’t sure about painting paneling, but after doing some research and seeing pictures, I gathered my courage and painted the wall yellow with the left over paint from the cabinets. It turned out great!
I then decided to replace the original vinyl tile flooring. It was very pitted, scratched, stained and generally gross. I had most of the kitchen floor covered with rugs so I could hide it. What to do? I poured over the flooring section of the blog and just couldn’t decide. Colors? Patterns? Styles? I really liked the Autumn Haze in Pam’s kitchen, but I decided to use the traditional Armstrong VCT flooring that I ordered from Lowe’s. It was more inexpensive with easier availability. My childhood house had the same type of tile only in a dark green, so I was comfortable with that decision. Now to agonize over colors. Single, two combo or a trio? After going through the entire Armstrong catalog, I decided on 3 colors for the floor- red, yellow and bone. Here we go again… pattern? I was not sure whether I wanted a structured checkerboard or a random pattern. Thank you reader Janice! After seeing pictures of her pretty Granny Smith and Autumn Haze random floor pattern, I went with the random placement of the colored tiles.
The hardest part of the project was removing the old flooring. SAFETY NOTE: For those who live in humid climates, I recommend wearing a breathing mask and gloves. When I pulled up the old vinyl flooring tiles, I encountered several pockets of nasty black mold. I worked on the floor each Sunday afternoon and it was finished (literally) in a month of Sundays!
THRIFTY MAINTENANCE NOTE: recently, I was fortunate to find a vintage Regina floor polisher/scrubber/buffer at an estate sale. Before that, I didn’t want to pay someone to clean and polish the floor and I didn’t have 300.00 for a floor buffer, so I improvised. I found a $25.00 car wax buffer at Wal-Mart. Yes, you have to be on your knees or sit to buff/polish the floor, but it does just fine. It is also handy to spot buff after wiping up spills and small areas that you have mopped.
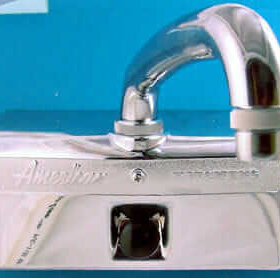
I had a contractor friend of mine come over and help replace the kitchen sink and fixtures. Previously, there had been a shallow (very scratched) stainless steel sink. Apparently the sink was too shallow because when he removed it, the entire interior back side of the cabinet under the backsplash was rotted due to water spilling over the back lip of the sink. He was able to splice in some new wood support pieces to the area under the backsplash to support the sink. I really did not have the resources to replace all of the cabinets and counters. At that time, I was unaware of Pam’s posting about the Kohler sinks and Hudee rings, so I went with a plain white enamel double bowl from Home Depot. The Kohler and Hudee ring are still a possibility, but for a future date.
I then decided to focus on some functional details for the decor. I was fortunate to find a 1949 Coldspot refrigerator in the classifieds that had been rewired and repainted. The owner was moving and wanted to get rid of it in a hurry, so it was very cheap. I kept my larger 1969 Coldspot and moved it into the utility room. It is interesting to have different year models of the same brand.
I found my mid century china cabinet at a local thrift shop. THRIFT NOTE: My china cabinet did not cost a penny – I traded my old china cabinet for the one I have now. I didn’t even have to pay for delivery because the thrift shop considered my old china cabinet as a donation, so they delivered the one I wanted and picked up the donated one I didn’t. I found the yellow cracked ice chrome table and chairs on CL and again, did not hesitate to drive the 60 miles to go get it. This was very similar to the set we had when I was a kid, but ours was green cracked ice.
I wanted a vintage stove and you know what they say… size matters. I found several that I liked, but they all were too big – 42-52 inches with the dutch oven. With the built in cabinets, I needed a 30″ size. As I discovered, this size is much more rare and harder to find. After months of previewing auctions, scouring thrift stores, used appliance stores and local listings, I was very excited to find one on CL. Didn’t matter it was 75 miles away, had to have it!!!
Made the call, my friends and I grabbed the tarps and bungees and jumped into the truck. The stove was a 1955 Westinghouse electric model FJ and had been sitting in a shed for 3 years. It was the right price, so I grabbed it not knowing if it was in working order. It took 3 days and 3 gallons of degreaser to clean it up- I took off every part that had a screw in it and cleaned like a madwoman. After the dirt, grease, mouse doo and birdsnests were cleaned out, it didn’t look half bad. All of the working parts were present except two knobs and later I found replacements on Ebay. SAFETY NOTE: I did call a home appliance repair person to come out and thoroughly inspect the wiring and parts before I ever attempted to plug in the stove. I was pleasantly surprised when Joyce the repair person said that the wiring was in good shape and did not need to be replaced. We plugged it in and tested all the parts and everything worked!
In keeping with my desire for authenticity, I now turned to lighting. Living in Florida, ceiling fans are a must and I already had one mounted above the dining area to provide cross ventilation between the patio and front rooms. I found the cutest MCM red striped ceiling fan shades at Rejuvenation. I also had a second ceiling light mounted over by the stove. This was a generic, bland replacement light. I saw the wonderful “flying saucer” pull down light in Pam’s kitchen. Wow! Just like we had when I was growing up — gotta have one! Looked on Ebay, but final auction prices were a bit out of my range, so I kept waiting and checking. The Lighting Gods rewarded me for my patience because I found one that apparently did not have a lot of interest because I got it for a song! I don’t know what style or manufacturer it is, but it wired right in and works great.
To finish out the functional decor details of the kitchen, I went flea marketing. I found an old jukebox telephone that had been converted to modern phone jack plug in status. This is just like the phone that we had in our kitchen when I was a kid. (I used to sneak into the kitchen and listen to the neighbors on the party line). I also purchased a NOS electric Sunbeam toaster (again, same model as when I was a kid), 2 old fans, and an old Traveller model AM radio all in working order. My favorite vintage appliance was not purchased, but handed down to me from my mother. It is the 1949 Hamilton Beach mixer (pictured on the counter). This mixer was the first item my mother went out and bought for her dowry after my dad asked her to marry him. It has been the workhorse of our family mixing up countless batches of pancakes, Christmas baked goods and of course, decades of birthday cakes. Every time I use it I think of the fun times I had in the kitchen with my mom preparing some kind of yummy baked goodie. It is the treasure of my kitchen. To finish out the decor, I needed some canisters. Hooray for Ebay! I found a set of red Lustroware canisters and breadbox and won them with a low bid. Last but not least, need a clock. Again, Ebay to the rescue!
After adding up the receipts for materials, fixtures, appliances, furniture and decor items, my grand total is $1,268.00 for my kitchen retro re do.
Jana, I am ready to head right over for a cuppa. Your kitchen is so charming and friendly — and gosh, you made it so easy for me to write this one up. In particular, I love how you worked with the existing harvest gold countertops — waste not, want not — but still were able to morph over to the sunny (rather than muddy) side of yellow…. I love the touch of adding the vintage wallpaper edging over the existing checkerboard…. I love your improvised, red knick-knack shelves flanking the sink… and Oh, and what is Not To Like about your Westie? This kitchen is like a party that was waiting for YOU to send out the invites. You go, girl! Thank you.


bepsf says
What a beautiful kitchen – It looks like it’s always been just like this, waiting for you to show up!
Congrats!
gabby says
OK- not to tease y’all….my hubby Slim actually does that kind of work around here. He figured since he can do repairs on cars with bondo-why not spruce up an old fridge the same way?
He didn’t wind up having to do much except a bit of work on the corners of this one, then paint it with leftovers from his (yes, PINK) car.
http://www.flickr.com/photos/93018283@N00/2528500911/in/set-72157605072678202
But I had been planning on finding an old handle he could add to a new fridge. We were also thinking of making a nameplate with the fictional brand ” Coldernell”..straight out of a Tex Avery cartoon. Maybe we’ll get to do that next time.
Exceptional control with your thrift-a-bility clearly gives your kitchen the homey touch, Jan. I am hoping to have similar luck and restraint with our new place. Hold out until we find the nice old stove and then work from there.
You clearly have inspired a lot of us. Great, great job!
Gabby
Jana (Berniecat) says
Gabby,
Love, Love, Love the pink fridge!!!! Your hubby did a great job!!! I also love the colors of the hanging coffee cups!!! So bright, cheerful and spring like. Is your husband saving some of that cool pink paint for your stove when you get one? 🙂
Trouble says
Man that’s awesome. I’m holding out for a Big Chill. I think I’ll have that Coldernell brand plaque made up!
Rebecca Prichard says
Oh my god! That is the cutest damn kitchen I HAVE EVER SEEN. I absolutely love love it. Great job! wow.
Paul says
Terrific kitchen, Jana! You did a great job on that floor; I love how you laid it out! Everything looks very comfy and it’s clearly a labor of love. Enjoy!
Trouble says
Come back Gabbie – we wanna know!
I just put my 1949 Maytag gas range into service after restoring it myself. Awesome. Isn’t it great to cook on an old range???!
Also, I love your VCT. I just did my bathroom w/Armstrong Classic black and learned that if you put a tile down on the spread adhesive a little far from the adjacent tile – there’s no scooting it over! 🙁 But there are only 2 or 3 places that are 1/32″ apart but it’s driving me batty.
Good job!
Lynn-O-Matic says
Job well done, Jana! I especially love the floor, too. I also have a red, yellow, and white kitchen with some of the same touches you have–Lustro Ware bread box and canisters, yellow cracked ice table and red chairs, etc. Sometimes I wish I’d gone with Jadeite green instead of yellow, but seeing your kitchen reminds me why I chose to go with yellow–so sunny and cheerful.
Cynthia says
Looks awesome! I love the floor. Yellow in the kitchen is wonderful…so bright and cheery. Great job, especially for the cost!
Natalie @ Chadwell Chronicles says
Did you install the floor yourself? Did you have it waxed and sealed?
The kitchen is just lovely and an inspiration! It is so happy and bright! We are finishing up our remodel (hence the question about the flooring). I like the random placement of the tiles as well. So very creative!
Jana (Berniecat) says
Hi Natalie,
Yes, I did put the floor down by myself. After I got the tiles down, I did seal it. Armstrong makes a VCT sealer and it is readily available at Lowes and Home Depot. I put down 4 coats (it recommends 3-5) and made sure it had plenty of curing time in between coats. Armstrong also makes a VCT wax that I applied with a damp mop. I put down 2 coats and then did a buff with my little auto wax buffer. (before I found the Regina floor buffer at an estate sale). The auto wax buffer worked very well and buffed up a really nice shine. I put a third coat of wax on for good measure after buffing and so far it is keeping up well with damp mopping and then a buff after the mopping. You can buy several different brands of floor wax cleaner/stripper that will take the old layers of wax off pretty easily and they are not very expensive. You don’t have to use a lot either. The third coat of wax seems to help keep scuffs and stains from settling in.
Natalie @ Chadwell Chronicles says
Thank you so much! That was very, very helpful! I don’t think we are going to put ours down ourselves, but I feel pretty confident that we can seal/wax it. I just needed some reassurance that it can be done as a non-professional. =)
Peter says
Awesome job. You’ve got a great eye for color and scale. Sorta-like someone agonized over each design detail for a custom house in 1948.
Sidney says
I covet this kitchen. So sunny. So hip. Reminiscent of sorority colors. Makes me smell lemon- and cherry-ade. Ready for summer.
I will steal it from you, Jana. Ready your dogs and your firearms.
Truly, spectacular job in every aspect.
And I’m really lazy, so your kitchen is safe. Enjoy!!!