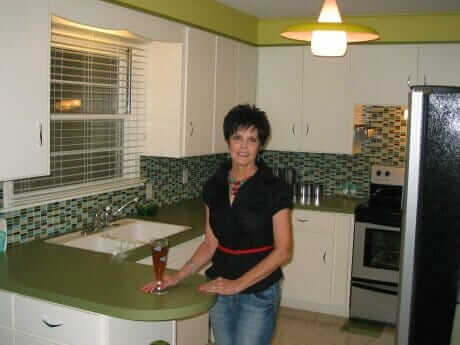
Today, Janice shares the story of her wonderful kitchen renovation, which includes avocado (yes) colored Formica countertops, new MDF cabinet doors, Azrock Cortina Autumn Haze floors — and , well, every detail carefully considered. 🙂 Janice writes:
Pam, here are the pictures to what I like to call my Retro Renovation Inspired Kitchen. I look around the room and can relate nearly everything to some piece of advice learned, a tip heard, or a resource discovered through the blog – a blog that I religiously read every….single…..day.
Here’s a little about the kitchen…..
My husband, Greg, and I bought our 1954 ranch house in Wichita, Kansas in 2008. We were downsizing from a much newer and much bigger house that we no longer needed since we’re empty nesters. I wasn’t nearly as enthusiastic as my husband about downsizing as I wasn’t ready to give up all my “stuff” that filled a 3 story home. That is, until I latched onto an Atomic Ranch magazine in a bookstore one day. I was inspired by the very unique, simpler concept of these homes and now I was completely on board with downsizing….so long as I could have a 1950’s ranch home in the right neighborhood. We were lucky to find our house after only looking at two houses and bam! Suddenly we were owners of a mid-century ranch. Now what the heck do I do?
Janice continues:
By now I was a regular subscriber to Atomic Ranch and loved pouring over the gorgeous homes in the spreads (and still do), but there really weren’t many stories for the moderate income lover of mid-century homes. These were $1 million redos! I needed something that I could relate to and quite by accident, I stumbled upon Retro Renovation. You were custom made for me and I wish I had a dollar for every time I said to my husband, “I was reading on ‘my’ blog ……” Now every time I mention a new idea, his response is, “Oh wait, don’t tell me….you read it on the blog, right?” (You have to read a little sarcasm into that comment.)
While you’ve seen me through 3 renovations (a family room, living room, and a kitchen), the kitchen is where I leaned on you the most. While I fell in love with my house from the moment I stepped in the front door, I didn’t feel like I was stepping back to the 50’s as much as I felt like I was stepping back to the 80’s. Sadly, the house had gone through a major renovation in the 1980’s and all the natural charm had been taken to the dump or covered up by oak veneer…which leads me to my first Retro Renovation inspiration.
I had decided early on that I was not going to rip out all the original cabinets just because they were covered in oak veneer. I chose to keep the bases and have new solid paneled doors made and then paint everything off white to simulate the look of metal cabinets. My plan was to use maple since it had a very light grain…until I read on the blog about the advantages of using MDF in a kitchen. After changing my order to MDF with my cabinet maker, I discovered its other advantage. Cost. My overall cost of the project was reduced by not using solid maple.
That led to me checking the blog before I made any future purchases or decisions. I either found my answer or inspiration on past posts or on the current posts, which seemed to coincidentally tie in with whatever phase I was in. I won’t monopolize your time or that of your readers by providing a story on each step I took, but here are the inspirations for which I’m especially grateful.
Aquamarine – Never in a million years would I have dreamt of putting aquamarine on a wall…until I saw your kitchen, Pam. Your kitchen was my first inspiration and I never get tired of seeing my aquamarine walls.
Where to find Aquamarine – the blog taught me to go to my local Sherwin Williams store and look at their classic collection of mid century paint. I also learned at this store that I love the color of chartreuse and from studying the period advertisements on the blog, I learned it was OK to mix it up a little when it comes to color.
Cabinet knobs – I learned that you could find new production of retro door handles at Rejuvenation. I selected the chrome boomerang ones.
Hudee Ring and sink. I, first of all, learned what a hudee ring was and its importance to the finished look of a 1950’s kitchen. Then I learned where I could still find one and which Kohler sink I should buy to go along with it. I also learned what to look for in picking out a new faucet to keep it period looking.
Stainless steel edging. I learned that I was going to have this come heck or high water, but in the end, I sacrificed it to have the higher priced Mod Walls backsplash I just had to have….in large quantity. I still covet the steel edging, but a girls gotta stick to her budget!
Speaking of backsplash. I learned about this particular pattern in a bathroom redo that you featured on the blog and knew immediately that this is what I had to have for my kitchen. Mod Walls’ Big Sur was the perfect complement to all the colors and tied everything together.
And finally the floor. This is where I agonized the most. I read every post on flooring, not once but several times. From the moment I saw Pam’s fabulous kitchen, I knew I wanted VCT in Autumn Haze. I sold my husband on it and it was a done deal….until contractors and salespeople started scaring the bejeebies out of us with all their talk of cracking, scratching, waxing, striping, waxing again, stripping again, etc. etc. etc. I searched every store in our area and on-line trying to find an acceptable replacement for my beloved Autumn Haze, but the closest I could come to was at a price of $6 per square foot and I didn’t even like it that much. Then one day I was reading along the blog on a topic unrelated to flooring when all of a sudden it takes a fatuitous turn toward an issue that was all consuming to me….kitchen floors. That’s when after posting a question about what a good alternative was for VCT, a reader convinced me to not be afraid of it. He said it wasn’t as difficult as everyone made it out to be and for the cost, well, redo it in 5-6 years if you hate it. That’s all I needed to hear, I ran back to my Autumn Haze and paired her up with a random pattern of Granny Smith Apple. I had it professionally waxed and buffed (well worth the $200) and when it needs done again, I’ll pay to have it done. That’s what I call a true low maintenance floor!
So, that’s my story of how you and your readers put my kitchen together. I am so grateful for all that you do to spread the love and ideas for mid-century style and design. Discovering you and Retro Renovation was the key to our success in bringing our house back to its former glory.
Pam, I know this is terribly long, but this was my chance to brag on you and sing your praises. By the way, the first two pictures are of the kitchen shortly after moving in.
All the best,
Janice and Greg
Aw shucks, Janice, you are too nice. That said, it’s great to hear the blog is helping folks with their reno’s. That was my goal in starting it all — to share the resources. And now, what’s even more fun is that now, I’d estimate that 50-75% of the product ideas I now post come are from reader tips. It’s all good karma. And, when you think about is, karma IS retro, don’t you think?… Like, it keeps coming back and goin’ round. I ask Janice about the counterops and the lighting. She explains:
Hi Pam,
1. The countertop is an interesting story, too. I absolutely heart your boomerang countertop, but as much as I love aquamarine, having it on the walls and the countertops was just too much for my husband
to wrap his head around. After discovering the Mod Walls tile on the bathroom reveal on your blog, I ordered a sample and noticed it had a great avocado green tile in the mix so that’s what I started looking for. I found it at Home Depot and it’s a Formica brand “Atomic Turf. The name alone made me want to buy it!
2. The lights are vintage lights that I found on Ebay from Sweden. Given that they were European wired, my husband had to re-wire them and devise his own system for
hanging them. We had one that started sliding down the wire, so some revisions to his invention had to be made. They’ve stayed secure ever since. I should add they were a filthy, dirty mess when we got them – in good shape, but really, really dirty. We spray painted the yellow and white and I spent a good amount of time scrubbing the white globes. They look perfect now!
Have a wonderful weekend!
Janice
I thought I recognized the laminate color: See this post I did on Atomic Turf and its sister laminate, Atomic Orange (also shown above). I have more improvements planned for navigation on the site, so everyone can get to these resource possibilities more easily.
Thank you so much, Janice, for sharing. Your kitchen looks fabulous, and you sound like quite the designer. Anyone who uses chartreuse on their walls gets my vote, and you were quite resourceful and lovin’ the house you’re in by keeping your oak cabinets and just switching out the doors. Everything came together just beautifully! Your husband, meanwhile, sounds like quite the wonderful partner in this whole journey. It sounds like you are having fun with the second nest! We need to see your other rooms. Way to go, retro Wichita! xoxo








Mandy says
Would you mind sharing which faucet you went with? I’m so happy I found your page. I am going to go with the same sink!
Peggy Miniard says
Janice,
I love your vintage kitchen. I love the way you keep it clean and simple and uncluttered. Its absolutely darling. You did a fab job.
buzzbuzzbecky says
Wow! We just purchased a home built in 1954 a year ago. The kitchen layout is exactly the same as yours and we are in the process of planning a renovation. I want to keep the feel of the 50s kitchen but provide modern convienences. Great inspiration from your pics. We have an original Thermador pink electric wall oven that no longer works and we will need to remove. Will plan on listing at Craigslist for someone who really loves the retro appliances. Thanks again and will post our pics as soon as we have finished.
Edwin wade says
Janice,
What a terrific renovation,Congratulations! I just purchased my 1961 atomic ranch completely intact from the original owners. I’m very eager to begin the more extensive renovation of the kitchen area, which includes painting the cabinets and replaces the floor and countertops. can you provide any details of the painting process? method of application, type of paint used, insides of the cabinets painted as well?
any assistance you could provide would be greatly appreciated.
look for my blog updates coming soon to atomdustbin.com
Thank you
Edwin