Lauryn and Dennis’ 1939 “humble kitchen” makeover — 20 photos
pam kueber - Updated: August 28, 2021
Retro Renovation stopped publishing in 2021; these stories remain for historical information, as potential continued resources, and for archival purposes.
I think I found Lauryn from one of her comments. I chased after her when she said something about the new countertop she’d just had installed… and crikey, it wasn’t just a countertop, she and her husband Dennis had just completed the most charming Retro Renovation of their 1939 kitchen. No — the kitchen in all these photos is not original. Almost all of it is new — with the ‘updates’ including linoleum floors, an undercounter Big Chill fridge (bye bye, dishwasher) and new cabinets put in place to solve for a variety of issues that Lauryn and Dennis had been living with for a while. What a wonderful job! Read on for their complete story — and 20 photos courtesy their friend Radim Schreiber — a professional photographer, so these are awesome photos. Oh, and there’s more: Lauryn and Dennis are a singing-songwriting duo aka Truckstop Souvenir,so we get a concert at the end. I love this story in so many ways. 🙂 –>
The kitchen “before” its Retro Renovation:
And after:
Lauryn writes:
As I’m sure is the case with many of your readers, my husband Dennis and I are what you might call accidental retro-renovators. We’re a songwriting duo who left Seattle for a simpler life in Fairfield, Iowa (the coolest town in the universe), and we both had our hopes set on a lovely Craftsman, of which there are so many gorgeous specimens in Seattle. We were unable to find one, but instead fell in love with a little Minimal Traditional cottage from 1939, knowing nothing about that era nor that style of architecture. And while we have always had a penchant for older things, particularly from the 30s and 40s, we did not set out to do a retro-renovation on our charming but tiny kitchen, we just wanted it to be more user-friendly (we actually use our kitchen) and were already into the process when we came upon the whole notion of retro-renovating.
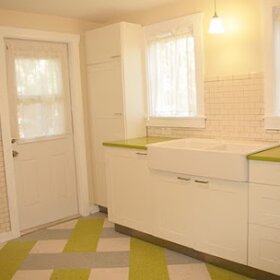
The kitchen when Lauryn and Dennis first bought the house
When we first started, one of the main issues was the breakfast nook, which while adorable, was freezing in the winter and hotter than blazes in the summer. Not to mention that it was a bit cramped for my long, tall Texan husband. Another was the space that housed the stove and the refrigerator: no room for countertops, no food prep space, the (cold) refrigerator inefficiently placed next to the (hot) stove and just enough space in between to catch all sorts of grease, dust, pet fur, and dirt but not big enough for a broom or a mop to clean it. We had limited storage, and I couldn’t stand the off-white ceramic floor tile — hard on the body, cold in the winter, and never clean. The final issue was old wood drawers that I had to brace my feet on the cabinets while sitting on the floor to open.
We talked to a few designers, all of whom had crazy ideas about knocking down interior walls, moving basement staircases (yes, really), pushing out exterior walls, and putting the stove or sink in the breakfast nook, but we didn’t like any of their ideas (and especially didn’t like the price tags that would have accompanied them). We originally thought of (gasp!) replacing the original cabinets so we could accommodate an apartment size fridge on the sink side and build new cabinets around the stove, but when, like good little homeowners we trekked off to our local Menard’s, we left the place a bit numb. Neither of us said anything on the ride home and then both of us practically burst out with “I just can’t do it” (me) and “how hard can it be to build a box?” (DH). The idea of ripping out the original cabinets was suddenly horrifying to both of us, so it was back to the drawing board.
Which was when we made a radical commitment to both our kitchen and house by doing something every realtor would be appalled at: We decided to remove the dishwasher, put in an under-the-counter refrigerator in its place, and have new cabinets, built to match the old, installed around the existing stove, resale value be damned. It was our kitchen, after all. We already had a chest freezer in the basement and who really knows what’s in the back of those behemoth refrigerators? We found a local carpenter to match the cabinets (who also sanded and evened out those pesky drawers) and got the remodel going.
In the meantime, we ripped out the breakfast nook bench. It was not an easy decision, as it was part of the original kitchen and had the original naugahyde on it. But previous owners had ripped out the back of the bench and replaced it with flimsy cushions, then painted a good chunk of the burgundy naugahyde white. And the space was drafty and uncomfortable so out it came. With the help of a friend, we insulated it, dry-walled it, and the temperature of the kitchen went up ten degrees (in an Iowa December).
But it wasn’t until we hit the countertop decision that we officially became retro-renovators. We had access to free (yes, free) granite. We looked at soapstone and quartz and butcher block and countless other surfaces but no matter how many countertops we looked at, I just kept saying, no, it’s not what our humble little kitchen wants. What it did want, I had no clue, until on the way out the door one day, my husband said, “What about those old diner style countertops?” And that was it. I jumped on the computer and found cracked ice and boomerangs and metal edging … and I knew we had found the countertop my kitchen wanted. And of course, it was how I stumbled upon your wonderful site.
And the rest unfolded over time, with me spending more hours than I care to admit looking at ads from the 30s and 40s, checking your site daily, and agonizing over the faucet and the sink and the fact that the new cabinets would not accommodate a larger vintage stove, because we didn’t even think about vintage stoves when we started.
Some of the highlights (for us) are the countertops, made by a local craftsman (in the end we did not use cracked ice, the replicas being nothing like the real deal, and choose to use a Nevamar linen-y thing)…
…the curved shelves I had him build to replicate those of the era (and to house our cookbooks, who lost their perch when we ditched the full-size refrigerator)…
…our vintage Kohler sink, which a friend had found years ago by the side of the road and had been using as a goat trough out at his farm, but which cleaned up rather nicely; our cracked ice table (the perfect size for our nook), found on a road trip at an antique mall we stopped in on a whim one day…
…the exceedingly cheerful Bradbury & Bradbury wallpaper (which offers a nice counter-balance to our tendency to ponder the dark side of life in our songs); and my cafe curtains (my first foray into sewing curtains).
It took an extraordinarily long time, with me unable to make up my mind about so many things, never mind being the world’s worst procrastinator and not the best DIYer. But eventually it all came together and in hindsight, given that our duo’s name, Truckstop Souvenir, was inspired by old diners and truck stops from childhood road trips, we really couldn’t have done anything but a retro renovation. We can actually cook together without stepping on each other’s toes too much and we eat just about every meal in the little breakfast nook, which, with east, west, and southern exposure, is almost always sunny.
I will admit one thing, though: We’re still not always sure what’s in the back of our refrigerator.
Let me know in the meantime if you have any questions on anything in the pictures. Your website was a constant source of inspiration for me as I went through this process.
Thanks again! xoxo, Lauryn
P.S. Because you are clearly a dog lover, I’m including a picture of my dog, worn out by the initial decision making process!
[And Lauryn follows up with another email]: Hey Pam, I just was going through a file full of artwork I found when I was visiting my parents and looky here, I found my first foray into Retro Design!! My husband and I had quite the chuckle over it and thought you might get a kick out of it too. I’m guessing I was probably in 3rd of 4th grade, judging by some of the other artwork from that “period” (hee hee). I have no idea whose kitchen this is … think it was just my fantasy kitchen!!.
Lauryn 🙂
Products used in Lauryn and Dennis’ 1940s kitchen remodel:
Big Chill Refrigerator (we had already picked out our under the counter unit and I got on Big Chill’s site to pine away for what we couldn’t have and lo and behold, there it was, less than a week on the site!)
Minka Aire Acero ceiling fan (sadly, we have only one original light fixture in this house)
Red Amaranth Marmoleum floor
Nevamar Serene Stardom (now discontinued) laminate countertops with aluminum trim from NY Metals
From one Iowa girl to another (transplanted) Iowa girl….just lovely! Love everything you did. It is timeless!
Nancysays
Love the redo!! The wallpaper is so beautiful at the end of your kitchen! It looks like you have happy geranium blooming all around! Really makes for a happy, soothing spot!
Great job!
Veronika Beckersays
Sooo cute! What a darling home!
Kerstensays
Oh, it is lovely! I’d sing in that kitchen all the live long day! Can you tell me about the flooring? Did you go with the sheet or snap in? What do you think of it now that it is installed? One other thing that I wonder if anyone has an idea/opinion about is if you can cut a formica counter top that is already installed? We re-did our counters a couple years ago with the Vivvarr which is no longer available. We allowed for overhang for counter stools, and now I wish I would have done regular depth to give us more room in our dining room. Think it is possible to re-cut the formica? I know the edge wouldn’t be laminate, but what if we used the metal edging to cover the cut? Anyone think this is a possibility (rather than having to re-counter the entire kitchen?)
pam kuebersays
Kersten, I’ve sent Formica your question and will plan to do a story when they answer. Can you send me a pic? or a couple?
Kerstensays
You bet! I’ll send you lots of pics to ponder! You know I’ve been putting off this kitchen deal for years! I don’t even care if one part of the kitchen has the metal edging and the other part doesn’t. I just don’t want to spend $$$ unnecessarily.
Joel Riehlsays
It is possible to modify the already-laminated countertops. You could even re-do the edge in laminate if you are careful. I would use a router to do the cutting, with a straight fluted bit. Clamp a fence (a piece of plywood with a good straight edge) to the top as a guide. The straight cut is easy. Then, if you want to undercut it by 1/16″ to get the top to overlap the edge band, come back again from the underside, with the router bit stopped short of the top sheet and remove the additional 1/16″. Then you slip the edge band up under the top sheet – using contact cement to adhere it. Route off the bottom edge to finish it, and you’re done. If the laminate is no longer available, you will have to see if you can salvage a piece from the portion of the top you cut off (the fence-routed edge should be perfect for butting up to the top). You should be able to separate the laminate from the substrate and clean it using methyl ethyl ketone. If you aren’t feeling up to it, or don’t have the tools, I would guess most cabinet makers (I used to be one) would be willing to give it a try.
Kerstensays
Thank you, Joel! Do you think it’s possible to do this as is in the kitchen, or do I need to try to remove that large piece of countertop before starting? I fear trying to remove it will mess with the other pieces where it is glued. I’d love to be able to leave it on the cabinet and do the cutting right in the kitchen.
Chrissays
Hey Kersten — my husband re-laminated our countertop and he did a great job!
He did it all in place, just cemented the new stuff over the old. Used a laminate trimmer he got from a cheap tool place. He did a beautiful job. He did have to stop with the tool and trim some parts by hand so he wouldn’t mess up the wall, cabinet, etc.
If you are really handy with tools, I bet you can do it.
Joel Riehlsays
Kersten,
That largely depends on maneuvering space for the router. If the counter projects so that you can get at the current and revised front edge from both top and bottom, and all the way along its length from side to side with a router (which will be 3 – 6″ in dia. depending on the type used), then you should be good leaving it in place. If not, you will have to pry it up. If one side or the other butts into a wall or other cabinet at right angles for instance, you will not be able to get the cutter on the router all the way through. If you have to remove it to work, pull out any drawers or other obstructions and look underneath. It may be held down to the cabinet base with only screws, and will come off easily. Or not. Even if you have to pry it off and some plywood or lumber splinters in the process, it will all be hidden once you re-mount it. Just keep the substrate (probably plywood) from cracking or bending all the way through. Keep the surface with the laminate intact. The back side you can hide. If it is part of a larger top in the shape of an ‘L’ or something like that, removal gets trickier.
Laurynsays
Thanks, Kersten! We did the sheet flooring and we love it … much nicer on the feet than the tile that was there before. I would not recommend installing it yourself unless you really know what you’re doing, as it’s a little more finicky than vinyl flooring. And definitely get someone who has experience with it!
Kristisays
There is absolutely nothing about this kitchen that does not make me absurdly happy. What amazing colors! It looks like the kind of room that you would always want to hang out in together.
What a beautiful kitchen! Red is my favorite color, but I often think it looks too harsh in kitchens because it is often paired with white and black. Your color palette is both soothing and cheerful! It looks like a lovely place to cook and eat. And props to you for making the choices you want in your kitchen instead of focusing on resale. I hope I am that brave with my renovation choices 🙂
lyndasays
Just perfect. Colors, material choices and layout couldn’t be nicer. One question. I don’t see a kitchen exhaust fan. Pam did a piece on the NuTone fans. One might be nice in the space. Love everything.
Laurynsays
I would love to have a NuTone above the stove, but that wall backs up to the basement stairs and there is no place to vent it to. So far it hasn’t been an issue and I’ve actually never had an exhaust fan in any place I’ve lived yet, so I’m used to it.
I was going to ask about an exhaust fan, too. Do you find that you don’t need one?
Our kitchen currently doesn’t have a working vent hood or fan and I have wanted to add one. In my research, though, I’ve learned that most stove hoods installed in houses about this age, most aren’t vented to the outside and just kind of move the smoke and odors around rather than sucking them out anywhere.
*Love* love love your kitchen, by the way. You guys have inspired me to try to keep our existing cabinets and maybe have a carpenter just add some in the same style.
pam kuebersays
Recommendation: Check your local building codes regarding this question, readers. Pammy’s usual: Consult with a properly licensed professional.
Juliesays
Love the non-granite, non-marble, non-stainless remodel. I have almost exactly the same (original) countertops, in a beige-ier color, and I love them. Glad to know what they’re called. I also love my butter yellow sink and harvest gold stove. Some day I’d like to replace the non-original, 80’s country raised cabinet doors back to slab (even though you see them in all the “before” pics). Thanks for the great pics.


 I think I found Lauryn from one of her comments. I chased after her when she said something about the new countertop she’d just had installed… and crikey, it wasn’t just a countertop, she and her husband Dennis had just completed the most charming Retro Renovation of their 1939 kitchen. No — the kitchen in all these photos is not original. Almost all of it is new — with the ‘updates’ including linoleum floors, an undercounter Big Chill fridge (bye bye, dishwasher) and new cabinets put in place to solve for a variety of issues that Lauryn and Dennis had been living with for a while. What a wonderful job! Read on for their complete story — and 20 photos courtesy their friend Radim Schreiber — a professional photographer, so these are awesome photos. Oh, and there’s more: Lauryn and Dennis are a singing-songwriting duo aka Truckstop Souvenir,so we get a concert at the end. I love this story in so many ways. 🙂 –>
 And after:
 Lauryn writes:
We talked to a few designers, all of whom had crazy ideas about knocking down interior walls, moving basement staircases (yes, really), pushing out exterior walls, and putting the stove or sink in the breakfast nook, but we didn’t like any of their ideas (and especially didn’t like the price tags that would have accompanied them). We originally thought of (gasp!) replacing the original cabinets so we could accommodate an apartment size fridge on the sink side and build new cabinets around the stove, but when, like good little homeowners we trekked off to our local Menard’s, we left the place a bit numb. Neither of us said anything on the ride home and then both of us practically burst out with “I just can’t do it” (me) and “how hard can it be to build a box?” (DH). The idea of ripping out the original cabinets was suddenly horrifying to both of us, so it was back to the drawing board.
Which was when we made a radical commitment to both our kitchen and house by doing something every realtor would be appalled at: We decided to remove the dishwasher, put in an under-the-counter refrigerator in its place, and have new cabinets, built to match the old, installed around the existing stove, resale value be damned. It was our kitchen, after all. We already had a chest freezer in the basement and who really knows what’s in the back of those behemoth refrigerators? We found a local carpenter to match the cabinets (who also sanded and evened out those pesky drawers) and got the remodel going.
In the meantime, we ripped out the breakfast nook bench. It was not an easy decision, as it was part of the original kitchen and had the original naugahyde on it. But previous owners had ripped out the back of the bench and replaced it with flimsy cushions, then painted a good chunk of the burgundy naugahyde white. And the space was drafty and uncomfortable so out it came. With the help of a friend, we insulated it, dry-walled it, and the temperature of the kitchen went up ten degrees (in an Iowa December).
But it wasn’t until we hit the countertop decision that we officially became retro-renovators. We had access to free (yes, free) granite. We looked at soapstone and quartz and butcher block and countless other surfaces but no matter how many countertops we looked at, I just kept saying, no, it’s not what our humble little kitchen wants. What it did want, I had no clue, until on the way out the door one day, my husband said, “What about those old diner style countertops?” And that was it. I jumped on the computer and found cracked ice and boomerangs and metal edging … and I knew we had found the countertop my kitchen wanted. And of course, it was how I stumbled upon your wonderful site.
And the rest unfolded over time, with me spending more hours than I care to admit looking at ads from the 30s and 40s, checking your site daily, and agonizing over the faucet and the sink and the fact that the new cabinets would not accommodate a larger vintage stove, because we didn’t even think about vintage stoves when we started.
Some of the highlights (for us) are the countertops, made by a local craftsman (in the end we did not use cracked ice, the replicas being nothing like the real deal, and choose to use a Nevamar linen-y thing)…
…the curved shelves I had him build to replicate those of the era (and to house our cookbooks, who lost their perch when we ditched the full-size refrigerator)…
…our vintage Kohler sink, which a friend had found years ago by the side of the road and had been using as a goat trough out at his farm, but which cleaned up rather nicely; our cracked ice table (the perfect size for our nook), found on a road trip at an antique mall we stopped in on a whim one day…
It took an extraordinarily long time, with me unable to make up my mind about so many things, never mind being the world’s worst procrastinator and not the best DIYer. But eventually it all came together and in hindsight, given that our duo’s name, Truckstop Souvenir, was inspired by old diners and truck stops from childhood road trips, we really couldn’t have done anything but a retro renovation. We can actually cook together without stepping on each other’s toes too much and we eat just about every meal in the little breakfast nook, which, with east, west, and southern exposure, is almost always sunny.
I will admit one thing, though: We’re still not always sure what’s in the back of our refrigerator.


Marymg says
From one Iowa girl to another (transplanted) Iowa girl….just lovely! Love everything you did. It is timeless!
Nancy says
Love the redo!! The wallpaper is so beautiful at the end of your kitchen! It looks like you have happy geranium blooming all around! Really makes for a happy, soothing spot!
Great job!
Veronika Becker says
Sooo cute! What a darling home!
Kersten says
Oh, it is lovely! I’d sing in that kitchen all the live long day! Can you tell me about the flooring? Did you go with the sheet or snap in? What do you think of it now that it is installed? One other thing that I wonder if anyone has an idea/opinion about is if you can cut a formica counter top that is already installed? We re-did our counters a couple years ago with the Vivvarr which is no longer available. We allowed for overhang for counter stools, and now I wish I would have done regular depth to give us more room in our dining room. Think it is possible to re-cut the formica? I know the edge wouldn’t be laminate, but what if we used the metal edging to cover the cut? Anyone think this is a possibility (rather than having to re-counter the entire kitchen?)
pam kueber says
Kersten, I’ve sent Formica your question and will plan to do a story when they answer. Can you send me a pic? or a couple?
Kersten says
You bet! I’ll send you lots of pics to ponder! You know I’ve been putting off this kitchen deal for years! I don’t even care if one part of the kitchen has the metal edging and the other part doesn’t. I just don’t want to spend $$$ unnecessarily.
Joel Riehl says
It is possible to modify the already-laminated countertops. You could even re-do the edge in laminate if you are careful. I would use a router to do the cutting, with a straight fluted bit. Clamp a fence (a piece of plywood with a good straight edge) to the top as a guide. The straight cut is easy. Then, if you want to undercut it by 1/16″ to get the top to overlap the edge band, come back again from the underside, with the router bit stopped short of the top sheet and remove the additional 1/16″. Then you slip the edge band up under the top sheet – using contact cement to adhere it. Route off the bottom edge to finish it, and you’re done. If the laminate is no longer available, you will have to see if you can salvage a piece from the portion of the top you cut off (the fence-routed edge should be perfect for butting up to the top). You should be able to separate the laminate from the substrate and clean it using methyl ethyl ketone. If you aren’t feeling up to it, or don’t have the tools, I would guess most cabinet makers (I used to be one) would be willing to give it a try.
Kersten says
Thank you, Joel! Do you think it’s possible to do this as is in the kitchen, or do I need to try to remove that large piece of countertop before starting? I fear trying to remove it will mess with the other pieces where it is glued. I’d love to be able to leave it on the cabinet and do the cutting right in the kitchen.
Chris says
Hey Kersten — my husband re-laminated our countertop and he did a great job!
He did it all in place, just cemented the new stuff over the old. Used a laminate trimmer he got from a cheap tool place. He did a beautiful job. He did have to stop with the tool and trim some parts by hand so he wouldn’t mess up the wall, cabinet, etc.
If you are really handy with tools, I bet you can do it.
Joel Riehl says
Kersten,
That largely depends on maneuvering space for the router. If the counter projects so that you can get at the current and revised front edge from both top and bottom, and all the way along its length from side to side with a router (which will be 3 – 6″ in dia. depending on the type used), then you should be good leaving it in place. If not, you will have to pry it up. If one side or the other butts into a wall or other cabinet at right angles for instance, you will not be able to get the cutter on the router all the way through. If you have to remove it to work, pull out any drawers or other obstructions and look underneath. It may be held down to the cabinet base with only screws, and will come off easily. Or not. Even if you have to pry it off and some plywood or lumber splinters in the process, it will all be hidden once you re-mount it. Just keep the substrate (probably plywood) from cracking or bending all the way through. Keep the surface with the laminate intact. The back side you can hide. If it is part of a larger top in the shape of an ‘L’ or something like that, removal gets trickier.
Lauryn says
Thanks, Kersten! We did the sheet flooring and we love it … much nicer on the feet than the tile that was there before. I would not recommend installing it yourself unless you really know what you’re doing, as it’s a little more finicky than vinyl flooring. And definitely get someone who has experience with it!
Kristi says
There is absolutely nothing about this kitchen that does not make me absurdly happy. What amazing colors! It looks like the kind of room that you would always want to hang out in together.
Kate says
What a cute and wonderful kitchen remodel! I love the breakfast nook!
Your dog is also adorable! 🙂
Lauryn says
Doesn’t Henry match the kitchen beautifully? He’s an old guy, but a good one (and much more cooperative than our cat!).
Laura says
Absolutely lovely work.
Heather says
What a beautiful kitchen! Red is my favorite color, but I often think it looks too harsh in kitchens because it is often paired with white and black. Your color palette is both soothing and cheerful! It looks like a lovely place to cook and eat. And props to you for making the choices you want in your kitchen instead of focusing on resale. I hope I am that brave with my renovation choices 🙂
lynda says
Just perfect. Colors, material choices and layout couldn’t be nicer. One question. I don’t see a kitchen exhaust fan. Pam did a piece on the NuTone fans. One might be nice in the space. Love everything.
Lauryn says
I would love to have a NuTone above the stove, but that wall backs up to the basement stairs and there is no place to vent it to. So far it hasn’t been an issue and I’ve actually never had an exhaust fan in any place I’ve lived yet, so I’m used to it.
Cat says
I was going to ask about an exhaust fan, too. Do you find that you don’t need one?
Our kitchen currently doesn’t have a working vent hood or fan and I have wanted to add one. In my research, though, I’ve learned that most stove hoods installed in houses about this age, most aren’t vented to the outside and just kind of move the smoke and odors around rather than sucking them out anywhere.
*Love* love love your kitchen, by the way. You guys have inspired me to try to keep our existing cabinets and maybe have a carpenter just add some in the same style.
pam kueber says
Recommendation: Check your local building codes regarding this question, readers. Pammy’s usual: Consult with a properly licensed professional.
Julie says
Love the non-granite, non-marble, non-stainless remodel. I have almost exactly the same (original) countertops, in a beige-ier color, and I love them. Glad to know what they’re called. I also love my butter yellow sink and harvest gold stove. Some day I’d like to replace the non-original, 80’s country raised cabinet doors back to slab (even though you see them in all the “before” pics). Thanks for the great pics.