

 Kate has been so retro crafty lately that, I admit, I got kinda jealous. I can be retro crafty, too! Really! I was a Girl Scout for like 9 years, in the 1960s and 1970s — the crafting nirvana heyday. Pretty much the only five things we did at Girl Scouts, in order of time spent, were: (1) Craft, (2) Craft, (3) Craft, (4) Sell cookies, (5) Go camping. Notice the emphasis on crafting. There were only three TV channels. There were no video games or cell phones. We kids rode our bikes, we did crafts, we read books. Now there. Don’t I sound like the old fart. Still, yes, alas, I recognize that I will never compete with Kate’s native talents. Nonetheless, I craft on, best I can, another poster girl for womankind who ain’t so great at crafts but still keep on tryin’. I have long had the idea in mind for this craft: Drill a hole in a vintage metal souvenir plate and insert a handle thingie — everything purchased from the Goodwill, of course. It was easy — even the drilling part. The drilling part was Exciting.
Materials to make a showy handle souvenir platter:
- Vintage metal souvenir plate. You could also use glass. The prospect of drilling through glass scares me. But I may give it a try soon.
- Some old server-thingie from the thrift store with a threaded handle up the middle. I found what looked to be some kind of relish holder for $1.79 at the Goodwill. It had no particular aesthetic gravitas as designed. I chose it for the handle and its decorative screw thingie with wood bobeche up the middle design.
- A drill that can operate on low speed.
- A special drill bit that can go through metal (or glass). My special drill bit had instructions how to drill — including how to keep the whole thing “cool”. Follow the instructions that come with the drill bit on how to use it on metal.
- Clamps, wood, etc. to hold the plate in place to drill… Goggles… All the safety equipment you need to drill safely. Do your research to make sure you’re using your equipment safely.
- Measuring tools and marker to mark the middle of the plate.
- Tool to unscrew the old-server-thingie, then to re-assemble it use the vintage souvenir plate instead. Looks like my tool was called a nutdriver / brand name “The Claw”.
- Level. I ended up needing a small level — to help me ensure I had the metal plate seated level.
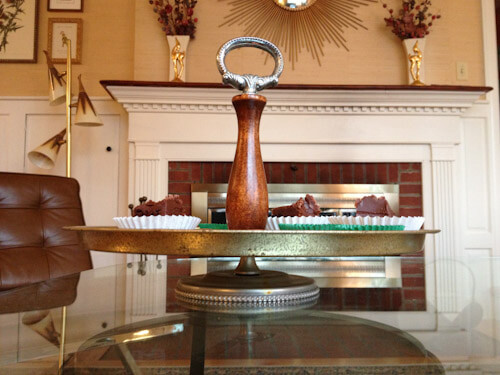 The video is a quick one. Drill. Disassemble. Re-Assemble. Adjust as required to get the tray to sit level. In my project, it turned out that the relish thingie was never level. So my plate did not want to sit level. I bent it to get it level. Obviously, this kind of solution is risky. But it worked, the souvenir plate had enough give. There may have been a better solution. I really should have tried to figure out the underlying cause of the problem. But I have only so much patience. My Troop Leaders would shudder reading this.
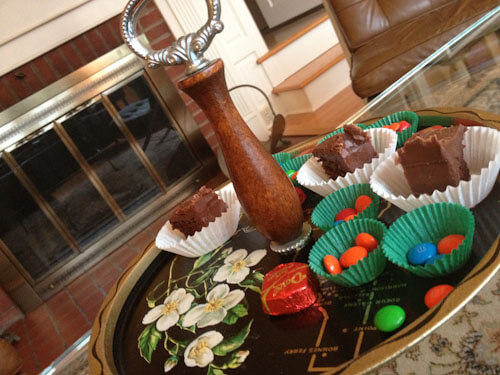
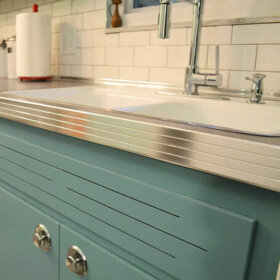
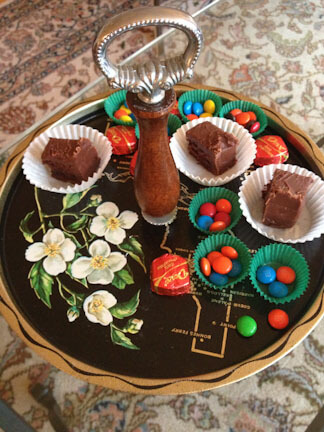 Okay. I now some of you may be *horrified* that I drilled a hole in the middle of a perfectly nice vintage souvenir plate of Idaho. But I thought the whole thing would be even prettier — kind of “showier” — with the handle up the middle and elevated like a cake plate. My assistant for the day — Abby — who is in art school — approved, she even liked the old-timey wood bobeche and the metal finishes of the relish thingie; she didn’t want me to spray paint the whole thing, which is another option. Her mom is a big cookie-baker, so I sent the showy serving plate home with her.
I was so darn proud of myself at how this came out, that I could just bust. Very gratifying.


Patty says
Maybe you mention this in the video — but it’s hard to know if lead based paint was used. I see you put your goodies on paper – good idea.
pam kueber says
Do you mean on the souvenir plate? I don’t know … I would put stuff in paper cups!
Suzanne says
Wonderful! I have a couple of old metal trays that have seen better days. Does anyone have suggestions on how to make them look better? I would hate to toss them out.
TappanTrailerTami says
Ok, now that safety is aside, wow Pam!!! Love this idea, and really, there are soooo many great vintage tole trays and serving trays of all kinds, there should be zero worries about “ruining” something by drilling a hole in it.
The other thing is I think you can order the parts for a lazy susan at rockler.com or similar and make a lazy susan out of these trays easily enough.
Great job on this Pam!
pam kueber says
oopsy, I woke up late, not sure where the video went — I added it!
Tasha says
I’ve always loved those trays but never could quite figure out what to do with them (and when I had one, it mostly sat in the drawer). This is a really cute upgrade, love the idea of it having a handle!
Annie B. says
Yet another Pamazing craft creation! It’s adorable, vintage, and usefully repurposed.
Our local Habitat ReSale sells three tiered servers made from vintage dishes. I like your tray server much better due to its uniqueness and practicality. There’s something about seeing a hole drilled in a “Blue Heaven”, etc., dinner plate that hurts my feelings. Just a dish-lover’s, thing, I guess.
pam kueber says
Here’s the thing: I think it’s better there’s a hole drilled in it — and it’s used a lot — than have it sitting in a drawer for 50 years! But I certainly hear what you are saying!
Jay says
Many of the old time dish sets (vintage) has matching serving pieces including tiered tidbit servers which were nothing more than attaching a handle to a piece of the pattern by drilling a hole. So very appropriate, however if you break the dish while drilling, that’s another story. I thought the tray was Florida but obviously I looked at it upside down. Nice job!
pam kueber says
Yes, you can for sure find these — using china — from the olden days. We have a couple of Stangl servers.
Annie B. says
You are absolutely right, Pam. Better to use and enjoy than hide away for years. I certainly have no qualms cutting up a vintage book or magazine. Sorry to sound like a hypocritcal whiner.
pam kueber says
no no no – i totally understand where you came from — you weren’t whining at all!!
Annie B. says
Big smile!
Tracie@MiddleClassModern says
Yay for vintage craftiness! Very cute. I think we should have some sort of internet wide vintage lover craftiness where we all attempt a project from a vintage craft book. Can you imagine? Much like with vintage cookbooks there are absolute gems…and then there is the crazy.
Rick S says
Drilling holes in glas requires the proper drill bit and water or other liquid to lubricate and cool the plate. Don’t put too much force on drill or go too fast. The plate should be supported on a piece of wood with putty in the middle. It allows the plate to be flat and support for plate and a scrap area to hit with drill before you drill into anything you don’t want a hole in. It wouldn’t hurt to practice on a “scrap” dish first.
The other idea is to take your dish or dishes to a mirror/glass shop and have them drill the hole. They have the tools and know how.
rick
pam kueber says
Thanks, Rick, for your tips about drilling into glass. What you way sounds consisent with what I’ve read. I do want to say to READERS, though, on issues like this — that involve safety — do your own thorough research, don’t depend on just one thing you read on the internet. The back of my drill bit box had instructions, too.
And yes, I also called my local glass show — they quoted me a price of $10 per hole, although they said it might be cheaper depending on how fast it went. I might go this route with a really “good” plate,
TappanTrailerTami says
Please folks!!! In Pam’s best safety voice: wear eye protection / safety glasses, especially when drilling metal or glass. One teensy shard or shaving in your eye can cause untold damage, not to mention a lot of pain.
Jenny A. says
Super cute, Pam! I think I could even do that. I find drilling things to be exciting, too, haha 😉
Janet in CT says
Very cute, Kate! I remember EVERYONE had one of those when I was a kid. My mother had a Stangl plate one and it seems every antique shop I walk into nowadays has one for sale! My mother also had a huge three tier milk glass one with a golden yellow ruffle around the edges of the plates; it was stunning. I do recall she had a glass one like you made where the hole got worn larger and cracked by taking it apart to wash it and tightening it too much when putting it back together again. Eventually that hole was so big, you couldn’t reassemble it. Thinking about it, I believe if you do it in glass, you need a rubber ring/washer on each side and a metal washer too to prevent it from this excessive wear. Hers probably had them but they got lost. I have no idea how to drill through glass but that scares me!
Kate says
This one is all Pam Janet! 🙂