

At one point we convinced ourselves
a complete gut of the master bath was in order
and had it fully planned and priced out.
But … a plan started to form in my head …
Pink tile is saved again! — Mike
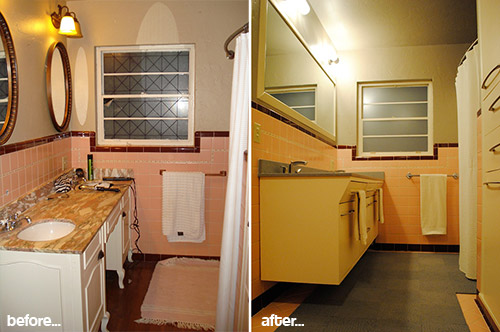
 Remember Mike and Lindsey and their French-Provincial-to-retro-modern pink guest bathroom remodel? Well, these two have been at it again — and have completed the restoration of another vintage pink bathroom. Yes, Mike and Lindsey were blessed two pink tiled bathrooms in their 1949 ranch — an adorable guest bathroom with dressing table…
  and a full master bath. Their retro modern master bathroom remodel is stunning — combining the best of old with new — and they saved many thousands of dollars — along with decades of history! — versus gutting the bathroom and starting from scratch. But have no doubt whatsoever: This was a lot of work.

Mike writes:
As much as we enjoyed the retro-renovation on our pink guest bathroom, I was not sure I wanted to take on a similar project in our master bath. Although our guest bath was technically just a make-over, it was a long process and seemed to take forever to finish. The master bath was the last room in the house for us to do since purchasing our 1949 ranch three yrs ago, and I wanted to finish with a bang!
At one point we convinced ourselves a complete gut of the master bath was in order and had it fully planned and priced out. But as I recovered from the countless hours of scraping the guest bathroom floor, a plan started to form in my head of how I could do our master bath in a special retro-modern twist… an example of how to meld new and original vintage together in a way that almost anyone could love. Pink tile as saved again!
The redo consisted of three main projects. Resurrecting the tile, replacing the vanity, and reconfiguring the built-in.
Uncovering and restoring the original floor tile
 Mike explains:
Once I began the arduous task of pulling up the vinyl flooring, I thought maybe I had made a mistake, as the floor in the master bath was even more difficult than the guest bath.
But section-by-section it came up and although the floor was not in quite as good condition as the guest bath, it cleaned up pretty well and only ran into a few problem areas. Well over 60 hours into tile alone. One issue was that most of the grout along the edges came up with the vinyl and I was left with sections of missing grout, so I had to chisel out the rest of the grout around the entire perimeter and re-grout.
The entire tub/shower surround area was a mixture of old cracked grout and layers of bad caulk jobs. A couple weekends were spent removing the old grout/caulk from the tile surround and re-caulking, then not liking how I did it…. removing and redoing it lol. The rest of the wall tile needed the grout cleaned and many areas of grout touched up and the corners re-grouted or caulked. A lot of this detail work on the tile does not show up in the pictures, but it really gives the bathroom a fresh clean feeling that I could not have gotten without either putting in all the work or replacing it all together.
Reconfiguring the built-in bathroom linen closet
The guest and mater baths each have identical floor to ceiling built-ins. In the guest bath, I simply freshened things up with paint and hardware as it was in really good shape. But in the master the built-in was pretty haggard from years of use and layers of paint, so we decided to reconfigure the openings and put on all new doors and drawers.
The bottom section we reconfigured to hold two large laundry hampers on full extension glides, which is great because it gets two laundry hampers off the floor of the bedroom. We are lucky to have a great trim carpenter (Joe from L&D Construction in Oklahoma City) who had done several custom jobs for us
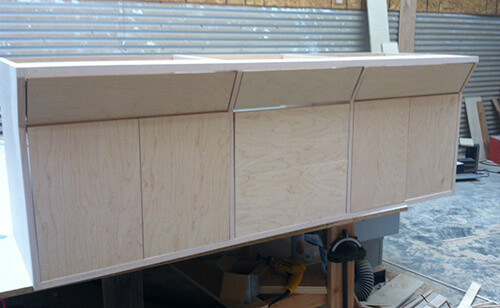
New bathroom vanity
By far the biggest project was the new vanity. I designed it, and Joe of L&D Construction built it for us. The general design idea came from a vanity pictured in one of Pam’s time capsule houses — the Sputnik house.
The vanity we removed was certainly not original, probably from the 80’s. It did have the pink marble top going for it, though…
Once the vanity was removed,we could see how the bathroom was originally configured. A wall-mounted sink to the left (mounting points on the wall were visible, as well as the marks on the tile from the legs) and a built-in vanity of some type to the right. Some floor tiles were replaced when the original vanity was removed, although it seems no attempt was made to get the color right. What was behind the vanity dictated what we could replace it with, as we basically had to cover up what was there with a custom vanity built to just the right dimensions.
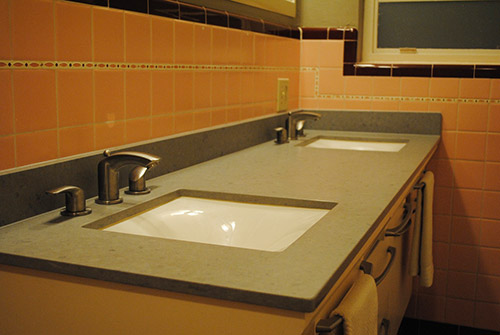
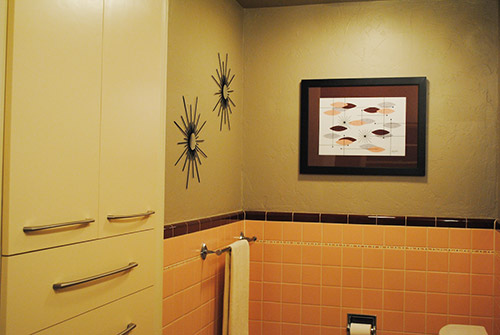
Ceaserstone counter tops, Kohler cast iron sinks, and Grohe faucets highlight the modern elements of the room.
Rounding things out
The bare tile floor is freezing in the winter, so we tried something different and put down carpet squares to serve as both the rug in front of the shower and our version of budget heated floors :).
We are not 100% sold on how we have them laid out, or if we will keep them in the long run, but they sure make middle of the night bathroom runs warmer on the feet. They also cover up some of the worn areas on the tile floor.
Built the mirror frame from basic wood trim from Lowes and had a glass company cut and install the mirror.
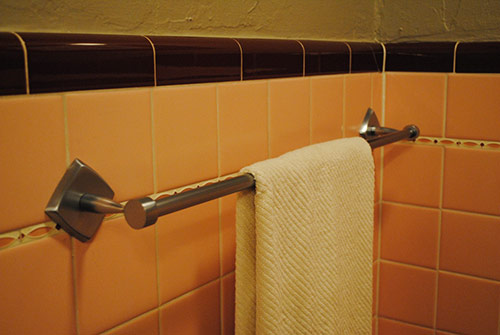
Re-painted, new toilet, towel bars, recessed soap dish, shelf in shower, shower rod, shower curtain, wall art, and privacy film for window
How much did the bathroom remodel cost?
We asked Mike, and he told us:
We did have a full gut and redo priced out. It was going to be between $15K-$20K, depending on how expensive we went with finishes and how much work we did ourselves. That would have been taking the bathroom down to the studs, all new tile on the walls and floors, converting the built-in into a walk in shower and the tub into a soaker. Besides that, it everything else would have been about the same as far as vanity and such.The final total for what we did came to $6K, and most of that was in the vanity (Splurged on the sinks and counter top)
Pam and I agree, if you think it’s gonna be $15,000-$20,000, it’s probably going to be $20,000 — and hold your breath even at that estimate. So the calculation is: Mike & Lindsay not only did they please the Save the Pink Bathrooms Retro Decorating Gods once again, they also saved $14,000 by sidestepping a gut remodel. And hey: This makes for a much better story!
Full resource list:
- Counter top – Caesarstone
- Sinks – Kohler undermount cast iron sink from Faucets Direct
- Faucets – Grohe Eurosmart Bathroom Faucet from Faucets Direct
- Hardware – Hickory Hardware Greenwich pulls from My Knobs
- Shower shelf — rolled rim china shelf from DEA Bath (took forever to find!!)
- Recessed soap dish — American Specialties (was hard to find in a brushed or matte finish)
- Curved curtain rod
- Vanity lights – modern bath bar from Lighting Direct.
- Wall art from Etsy shops Gamma2Hey and Inspiring4U
- Carpet Squares (cut in 1/4’s) from Flor.
- Carpentry work, L&D Construction in Oklahoma City
Mike and Lindsey — wow — your determination is impressive. I know how tedious peeling up* flooring with a heat gun is. (*Precautionary Pam warns to consult with a properly licensed professional when you are planning on stripping layers of anything old — vintage nastiness such as lead and asbestos can be in so many places….) *My last house had 1980s press and stick tiles over all the original hardwood floors — in multiple layers. I went through so much adhesive remover and several heat guns before the floors were ready to be sanded. That kind of project is test of your patience and sanity.
You’ve done another bang up job restoring and modernizing and saving another pink bathroom — thanks for sharing your story — once more — with the Retro Renovation tribe.
Pam adds (to this story by Kate): AWESOME remodel, Mike and Lindsey! This really combines the vintage and the modern beautifully. And thank you for the wonderful, detailed Resource List! I also love how you were burnt out after restoring the first bathroom… but then got your juice back… Yup, that’s the way it goes for me, too, I can only tackle so many major projects in a given time period, but when it really gets down to it — it’s do it the hard way. Well, done, Mike and Lindsey, you two have it going on!


Eva says
I cannot believe the shower pan didn’t need to be replaced! How lucky! That is the reason for the death of most original tile showers–and it’s going to happen to ours, sadly.
Karen says
So glad you rescued both bathrooms. What a crime to cover those tile floors! In the photos of the rest of the house, the built-in shelves by the fireplace really caught my eye. Could you send a photo? I have a space that’s been waiting for them. 🙂
If it’s okay with Pam, my email is trainerlady@hotmail.com.
Many thanks
Jx says
Love the art in both this bathroom and your previous remodel. I’ve been wanting to place something on my bathroom walls… but I’m afraid that paper or canvas will become moldy from humidity. Any thoughts, Pam?
Linda haas says
Love what you did!! Looks amazing. What color did you use on the wall paint?
Miked says
The wall paint is what I would consider a “gray toupe”. It is a bit of a Frankenstein color, as the original color is Sherwin Williams Tony Taupe that we used in a different room in the house. I needed more of it to do some touch up so I went to Lowes and had them color match it in the Valspar brand, but they did not really get it right. What I got was kind of a cool gray color that I ended up really liking so I used it in the hall and the bathroom
Rebecca | MidcenturyModernRemodel says
Nice job and what a ton of hard work. My favorite thing is your new vanity. Great blend of old vs new.