Kristen’s 7 step-by-step tips to make a pleasing gallery wall
Kate - Updated: August 5, 2013
Retro Renovation stopped publishing in 2021; these stories remain for historical information, as potential continued resources, and for archival purposes.
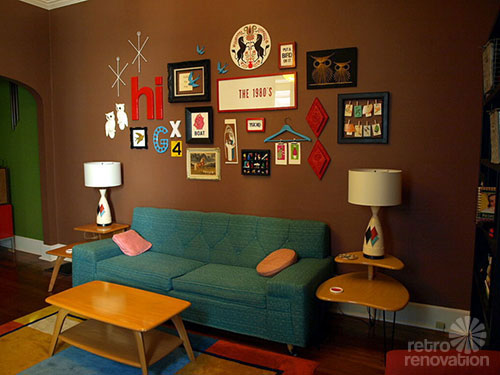
We first discovered that reader Kristen’s talent at making gallery walls when she submitted this photo to our uploader of 306 reader living rooms. So when Kristen emailed Pam to let her know that she had just finished making yet another amazing gallery wall in her home — this time up the staircase wall — we knew it was time to bow down to the master. We asked Kristen to share her tips, and she delivered big time, with lots of ideas and photos from her projects inside her house and for local shops, too.
Kate & Pam… this was kind of hard for me… because I never do this thinking in steps… it is very intuitive for me. I do it without thinking.
One of my vintage decorating books states you should have “something dark, something light, something dull and something bright” and I think that is probably good advice! I don’t like things to look too similar or have too much of the same shape or color going on. You want there to be a variety of things, but they look like they all make sense together. (Basically all items should look kind of the same, but kind of different).
The first step is to find objects for your collage wall. Don’t be afraid to think outside the box. Sometimes, I think it’s too boring to use picture frames only. Try incorporating sign letters, shelving with trinkets, shadowboxes, dishes, mirrors– you can really get creative here. These items seem to add a little 3-D effect rather than just flat framed pieces. Also… don’t be afraid to use kitschy vintage wall art! If it’s not exactly the way you like it… freshen it up with a little paint! Those 70s brass & brown pieces look great & punchy on a wall when you paint them your favorite color!
Use things with a bold graphic impact that don’t get lost in a wall full of images. I like to use things that are simple and bold– but stay true to your own style… that’s going to be what makes it great!
Spend time collecting things! It took me over a year just to find the right photo frames & kitch wall art for my projects. I don’t like to hurry it… I need time to spend with these items to see if I really like them.
Some lesser items really grow on me and end up being my favorite pieces and I decide I really don’t like some things at all. You may not have a year to do this… but at least spend some time (a couple days or a week) with the items laid out in a corner or somewhere you will pass by them everyday.
I usually collect way too many items and edit it down to the very best… not even using some items. I think it’s good not to over design. Not everything you collect will need to be part of the collage. Sometimes it is hard to say no, but you have to think of the look of the overall composition.
Once you have everything gathered, I like to lay the collage out on the floor and get a preliminary arrangement there before it is permanently affixed to the wall. Then you can rearrange and play with it on the ground until you get it right.
Here are some tips for the actual arrangment process:
Larger items or favorite pieces look good in the middle as central focal points
Stagger pieces for more interesting arrangement
Think about balance. The balance doesn’t have to be symmetrically perfect, but there should be some good visual balance going on (my collages are hardly ever symmetrical, but I like them to look weighted evenly.)
I like to think about what the outside border is shaping up to look like as well as the contents of the inside of the collage. I personally don’t like to have a square outside border (too boring!) I like it when things creep out of the border a little!
There is a certain invisible path that leads our eyes from piece to piece to take into consideration. Consider hanging pieces in a staggared fashion… I think this helps lead the eyes in a fluid fashion rather than art gallery wall style of one right next to the other).
For an authentic look when framing vintage portraits, stay away from too much matte board. From my research, they didn’t matte things too heavily during the mid-century era in modest homes.
You can find terrific vintage frames at thrift stores & yard sales! I have never purchased a new one for any of my projects!
Once you have the layout down, take a photo with a digital camera so you can refer to the arrangement as you are hanging. This is a small step, but rather important if you are a perfectionist like me!
I do a “mock” hanging on the wall. I trace every piece onto construction paper or newspaper, cut it out and hang it on the wall with painter’s tape or a small pin. This allows you to move items around easily and find the center without having to re-nail items over and over. We even mark a dot on each individual paper where the hanging device is to make the hanging process as easy as possible.
Hang your collage and enjoy it!
One other tip…
If you don’t have time to go to garage sales for a year like me, a lot of Etsy sellers have been selling grouped frames & finds (some are painted and some are not) so you can have items instantly for a collage wall!
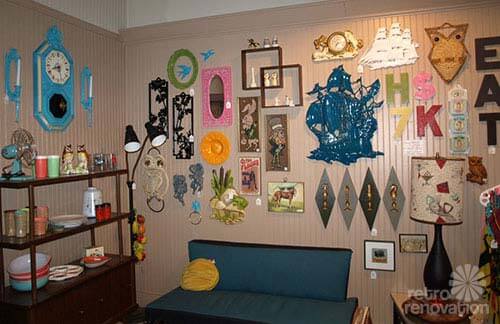
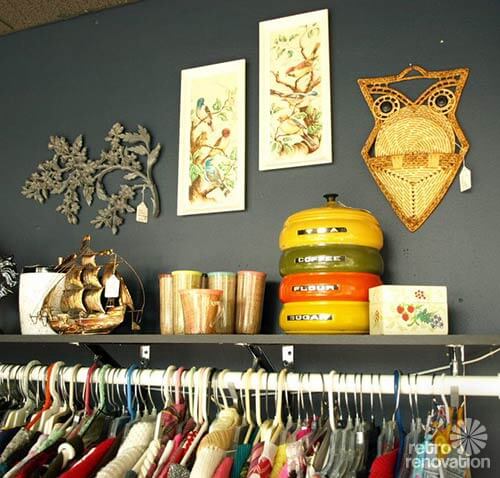
A collage wall Kristen assembled in a local vintage shop.The collage wall had to be rearranged as pieces sold.
P.S. I have also had small vintage shops in town. One partnered with a vintage record store and now currently we are sharing space with a local coffee shop.
I love decorating the retail space — when something sells, I get to re-do the wall! I have included photos of those spaces too.
Kristen, thank you so much for the great tips and tricks to collect, compose and hang a retro vintage gallery wall. You make it look so easy, though I know it takes some luck and a trained eye to find and assemble all of the parts to a successful collage wall.
I’ve summed up Kristen’s seven main tips below:
Steps to make a vintage gallery wall (also known as a collage wall):
Gather art, photos, frames and objects for your gallery wall. Try to choose items that are simple yet bold. Items that are similar in shape or color (yet not too much alike) work well. Try to collect more objects that you will actually need, that way you can edit and use what works for your space and style.
Spend time with objects — trying to look at them every day for a week or so to decide which objects you really like and which are not working for you. Try to think of your overall composition and taste in decor when selecting which items will be used.
Lay out the objects on the floor to get the preliminary arrangement before you affix anything to the wall. Rearrange and play with the composition, paying special attention to the way the objects are balanced and the negative spaces between objects as well as the overall shape of the collage as a whole. Aim for “balanced asymmetry.”
Once you have a composition you like, take a photo so you can refer back to it later.
Trace each item for the gallery wall onto newspaper or construction paper and then cut them out. Make a dot on the paper cut out where the hanger for each piece will need to be driven into the wall. This will make it easy to hang the objects.
Attach the cut out shapes to the wall in the pre-determined composition with tape or tiny pins. This way you can tweak the spacing of the objects without making unnecessary holes in the wall.
Hang your objects and remove the paper patterns. Now your wall is done and ready to enjoy.
Gorgeous. And, I have a tiny sub-tip for step 6: after you make the dot on your paper template where the hanger needs to go, and lightly pin or tape the templates to the wall…go ahead and drive the nail right through the paper for extra precision. You can just tear the paper off!
Kristensays
brilliant– I have no idea why we didn’t do this!
June Cahillsays
Love the ‘groupings’ as my Mom used to call them – I found a book “The Personal Touch in Interior Decorating” – by Betty Pepis. In there she touches on making ‘collages or groupings’ – this was so popular starting in the 50s…and it makes such interesting visuals – instead of just one big picture. I did a ‘grouping’ in my entryway – had one BIG blank wall and just couldn’t decide what to do with it! My Mom was an artist/ceramist and not only did I inherit flat “pictures” but had pottery to display. I bought some glass shelving from IKEA – the type that shows very little – I wanted the pottery to be seen more than the shelving. I mixed the 3D with the flatter pieces – all types/shapes/sizes(laid out on floor to rearrange before committing to the wall) – copper, pen and ink, batik, wood, and then added three recessed halogen ‘spots’ to show it off in the evening. Stunning! Such an inspiration!:)
nin462says
I love the blue sofa in her living room & hope to have one myself someday. Thanks for the hints, as I really need to do something with my living room wall & a spare bedroom. My goal this summer/fall is to paint the spare bedroom and arrange my pictures/items. I have them all picked out & bought old (new to me) furniture this summer.
I love your groupings, Kristen! We used pretty much this same process to do a gallery wall in our guest bedroom. Laying the pieces out on the floor is crucial to getting it right before you put holes in your wall. It also lets you adjust the spacing precisely, to get just the look you want. It’s surprising what a difference even half an inch can make!
Jane Kathryn Kollessays
What wonderful eye candy and great advice on how to pull it off in your own home. Thank you for the ideas and inspiration!
You usually see these wall collections using new stuff from Home Goods. It’s so refreshing to see it on a dark brown wall with some cool old stuff. Bravo!
Annie B.says
Thank you for sharing your seven “collogical” ideas, Kristen. I’m sure many of us would love to display our treasures in artistic wall arrangements, but are not sure about the logistics. You’ve made it simple. There can be something really terrifying about putting a nail hole in a freshly painted wall. Your cut-outs-and-tape technique will work for even the seriously faint of heart.
You’ve got a great eye for design, Kristen. Wonderfully fine vintage items on display, too. I want ’em all.
Pam, I’m now thinking of wallpaper as collage substrate rather than wall covering! You know I’ve loved this post, particularly. Ladies, thank you both for making my morning.
Yes, I did a grouping once by laying it out on the floor and then calculated the positions of every picture. I made a computational error and the whole grouping was 3 inches left of center! So lucky I didn’t make it too high since the pictures covered the misplaced nail holes!
Roxiesays
If you are concerned about holes, use 3M Command Velcro strips on the backs. That way if you need to swap or remove it is very simple. I use them for a vintage tray collage in my dining room. That way, you can decorate without fear.
Janet in CTsays
Great story! My mother died in January and my sister just gave me big boxes and laundry hamper sized bins of almost all of her photographs. I didn’t know what to do with them; there are so many beautiful old photos and frames, I didn’t want to throw them away either. Now I have the motivation and plenty of “stock” to work with to build a nice gallery wall. Many of those frames date back to the forties, fifties and sixties and are so much prettier than the ones sold now. Love the displays in the stores too and see many things from the sixties and seventies that I am familiar with. We sold ALOT of those plastic molded butterflies!
Katesays
That sounds like a great idea Janet 🙂 Go for it.
Mary Elizabethsays
Janet, I’m so sorry you lost your mom. Working with her photos will be healing and give you nice memories, won’t it? My mom died a few years ago, and shortly afterward I moved, so all family photos are still boxed up. I am now inspired to do a family gallery wall, which I’ve been planning all along.
Miss Wynonnasays
Oh My !!
PLEASE, do not ever throw away old family photos…..call other relatives and ask them if they would like what you do not want.
When my Great Grandmother was going to live with my Great aunt she had my great aunt throw away a bunch of framed family portraits, just because they were “old” Later my Great aunt realized that she should have just hidden the pictures away versus tossing them out.
And later, when my grandmother died, my aunt threw away a ton of old pictures because she had no clue who the people were in the pictures. She did not stop and think that there were other relatives who did know who the people were in the pictures and were quite upset that she just tossed out all those pictures………
Sarah g (roundhouse)says
Yes! I love the ‘cluttered’ (meant in the best way possible) look when doing wall arrangements! I did this in my sunroom and office. I can agree that it is very intuitive and helps if you arrange the pieces out on the floor first, and very important to have a variety of shapes and sizes.
Thanks Kristen for the tips and lovely examples! I was also admiring the shade of brown on the walls of your sitting area. It’s never a color I would gravitate towards myself but compliments your furniture and art quite nicely.


 We first discovered that reader Kristen’s talent at making gallery walls when she submitted this photo to our uploader of 306 reader living rooms. So when Kristen emailed Pam to let her know that she had just finished making yet another amazing gallery wall in her home — this time up the staircase wall — we knew it was time to bow down to the master. We asked Kristen to share her tips, and she delivered big time, with lots of ideas and photos from her projects inside her house and for local shops, too.
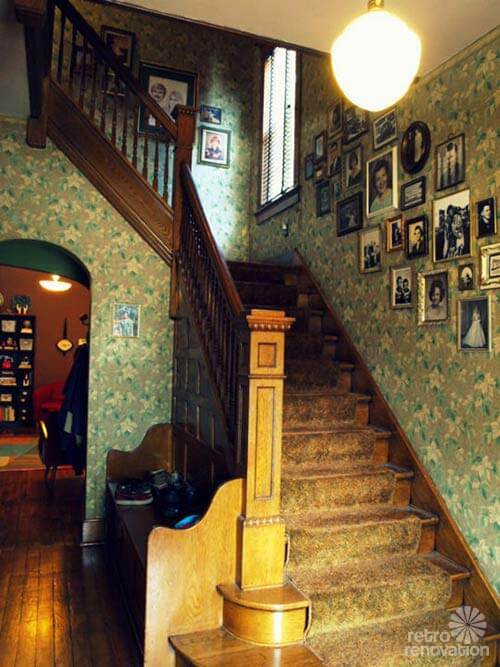
The first step is to find objects for your collage wall. Don’t be afraid to think outside the box. Sometimes, I think it’s too boring to use picture frames only. Try incorporating sign letters, shelving with trinkets, shadowboxes, dishes, mirrors– you can really get creative here. These items seem to add a little 3-D effect rather than just flat framed pieces. Also… don’t be afraid to use kitschy vintage wall art! If it’s not exactly the way you like it… freshen it up with a little paint! Those 70s brass & brown pieces look great & punchy on a wall when you paint them your favorite color!
Use things with a bold graphic impact that don’t get lost in a wall full of images. I like to use things that are simple and bold– but stay true to your own style… that’s going to be what makes it great!
Spend time collecting things! It took me over a year just to find the right photo frames & kitch wall art for my projects. I don’t like to hurry it… I need time to spend with these items to see if I really like them.
Some lesser items really grow on me and end up being my favorite pieces and I decide I really don’t like some things at all. You may not have a year to do this… but at least spend some time (a couple days or a week) with the items laid out in a corner or somewhere you will pass by them everyday.
I usually collect way too many items and edit it down to the very best… not even using some items. I think it’s good not to over design. Not everything you collect will need to be part of the collage. Sometimes it is hard to say no, but you have to think of the look of the overall composition.
Once you have everything gathered, I like to lay the collage out on the floor and get a preliminary arrangement there before it is permanently affixed to the wall. Then you can rearrange and play with it on the ground until you get it right.
Here are some tips for the actual arrangment process:
I do a “mock” hanging on the wall. I trace every piece onto construction paper or newspaper, cut it out and hang it on the wall with painter’s tape or a small pin. This allows you to move items around easily and find the center without having to re-nail items over and over. We even mark a dot on each individual paper where the hanging device is to make the hanging process as easy as possible.
Hang your collage and enjoy it!
I love decorating the retail space — when something sells, I get to re-do the wall! I have included photos of those spaces too.
 Kristen, thank you so much for the great tips and tricks to collect, compose and hang a retro vintage gallery wall. You make it look so easy, though I know it takes some luck and a trained eye to find and assemble all of the parts to a successful collage wall.

Kim says
Gorgeous. And, I have a tiny sub-tip for step 6: after you make the dot on your paper template where the hanger needs to go, and lightly pin or tape the templates to the wall…go ahead and drive the nail right through the paper for extra precision. You can just tear the paper off!
Kristen says
brilliant– I have no idea why we didn’t do this!
June Cahill says
Love the ‘groupings’ as my Mom used to call them – I found a book “The Personal Touch in Interior Decorating” – by Betty Pepis. In there she touches on making ‘collages or groupings’ – this was so popular starting in the 50s…and it makes such interesting visuals – instead of just one big picture. I did a ‘grouping’ in my entryway – had one BIG blank wall and just couldn’t decide what to do with it! My Mom was an artist/ceramist and not only did I inherit flat “pictures” but had pottery to display. I bought some glass shelving from IKEA – the type that shows very little – I wanted the pottery to be seen more than the shelving. I mixed the 3D with the flatter pieces – all types/shapes/sizes(laid out on floor to rearrange before committing to the wall) – copper, pen and ink, batik, wood, and then added three recessed halogen ‘spots’ to show it off in the evening. Stunning! Such an inspiration!:)
nin462 says
I love the blue sofa in her living room & hope to have one myself someday. Thanks for the hints, as I really need to do something with my living room wall & a spare bedroom. My goal this summer/fall is to paint the spare bedroom and arrange my pictures/items. I have them all picked out & bought old (new to me) furniture this summer.
Thanks for the kick to get me going!!!
Laura E. says
LOVE LOVE LOVE!!!!
Jane / MulchMaid says
I love your groupings, Kristen! We used pretty much this same process to do a gallery wall in our guest bedroom. Laying the pieces out on the floor is crucial to getting it right before you put holes in your wall. It also lets you adjust the spacing precisely, to get just the look you want. It’s surprising what a difference even half an inch can make!
Jane Kathryn Kolles says
What wonderful eye candy and great advice on how to pull it off in your own home. Thank you for the ideas and inspiration!
Jenn Ski says
You usually see these wall collections using new stuff from Home Goods. It’s so refreshing to see it on a dark brown wall with some cool old stuff. Bravo!
Annie B. says
Thank you for sharing your seven “collogical” ideas, Kristen. I’m sure many of us would love to display our treasures in artistic wall arrangements, but are not sure about the logistics. You’ve made it simple. There can be something really terrifying about putting a nail hole in a freshly painted wall. Your cut-outs-and-tape technique will work for even the seriously faint of heart.
You’ve got a great eye for design, Kristen. Wonderfully fine vintage items on display, too. I want ’em all.
Pam, I’m now thinking of wallpaper as collage substrate rather than wall covering! You know I’ve loved this post, particularly. Ladies, thank you both for making my morning.
Chad says
Yes, I did a grouping once by laying it out on the floor and then calculated the positions of every picture. I made a computational error and the whole grouping was 3 inches left of center! So lucky I didn’t make it too high since the pictures covered the misplaced nail holes!
Roxie says
If you are concerned about holes, use 3M Command Velcro strips on the backs. That way if you need to swap or remove it is very simple. I use them for a vintage tray collage in my dining room. That way, you can decorate without fear.
Janet in CT says
Great story! My mother died in January and my sister just gave me big boxes and laundry hamper sized bins of almost all of her photographs. I didn’t know what to do with them; there are so many beautiful old photos and frames, I didn’t want to throw them away either. Now I have the motivation and plenty of “stock” to work with to build a nice gallery wall. Many of those frames date back to the forties, fifties and sixties and are so much prettier than the ones sold now. Love the displays in the stores too and see many things from the sixties and seventies that I am familiar with. We sold ALOT of those plastic molded butterflies!
Kate says
That sounds like a great idea Janet 🙂 Go for it.
Mary Elizabeth says
Janet, I’m so sorry you lost your mom. Working with her photos will be healing and give you nice memories, won’t it? My mom died a few years ago, and shortly afterward I moved, so all family photos are still boxed up. I am now inspired to do a family gallery wall, which I’ve been planning all along.
Miss Wynonna says
Oh My !!
PLEASE, do not ever throw away old family photos…..call other relatives and ask them if they would like what you do not want.
When my Great Grandmother was going to live with my Great aunt she had my great aunt throw away a bunch of framed family portraits, just because they were “old” Later my Great aunt realized that she should have just hidden the pictures away versus tossing them out.
And later, when my grandmother died, my aunt threw away a ton of old pictures because she had no clue who the people were in the pictures. She did not stop and think that there were other relatives who did know who the people were in the pictures and were quite upset that she just tossed out all those pictures………
Sarah g (roundhouse) says
Yes! I love the ‘cluttered’ (meant in the best way possible) look when doing wall arrangements! I did this in my sunroom and office. I can agree that it is very intuitive and helps if you arrange the pieces out on the floor first, and very important to have a variety of shapes and sizes.
Thanks Kristen for the tips and lovely examples! I was also admiring the shade of brown on the walls of your sitting area. It’s never a color I would gravitate towards myself but compliments your furniture and art quite nicely.