

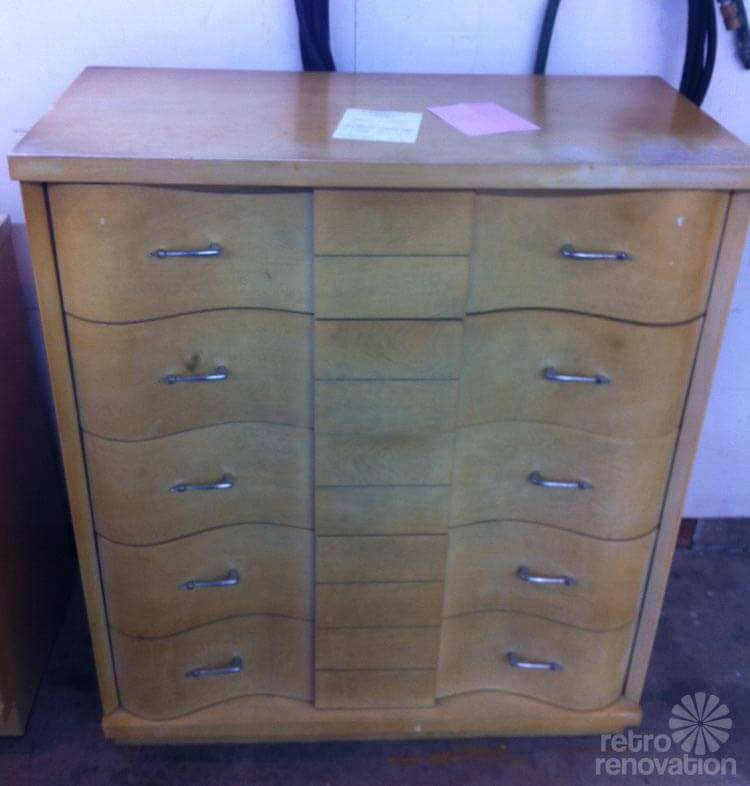
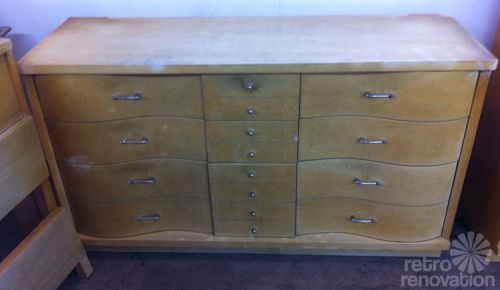
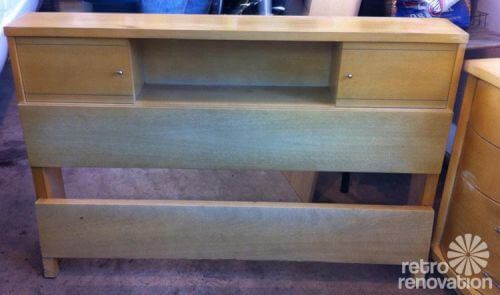
 While on the rounds at one of their favorite local thrift shops, readers Jeff and Debbie happened upon two beat-up retro blonde dressers in need of some serious TLC. Seeing past the worn finish, the pair immediately knew they could refinish the dressers to use in their midcentury styled home. While loading up the dressers behind the thrift store, Jeff found the set’s matching headboard buried in a heap of trash and decided it too could be salvaged. With just a little effort, Jeff and Debbie were able to see past the furniture’s worn facade to envision a whole new set of well built, retro furniture for themselves.
Jeff writes:
My girlfriend Debbie and I go thrifting at least once a week if not more and have several different “runs” that take us east-west-north and south of our home. Its something we both enjoy, but I will admit that out of the two of us she has a quicker eye than I do. Our routes through the stores are always the same. She heads for the clothes and I head for glassware-furniture. At one particular thrift store though, she is the lead on furniture (lack of quality vintage clothing is my guess).
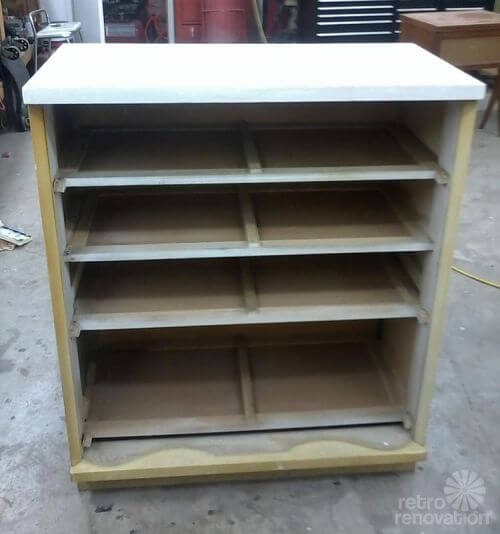
She found a great mid century modern wall unit there and was the first of us to see the beauty in the two dressers. When we first purchased the dressers, there was no headboard, and we agreed it was a shame because it would likely have been a really cool retro-looking piece.
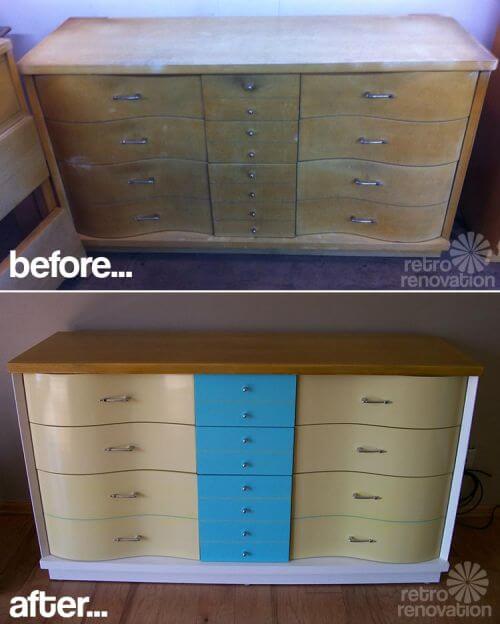
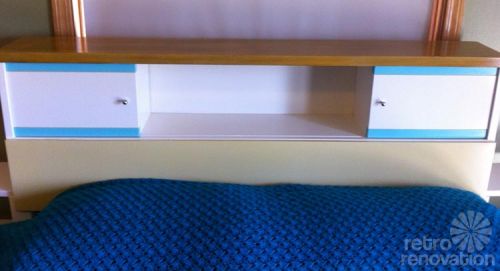
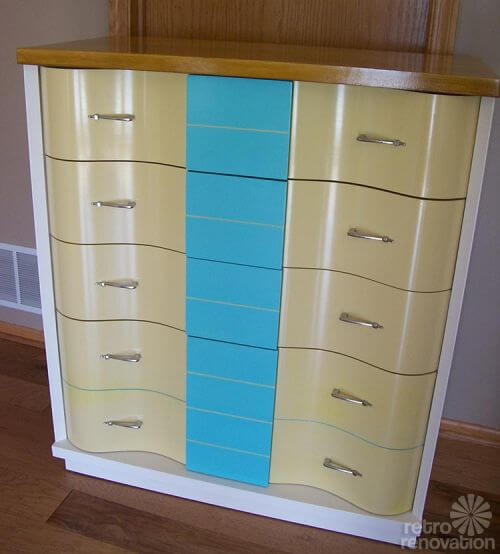
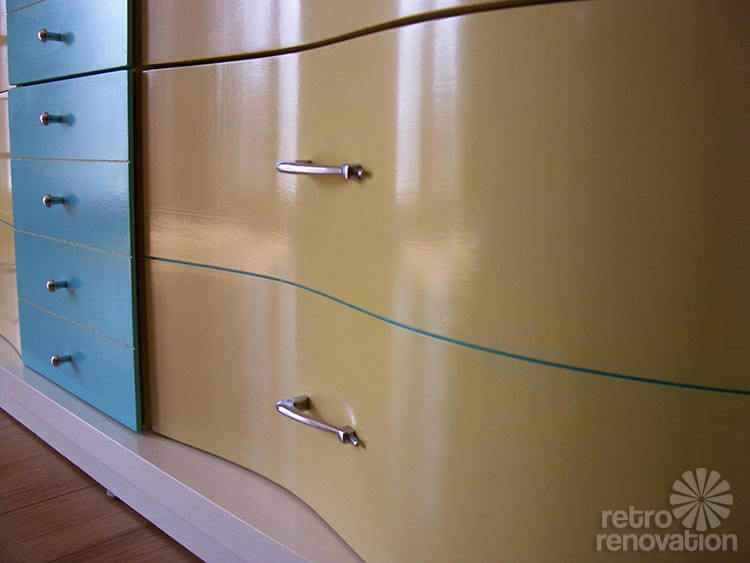
Debbie had great ideas about paint,decorating, and colors. It was her idea about using the off white and Tiffany blue for the drawers but was worried it would look to much like a girls room for me, so I suggested that keep the “blonde” tops and use a gold toned brown to off set the blue to keep in line with the mid century danish modern look that we have in the rest of the house. When we went to pick out colors, it took us about five minutes to come up with the ‘scheme’ that we had both envisioned.
When we returned to the store with our rusty but trusty truck for hauling the big stuff home, I had a chance to go in the back by the loading docks. While waiting for the dressers to be brought out, curiosity was killing the cat and I started to poke around in the back. I thought I glimpsed a piece of hardware on something that looked awfully familiar.
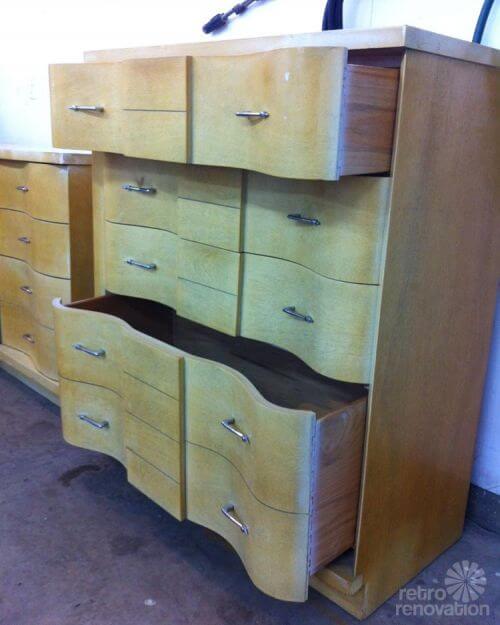
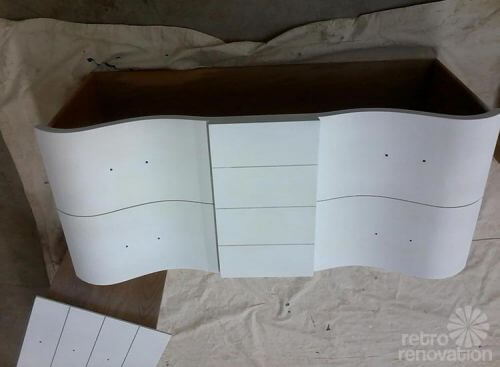
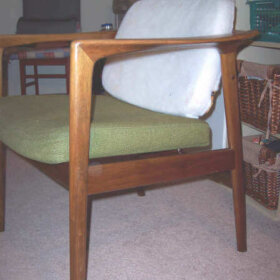
After digging a bit it was like striking GOLD. There, under some other bits and pieces of throw away items was the headboard, only it was missing one of the sliding doors……….dang. I looked down and on top of a nearby table was the other little door! Although in rough shape, structurally, the pieces were all very sound and thankfully not a lot of veneer repair was needed. All the hardware was intact, the drawer guides were not broken and there were no huge chips or gouges. The few chips in the piece were easily fixable with wood putty and sandpaper.
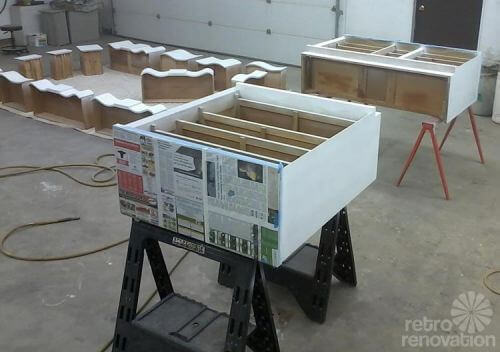
As far as the finishing/painting process went, the hardest part was recreating the blonde tops. My suggestion for readers would be to strip them. Its not as bad of a process as you would think and the paint strippers of modern day have little in common with their smelly/chemical laden predecessors. I use a product made by Zinsser called “Magic Strip.” It is like a jelly and removes several layers of paint /varnish in one step. Make sure you use a plastic scrapper and not a lot of force so as not put a gouge or scratch in the wood veneer. After the stripper use the Zinsser stripper wash and follow the directions for scrubbing with steel wool. You will be amazed at how easy it is to take off the old blonde stain and paint coat underneath that was on some of the older blonde furniture.
PRECAUTIONARY PAM here notes: The layers in our houses — and furniture like this — may contain vintage nastiness such as lead. Before you start strippin’ and scrapin’ and sanding, consult with your own properly licensed professional about how to test for the presence of lead and how to then handle the project safely if it’s there.
Jeff’s refinishing products and tips:
For the tops I used an amber finishing shellac — another Zinsser product — their Bullseye Shellac in “Amber” — for the blonde look… That stuff is pretty durable and shiny…. I spray painted three coats of it to get the tone I was looking for. If you want a lighter tone you would just use maybe one or two coats and finish with a third or fourth of “Clear” colored Shellac. To thin the shellac for spraying, I used denatured alcohol.
{For the sides of the furniture] To make the … look I was going for, I spray painted some flat white ceiling paint that I had on hand on all the furniture, it is also what I used for primer under the other colors. Instead of using a brush, I spray painted the furniture. You could brush it on, but then you will get brush marks. For the paint we used a Latex Enamel Gloss paints for our colors. It is easy to thin for spraying because it is water based and cleans up easily. [Pam and Kate note: Yes, readers, we think that with a project like this, you are going to get waaaay better results spraying paint on, versus brushing it on…]
Prep is most of the work in doing these projects as is the case in most do it yourself endeavors. [I used] 220 grit sandpaper to prepare the surface before priming and 220 again before painting to make a smooth to the touch feel. Your paint will only look as good as the work you do before hand in prep.
After the paint dries for about three days you will want to apply and sealer to the furniture. If you don’t things will “stick” to the surface. You don’t want your favorite paperback stuck to the top of your headboard or the alarm clock feet leaving impressions on any flat surface. MY suggestion is to use another water based product made by Min-Wax called polycrilic. It works just like any polyurethane that you use on stained furniture but this is water based, dries fast and is easily applied with a spray gun.

 Our thoughts on repainting vintage wood furniture

Golly, this topic — whether it’s “right” or “wrong” or “whatever” to paint vintage wood furniture — can get readers very hot, very fast. Pam wanted to weigh in on this topic:
When it comes to repainting wood furniture — or wood trim in your house — I see this as a very personal, aesthetic issue — not one of righteousness. That said, I encourage readers to learn about the pros and cons of each approach, including how painting will potentially affect the underlying monetary and/or historic value of a piece of vintage or antique furniture … same with original wood trim, paneling or cabinetry. If you have ever watched Antiques Roadshow and seen a piece of vintage furniture appraised for thousands or hundreds of thousands of dollars including because it has its “original finish and patina,” well, there you go, that’s why you might want to go slow before fixing in on the decision to paint over an original finish wood.
Overall, though: Whether we “like” furniture and trim painted versus with a natural wood finish generally is a function of fashion. One year natural wood is “in”. The next year, painted is “in.” Ping. Pong. A wood finish can be very beautiful. A painted finish can be very beautiful. I consider either finish choice an aesthetic preference, not an aesthetic imperative or aesthetic absolute.
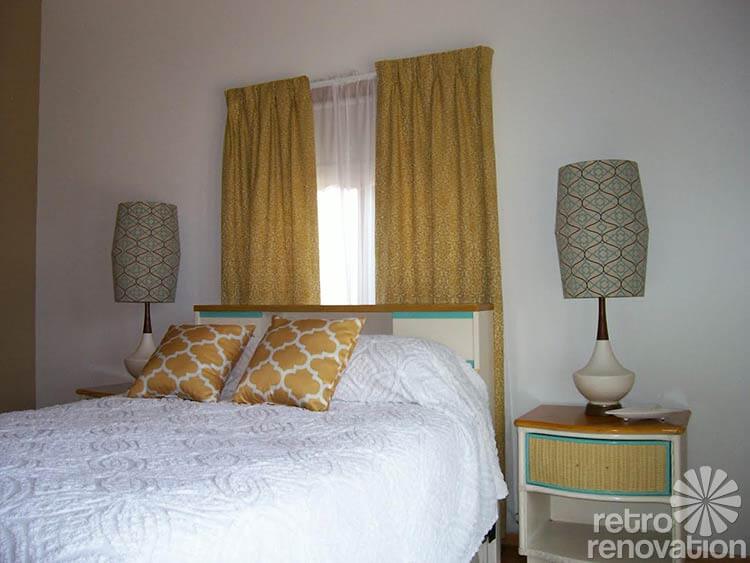 Jeff and Debbie, we think you guys did a fantastic job with this set. Not only did you make some tired looking retro furniture look shiny and new again, but you also saved the headboard from the landfill. Kudos to you both for having the vision to fix up these pieces in a way that works in your home and makes you happy, because heck — making your home a happy, comfortable place that you can be proud to live in is part of what its all about. Thanks so much for sharing your project with us.


Robert says
That is a beautiful restoration. I suspect the original furniture designer would be smiling, and probably thinking to herself, “wish I’d thought of it.”
Olivia says
How lovely! I have a blonde bedroom set that my grandmother purchased in 1958 and gave to me in 1988 and I have been putting off refinishing it for a long time because I don’t want to ruin it. However, it is in really rough shape with peeling varnish, water stains, etc. I’ve been contemplating sanding, patching and painting it in a similar color.
Joanne says
I’m in the same boat. Have a blonde set I bought at the Salvation Army in 1986. It was rough to begin with but with all the moves it’s been through and just daily life of almost 30 years with me (not to mention the 30 years before that) the veneer has seen better days. I’d been thinking about painting it for a long time, but was torn. Jeff and Debbie’s project is both food for thought and inspiration!
Jewel says
Great job, Jeff and Debbie! I am not normally a fan of painting such lovely blonde mid-mod furniture (although I actually made the mistake of staining some of it a dark walnut color 20 years ago before the mid-mod bug caught me! imagine that!) But in this situation, I believe you absolutely made the right choice. With the rough shape it was in, I agree with Mary Elizabeth who stated how difficult it would’ve been to have had it refinished properly. Probably would have had a hard time finding just the right expert who could have done it justice, and if you had, it would have cost you an arm and a leg. So great job! Thanks for sharing.
Elisabeth says
I’m really impressed !! A professional wouldn’t have done better !!
Kudos to you both !
Jenny A. says
Wow, you guys! It looks awesome! I love the color scheme and you did a fantastic job of applying the paint. It looks very professional. Painting furniture can be tricky and I’ve painted a few pieces that have not turned-out so well. I do think the sprayer would make a huge difference, which is something I don’t have.
Mary Elizabeth says
I love the shape of those drawer fronts, and I love the way a seemingly unrelated bedside table was pulled in with a matching finish. Jeff and Debbie did a creative and well-executed job on the design and refinishing. Thanks for the step-by-step photos of the project. And thanks for the tip on sealing painted furniture. DH and I use a water-base polyurethane gel, but I will look for that spray.
About the aesthetic versus practical issues: In this case, because there were dings in the veneer on some of the pieces that needed to be filled with wood putty, it would have been extremely difficult to refinish the whole set in blond stain. (My grandfather could have done it so it wouldn’t show, and so could Tommy Mac on TV, but I know few people who have those mad skills.) Saving the tops and painting some of the doors in a similar blond color freshens the look. Since Jeff and Debbie seem experienced in the art of furniture repair and refinishing, I’m sure they made the best choice for the condition they had before them and for the look they wanted. And some paint, some stain is a very typical alternative to all wood stain in midcentury modern furniture.
I think what’s most important to most–not all–of us on this site is restoring our furniture and houses so we can live in them and with them, not so we can invest in museum quality pieces. Those of us who are planning to stay with our homes and furniture until we are carried out in the old knotty pine box salute you, furniture salvagers!
And speaking of the old pine box, here are some choices for those who are considering cremation: http://theoldpinebox.com/singul_urn.html
pam kueber says
I agree: Underlying overall condition can factor into your decision whether to finish with stain or paint…. Paint covers many sins!
TappanTrailerTami says
Pam, paint does cover a multitude of sins….(and cheaply too). My current bedroom set has SO MANY sins to its finish, paint would be the definitive solution. These days though, there are quite a few master restorers out there that can fix just about any sin during refinishing. I follow the antique radio forum, and you should SEE some of the console radio cabinets folks have salvaged and restored/repaired – amazing workmanship. My bedroom set: 48″ dresser, vanity w/ mirror and stool, high chest, and a nightstand is going to run me about $3000-$3200 (CA Bay Area pricing) to have it completely refinished and restored. Yep, lots of money….but to find a set in excellent condition, either original or restored is that plus some here, unless the luck Gods are looking upon you.
elle says
I agree. I have a piece that I got at a Habitat Restore for $12, knowing full well it could never be restored to original because of the amount of damage to the wood. But I loved the drawer pulls and the overall design, and couldn’t bear to see it sit there all heaped upon and dusty. So I know it will have to be carefully painted, but the value was in saving the piece.
Very nice work on the furniture. I think the sheen of the paint and the smoothness is outstanding!
Karen says
I have picked up many pieces of furniture over the years, many on the curb and in poor condition. For some time, I tortured myself over
“desecrating” the pieces with paint. But finally, I came to realize that as Elle says, the value is in the rescue. I learned the hard way moving from paintbrush to spray paint and, apparently, will now be investing in a sprayer. Most of the pieces get donated to a local group which provides furnishings for people moving from shelters into housing. Enjoyment for all!
Karen says
Oops, thanks for the great piece and the clear explanations.
pam kueber says
What a wonderful idea — rescue and release! I have the itch to makeover furniture like this, too, but have nowhere to put it. GREAT idea to donate it! Good on you!!
Mary Elizabeth says
Yes, indeed! It’s like bringing stuff to the Habitat for Humanity ReStore–a double blessing. Keep things out of the landfill and add value to someone else’s home. Great!
linda h says
Cool lampshades also!
Jeff Kidd says
Thanks for the lampshade comment. They are actually 2 lampshades put together to make 1. We searched and searched for some shades and always came up empty. We wanted some height to them to give the wall a higher look. After looking at custom shades and getting sticker shock LOL, We were walking through a local chain store and spotted this design. We took two and flipped them end-for-end and walla, I think this will work. Brought them home and used jewelery wire to tie them together.
Allen says
That is great! I’d like to see a step by step on this with some closeups.
Leslie Long says
That was BRILLIANT, out-of-the-box (no pun intended!) creative thinking! No one would ever know they didn’t come that way! Such a great look.
I saw an article somewhere that showed someone using an upside- down, metal wastebasket for a hanging light fixture which looked amazing after painting. Same result: custom look, fantastic price & one-of-a-kind result. Dang; some people (like you) are just too creative not to be RICH!
Hope you post some of your other projects. So enjoyed the step-by-steps visuals.
Kkmk says
I can’t believe how amazing the formerly beat up pieces look after your multi-step efforts! I did not expect the veneer to turn out so well. Kudos on your ability to see the diamond in the rough.
Wendy in St. Louis says
***FABULOUS*** job.
Chris says
Wow! I am so impressed! What a beautiful, smooth finish! Love that you gave new life to something that was in really, really rough shape.