

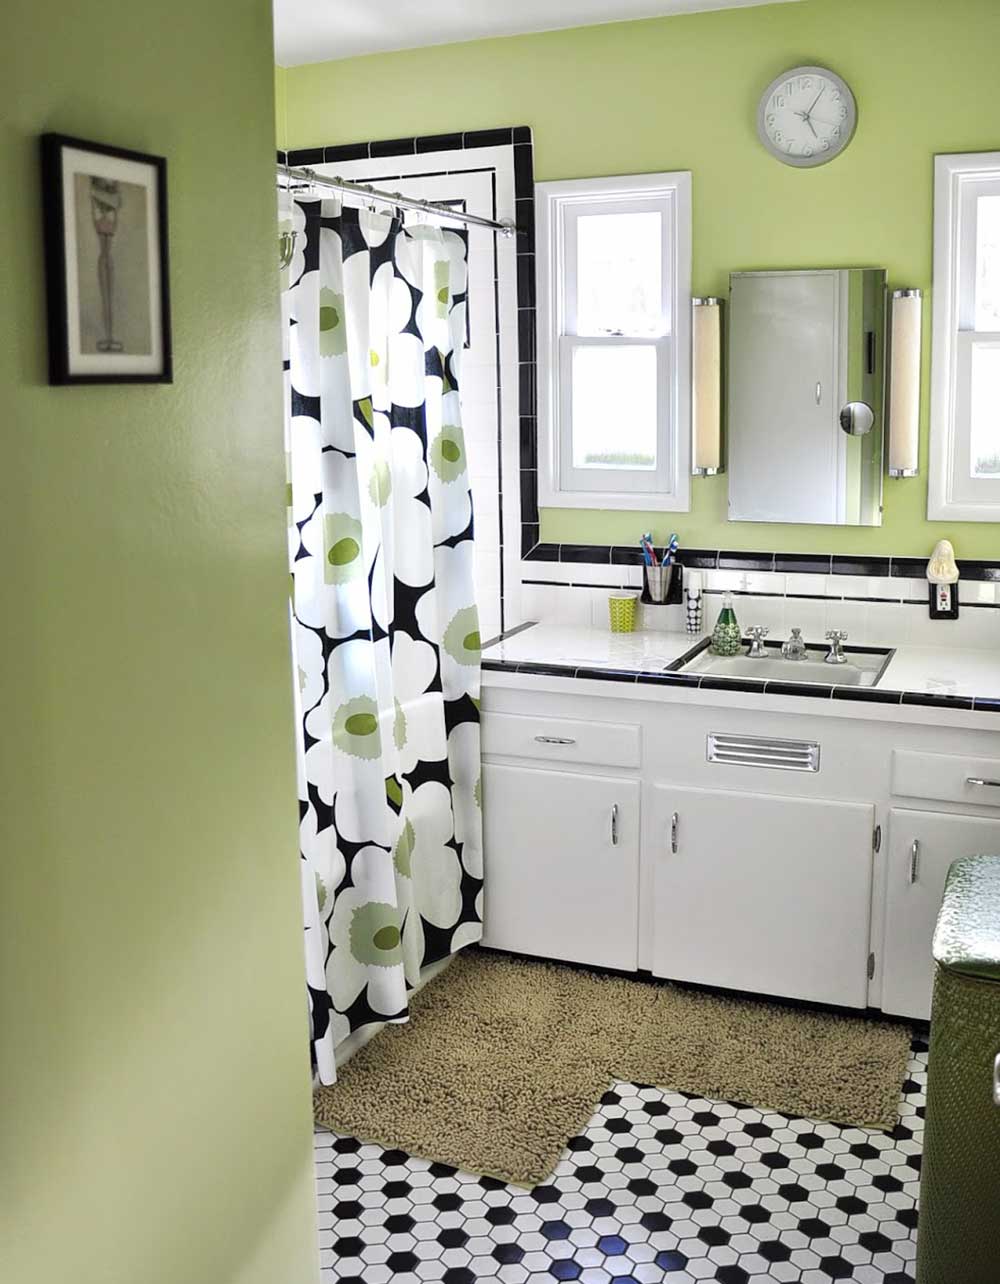
Reader Dawn has just finished remodeling the only bathroom in her 1950s home — using readily available black and white tiles to create a crisp and classic bathroom that looks like it’s always been there.
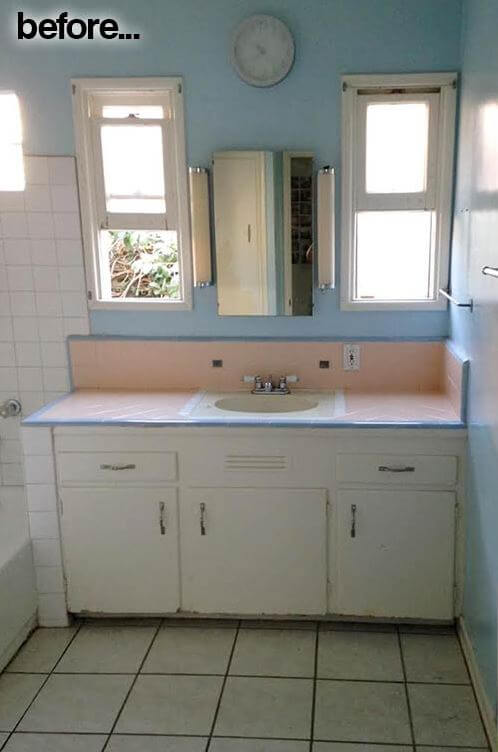
Prior to the remodel, the space was in sad shape — cheap, big box store ‘upgrades’ and cracked floor tiles dominated.
Dawn writes:
Hi!!! Just wanted to share my awesome bathroom remodel with you. Your site was a great resource and I learned many things along the way from you site. It made it so much easier in the long run having so many questions I had already answered on your pages. Thanks a bunch. Hope you like it.
Yes Dawn, we do like it, nay — we love it! Golly, that original vanity is cute, and we love the vintage sink too.
This bathroom remodel is a great example of how you can use very affordable (relatively) tile in a midcentury bathroom to great effect. The white 4″ x 4″ wall tiles and 4″ black liner tiles are from Home Depot… the black and white 2″ hex tile on the floor and the other trim are from B&W Tile. And oh my goodness, we love the Marimekko Unikko shower curtain — it makes a great mashup of 1960s mod and 1940s/1950s modest, with brilliant use of scale and color. Nicely done, Dawn — you have the eye, for sure!
See the complete transformation and Dawn’s resource list:
- You can see all of the photos of Dawn’s retro bathroom remodel and read more about her story over on her blog digadig home.
Thanks so much for sharing your space with us, Dawn!


Wendy says
Oh wow! Love it. The floor tiles in the original photo look like the crappy tiles in my current 1947 bath that someone used, much to my dismay. How hard was it to get those up?
pam kueber says
Precautionary Pam reminder: Beware vintage nastiness that may be found in old floor tiles and their adhesives. Consult with a properly licensed professional to assess what you have so that you can make informed decisions.
Dawn says
Luckily for us the tile in the before picture was put in during a previous remodel. They had already removed the original flooring so we didn’t have to deal with any potential hazards
Wendy says
No worries! Our tile is from a recent renovation, as well.
Karin Jeffrey says
Dawn, I love that little grill so much that I sort of replicated it in my bathroom. I have a square louvered metal grill in condo’s bathroom ceiling. It’s the only vent. I took it out, cleaned it, and whipped out my can of chrome paint. Looks great. That will do until I order the round NOS Nutone grill cover. Thanks!
Laurie Louise says
Like a breath of fresh air! Great job!
Carol says
Luscious looking remodel. Glass block windows in the shower are so charming. It’s perfection.
Cynthia says
Excellent! Love the color combination, the green is so fresh and inviting, and the workmanship is terrific. The whole effect is so crisp and clean, especially on Dawn’s website. Dawn, were the glass block insets in the tub area original? and what is the long hose with spray nozzle attached to the toilet ? I’ve never seen that before….just wondering…..
Dawn says
Cynthia the glass blocks are original to the house. We really love them and the great light they let in the shower.
As for the sprayer it’s actually a diaper sprayer for our cloth diapers. lol They sell “pretty” ones but we just crafted up this inexpensive ugly one from hardware store supplies. Hopefully within this next year we will be done with diapers over here and we can get rid of it. 🙂
Mary Elizabeth says
What a clever idea!
Summer is a good time for potty training. Just let the baby run around in training pants and find some incentive to sit periodically on the potty. ( I had a dish of M&Ms and raisins on a shelf.) In the 1950s, my mom used to put the potty chair in the mudroom, right off the back yard. The neighbors were scandalized to see us running around in training pants and nothing else.
That being said, every kid is different, as you know. You have two, right? With some of the kids in our family, they had no interest in potty training until they were three or so. We then said, “Oh, too bad. To go to preschool in September you have to be using the potty all the time.” Then they would be done with diapers in two weeks time.
tammyCA says
Terrific bathroom! Love that shade of green against the classic black & white tiles. What a story about the shower curtain..it certainly ties it all together nicely so great that you finally found one.
Geronimom says
WOW! Look how nice and crisp that green looks here with the black – a match made in heaven. That shade of green is SO versatile. You knocked this one out of the ballpark for sure –
love it!
Karin Jeffrey says
Wow, LOVE it. Every detail is spot on. I also have a question . I love that little chrome grille on the vanity. Did you strip the old one and shine it up, or buy a NOS grille? Just when I had my heart set on an aqua and black tiled bathroom like Kristen and Paul’s, comes this beauty. You guys are killing me, lol. We already put in the black and white hex tile with black cove. Now we have to decide on the walls and shower. Black and aqua or black and white? Choices, choices choices!
Dawn says
Just stripped the old one and spray painted it with chrome paint. The original finish was blemished after I took the layers of paint off.
shirley says
What a beautiful bahroom. The elecrtric wall heaters are so nice in the winter time.
Jason says
I’m most curious about the little vent plate under the sink… It was obviously painted over as seen in the “Before” (and most I run across have been, it seems) so I’m wondering if it was replated, or if it actually cleaned up that nice with a simple stripping/polishing.
Also, does anyone know of a source that makes those now? I’ve got a couple that need replacing…
Dawn says
I stripped it with some of that orange gooey paint stripper. It came out fairly well but had some discoloration in the metal. We decided just to spray paint it with chrome spray paint. It actually came out really great.
Jason says
Nice work! If I can’t find replacements I’m going to have to go that route. After I use some JB Weld to reattach a couple of the broken louvers, that is… Dang tin is too thin to even solder.
pam kueber says
Yes, Dawn — this is a great question! Where did you get that????
midmichigan says
Here’s a source, Jason, with a reasonably priced product:
http://www.thehardwarehut.com/catalog-product.php?p_ref=301451
Many of these are in the boating supply industry as well. They’re usually called a “louvered vent panel”.