

 Want a checklist of key elements to create or recreate a 1940s style kitchen? Reader Carolyn recently wrote to us asking for ideas to help repair and decorate her 1947 kitchen. Long story short: I think that Carolyn has the need for a significant remodel on her hands. If she goes this route, to help I put together a list of key items for her to consider to get an historically appropriate look.
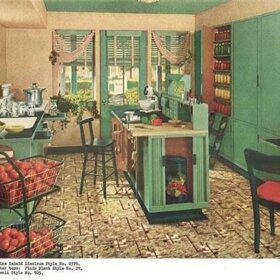
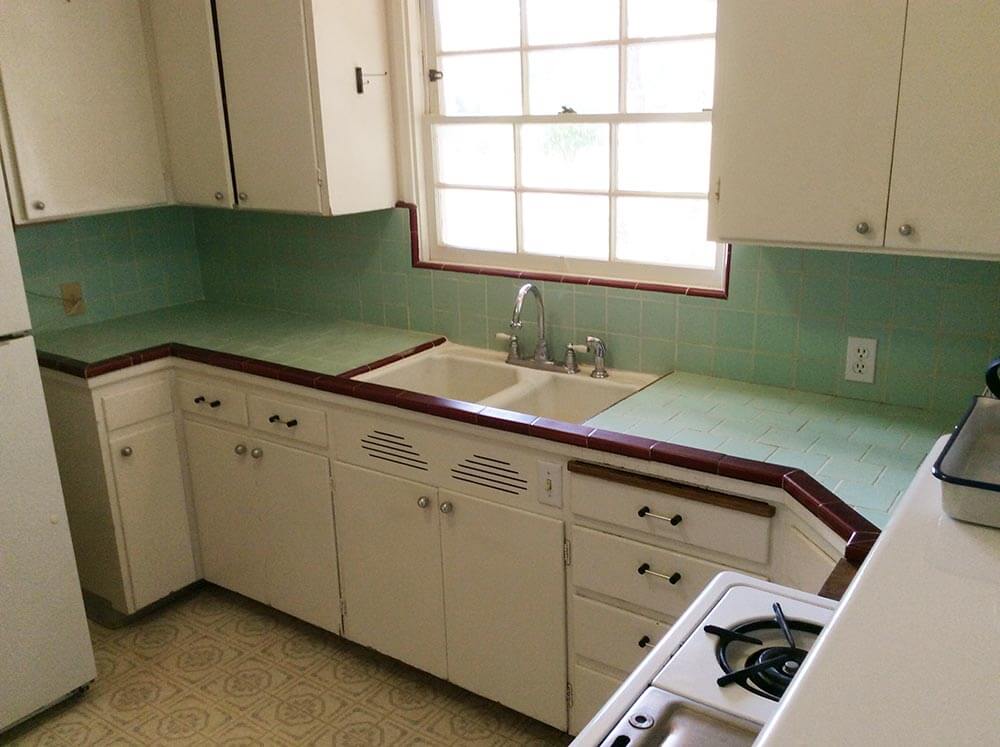 Carolyn’s kitchen looks pretty adorable in these photos, but she told us that 60-year-old tile countertop has “twisted, cracked and the wood underneath has bent to expose the grout more than an inch on 2 sides of the sink. We had our grout cleaned and re-grouted just last year!”
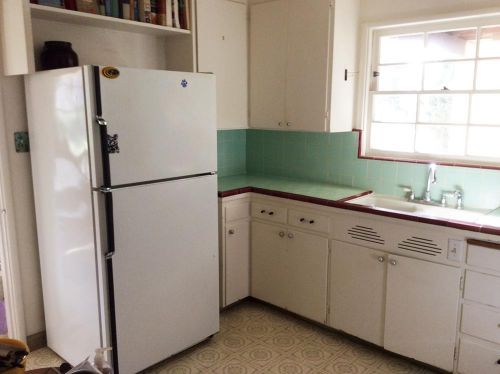 In addition, the sink needs to be reporcelained… the lazy susan is broken and impractical… they need a new refrigerator… the cabinets need a new paint job… and the floor needs to be replaced.
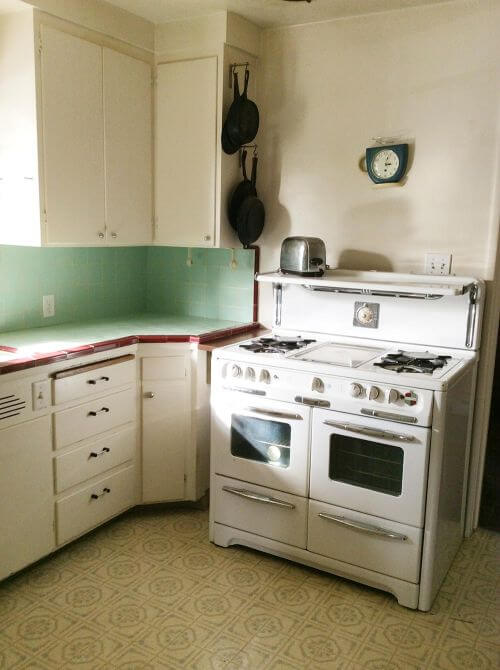
But two pieces of good news: Carolyn loves her 1940’s Wedgewood stove. “It is large for our kitchen but, it is a work horse, and I love how it looks”…
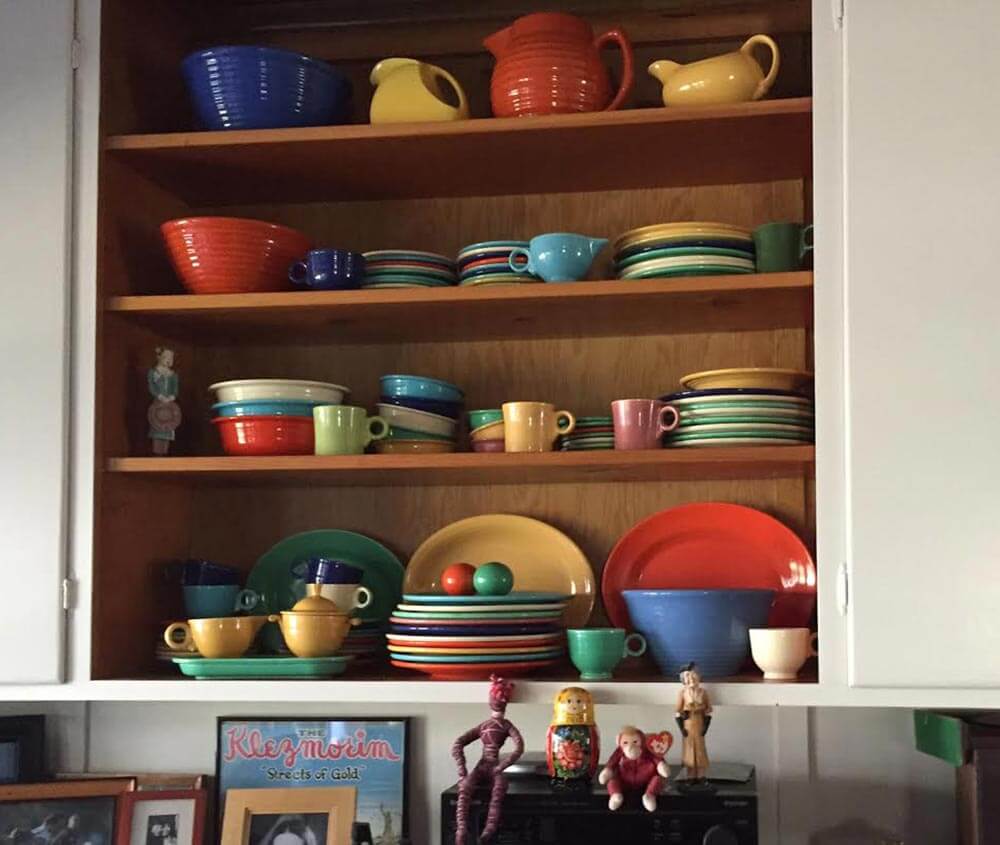 …And she has plenty of color inspriration, in her big collection of vintage Fiestaware.
Carolyn, once you pull out that tile countertop and backsplash, I think you are going to be left with an enormous mess. In addition, your cabinets are not sized correctly to match up with your stove and a modern countertop-depth refrigerator. Since you are planning on replacing so many elements already, I’d say: Save your dough re mi and plan for a gut-remodel or near gut-remodel — and recreate a 1940s style kitchen set to endure for another 70 years. Just do what you gotta do.
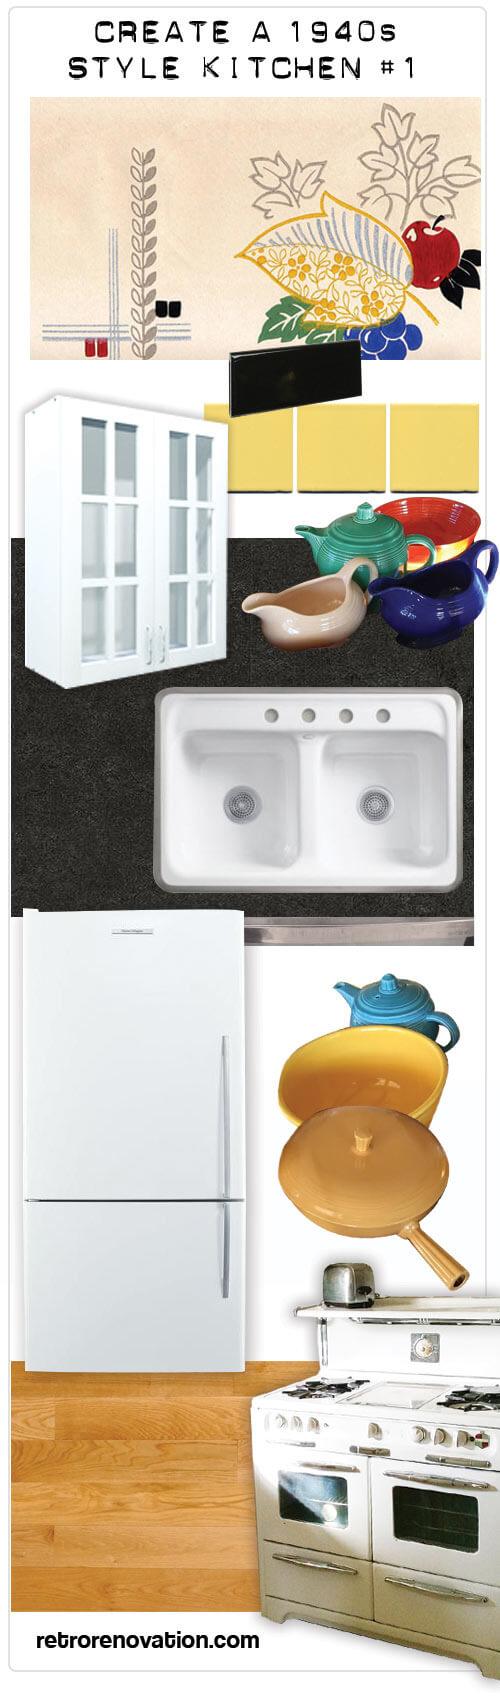
Pam’s Design Formula #1 to Create a 1940s Kitchen
I think that the basics of a 1930s and 1940s kitchen are pretty easy to identify and pull together. I would even go so far as to say this is a “formula” — one that’s very adaptable, though, in particular as it comes to selecting colors, patterns and of course, decor. In addition, there are other alternatives (above and beyond those shown today) for sinks, flooring, countertops and appliances — I’ll do another design board with Formula #2 and maybe even Formica #3 soon…
But for this one, the impetus was Carolyn’s wants and needs. In our email exchanges, Carolyn indicated an interest in a yellow-and-black tile color scheme. I also think that yellow tile works well with her yellow Fiestaware. So that’s where I started with this Design Formula:
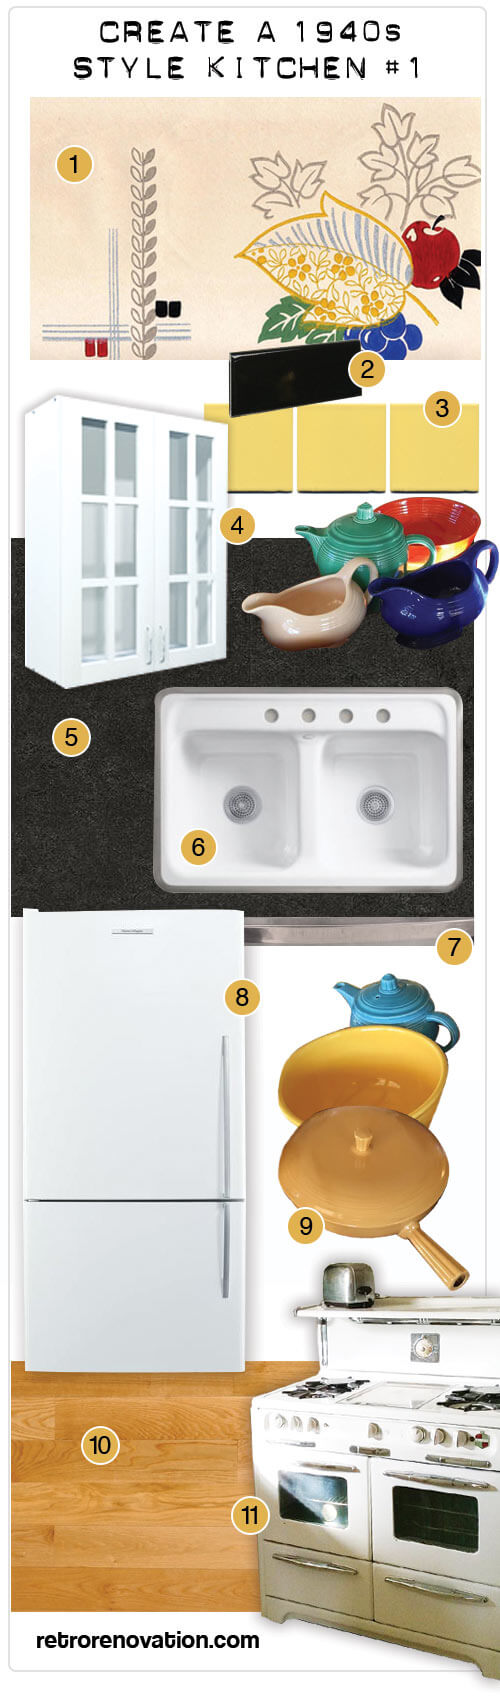
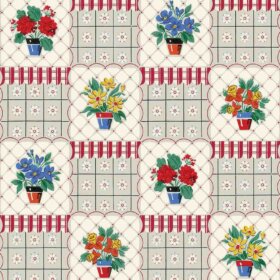
- Wallpaper — This vintage wallpaper from Second Hand Rose looks like it would coordinate nicely with the yellow-and-black tile scheme… and, it picks up the other colors in the Fiestaware — but without competing or adding too much extra pattern to the small space.
- Tile edging — You can get black bullnose tile right from Home Depot or other big box stores.
- Backsplash and wall tile — Yellow 4″x4″ tile from B & W Tile. You can see all the color for B&W Tile at Clay Squared. You can buy from either place. Or, choose this lovely soft yellow tile from Classic Tile, I think it’s even less expensive. Note: It’s gonna cost more — but in a 1940s kitchen, in addition to tiling the backsplash, I would likely lean toward tiling the entire room. That is, tile about halfway up the walls, with bullnose trim.
- Cabinetry — White cabinetry is appropriate. This example is from Barker Doors, which can custom-size you anything. Yes, Carolyn, you can have glass in the wall cabinets — just know: You must keep what’s behind it super tidy — even “staged” — or else it will just look a mess. Note also: Soffits, please, above all those cabinets and the refrigerator, too, for a built-in (and easier to keep clean) look. I even believe: Soffits make a kitchen look bigger.
- Countertop — Linoleum. That’s what they used in the 1940s, along with tile and wood countertops. Shown here: Marmoleum linoleum. I believe that black linoleum countertops were the #1 most common color in the 1940s. They would look great in the color scheme of this kitchen, I think.
- Kitchen sink — Kohler Delafield with hudee ring. The kitchen sink o’ choice here on Retro Renovation. I did not specify a kitchen faucet — but peoples, enough with those goosenecks that sit super high — they are too splashy once the water hits the base of the sink. Me no get it. Here’s the faucet I have in my kitchen (affiliate link), and I love it, the spout is 10″ long so it sticks well into the center of my sink, and it is not high like a gooseneck, so I get minimal splashiness outside the sink:
- Countertop edging — For linoleum, I would likely go with stainless steel edging from New York Metals because this edging has a big lip to grab onto the linoleum.
- Refrigerator — Okay, it’s not retro looking — but I like this size and color of the this Fisher Paykel refrigerator I discovered when researching this story. It’s counter-depth, not too tall, not too wide. The think about small kitchens like Carolyn’s is that if you have too big a fridge, it just takes over like a big white elephant in the room. Yes: A vintage fridge from the 1940s or early 50s also would be great, if you have the patience and tenacity for it.
- Decor — When designing a kitchen, it’s always great to start with an inspiration item — a curtain fabric, a rug, whatever — to drive a color palette. In this case, Carolyn’s Fiestaware does the trick quite nicely. That said, I would pick only one color — in this case, the yellow, as described — to ground the whole look.
- Flooring — Carolyn said that the rest of her house has wood floors. So yes, continue them into the kitchen.
- Stove — Yum. This vintage Wedgewood stove = The star of your show. Lucky Carolyn! Be sure to consult with properly licensed professionals about placing and installing it in your kitchen in accordance with local building and plumbing codes.
Other 1940s style kitchens with useful ideas for Retro Renovators:
- Lauryn and Dennis’ sunny 1940s kitchen makeover
- Dave and Frances’ 1938 kitchen
- See how the tile is done on the wall in Kristen’s original 1940s kitchen.
- Maile displays her dishware beautifully in glass-front wall cabinets in her 1940s style kitchen.
- Vintage metal cabinets are appropriate too — and lookie the best cafe curtains ever in David’s kitchen.
We hope this is helpful to you, Carolyn, and to other readers working to design a 1940s style kitchen. A few more Formulas yet to come!
See all of our 1940s kitchen design boards here


pam kueber says
Hey, here’s another idea: Keep the backsplash — but put in a rich burgundy linoleum countertop that matches the trim tile!
Still… would require a lot of fussy craftsmanship ($) to get it to work out well. I fear the cabinets also are no longer level…. a thought, though.
LuAnn says
Oooo, the current backsplash with burgundy linoleum countertops would look adorable. You’re right, Pam. Once you start pulling stuff out, you never know what other problems may be lurking.
pam kueber says
I agree that the wall cabinets may be able to be saved — depending on what happens to the wall when that backsplash comes out. Also, depending on the aesthetics you are going for. Golly, I’d love to see what not shelves framing the window…. and the space about the stove is not being well utilized…
The shelf cabinets above the fridge – no, just no, not useful anyway.
Could be that the current base cabinets also are not 24″ deep. This could be a problem re a new kitchen sink.
I continue to believe: To maximize the base cabinets for utility — including finding space inside that corner meeting up with the stove, you’re better off just starting from scratch.
I will also point out that finding someone to spend a lot of time fussing with something custom may end up costing more than just putting in new.
Final note, Carolyn needs a good kitchen designer to help maximize every inch. We didn’t show you the other wall either…
Lynne says
Old magazines from the 1940’s, such as Better Homes ,Good Housekeeping, and American Home are just loaded with ads for kitchens. Lots of inspiration and authenticity to be had.
Check Ebay, I’ll bet you can pick some up for a good price.
LuAnn says
What an adorable kitchen! I love all of Pam’s ideas. I don’t know if there’s any way to save the cabinets you already have. I love all the cute details…the vent under the sink. And is that the garbage disposal switch in the sink apron? Those cabinets were most likely built in place by a carpenter and will probably outlast any new cabinets you buy today. Maybe you could get a carpenter to tweak some sort of solution around the stove and fridge. Also, don’t know if you live anywhere near Los Angeles, but the tile countertops were ubiquitous in this area at least from the 1940s through the late 1960s. I’ve never had anything else, and I like them a lot. Good luck with your fun remodel. 🙂
Debby says
Flooring: No, no, no, no, NO! We have 70+ year old wood floors in our house and the previous owner put new wood floors in the kitchen. It looks like crap! The floor itself is nice but it in no way matches the original floor and so sticks out like a sore thumb. Unless you go the salvage route, the comparison between old boards and new just won’t cut it. Why not go for linoleum or tile flooring which is probably what was original to the house in the kitchen? We’ll do something like that when we renovate.
pam kueber says
She has a laundry room adjacent to the kitchen in a brick sheet style. Too many floorings next to each other so I voted wood too keep it to only two.
Note: I did not have a hard time finding oak flooring for my living room that coordinated seamlessly with the oak parquet in the adjacent dining room.
Jay says
I am glad someone brought this up, re: the flooring. I wondered why you suggested wood flooring instead of linoleum for a 40s kitchen. I thought the wood flooring in the kitchen suggestion somewhat trendy (sorry) unless it’s a 18th century house. I think if the budget allows, it would be easier to recover both the kitchen and laundry area flooring together in the same vinyl material.
I agree about new cabinets – the fridge side and the stove side don’t look right, it’s not a seamless look and there is wasted space. The existing tile counter top looks icky (permission requested) not style wise but food prep sanitation wise. It’s just plain worn out!
pam kueber says
I agree she can cover the kitchen and laundry room floor together, for cohesiveness… but she had really pretty laundry room flooring. That said: I hear what your are saying and advise: Renovate once, for the long haul.
pam kueber says
it is certified icky – by Carolyn!
Jean says
I have original wood flooring in my 1952 mid-mod kitchen, as does my brother who lives in a similar house in the same area. Not 18th century.
Maggie says
I’ve got a 1949 cape and my kitchen has the same original wood flooring as the rest of the house (including the bathroom)- it’s fir which unfortunately the dog’s claws easily scar. So, wood was def. being used.
Jill says
We inherited that stove and if I get my way we will eventually build a house around it.
nina462 says
I LOVE that stove and would do almost anything to have one like it. However, it wouldn’t fit in my ’65 kitchen 🙁 – I’ve passed up many a stove like that at estate sales.
I like your kitchen – it reminds me alot of my grandma’s kitchen. Maybe she needs a cheery red table & chairs in the corner?
lorraine says
Jill I built my kitchen around my antique stove. Really!
Sandra says
Bullnose tile is still available, but it’s harder to find the corner tiles (inside and outside corners) and edging tiles that old tile jobs would have used around the sink and at the ends of countertops. I love my Marmoleum floors and the scraps line all my cabinets. It’s nice to work with and the colors are all wonderful.
Justin says
As someone who isn’t there in person and cannot observe the tile countertop or its damage, I would suggest trying to keep it. If that is out of the question, I would do tile backsplash as Pam suggested, but instead of the laminate countertops, I would go with tile countertops. Just continue running the tile from the backsplash to the countertop.
As far as the fridge, I would personally go with a 1940’s fridge. There are some that do have to two doors. I have a 1949 Hotpoint that has a seperate door for the freezer. There isn’t as much space in them and you have to manually defrost them as well. If you go that route, make sure you have a professional inspect its condition.
Ann says
I am with Justin on this. I would try to repair as much as possible and replace components of the cabinets. If something is warped or rotted, replace that piece. No need to throw the baby out with the bathwater. Also, newer base cabinets have more depth, and that would take away floor space in the kitchen. I see flipped houses where the galley kitchen used to be comfortable, but now is really narrow because they put in new, straight from the store cabinets. I don’t see anything wrong with the uppers. Painted cabinets are definitely 1940’s (I have them in my 1940 house) as is linoleum flooring, although not in the current pattern. White is ok, but green and cream are more of the era. So glad Carolyn has kept her windows, and she’s right, those old stoves are workhorses.
Although they are not in the home reno biz, you might reach out to your State Office of Historic Preservation and see if they can give you some direction on places to look for people who can do rehab over gut ‘n replace. Here is a list of contacts for each state: http://www.nps.gov/nr/shpolist.htm
pam kueber says
This is not a galley kitchen per se. She has plenty of depth to the kitchen.
Ann says
I agree. I mentioned the galley kitchen simply to illustrate what I meant about cabinet depth.
pam kueber says
Green and cream painted cabinets more of the era? I don’t have any evidence that is the case. White paint or stained wood, that’s what I’d say….
Maybe not brite white, but white nonetheless.
Ann says
It has been many lifetimes ago, but when the blog was new, you posted about the 1941 Sherwin Williams Paint Guide. There was one in there. Here’s the Flickr link:
https://www.flickr.com/photos/java1888/3845505507/in/set-72157621897306205
pam kueber says
Ok. But I don’t think cream was more common. I tend to think: White was the go-to color then — as now
pam kueber says
Also, Carolyn wanted yellow and black tile. That will go better with white cabinets….
pam kueber says
Carolyn does not want tile countertops. She actually said she wanted solid surface. Which I will not recommend for a restoration. Hence, I recommended linoleum.
Mind you: This is just Formula #1.
Wendy in St. Louis says
I love that beautiful stove! One word of CAUTION: That fridge might not work for you – please test it out before considering. My mom had one of those bottom door fridges and we all h*ted it – total pain to use. Bend over, open door, get out of way of door, pull out a basket or scrunch down to dig around since you have to be low/in front of the open door to find anything, all the while pushing the dog’s sniffing head out of the way.
With a drawer, you just pull it out, look straight down, slide the top basket out of the way if needed, see all your stuff. Try it in person, there is quite a difference.
~~exiting soapbox~~
Good luck with your retrovation!
Lynne says
This is an excellent point, Wendy. I wanted a single door fridge when we moved into our house. We spent a lot of time searching, and luckily realized that the doorways and island were too close. When the door of the fridge opened it would be intrusive. I HAD to get a double door model. The size of the split doors is much narrower and it just visually is scaled better for the space.
The other thing to watch for especially with an island, is if you can still stand in front of your oven door when its fully open. Nobody wants to try to get a 425* hot dish out of the oven while they stand sideways next to the oven.
Sandra says
I put this fridge in my 1956 retro kitchen, and I like it. It is true, however, that you need to be extra careful to have enough room to swing the door open wide in order to pull out the drawers (these drawers save energy by preventing the cold air from falling out when you open the door). Mine is somewhat limited and I have to pull the fridge out into the room if I want to change the shelf heights because the door can’t open quite wide enough.
In addition to being more energy efficient, it is taller than a 40’s “ice box” but about the same depth, so it looks more authentic.
pam kueber says
For Carolyn’s kitchen I specifically looked for a fridge that had its door swing from the left… she has the room.
One of my biggest pet peeves with many kitchen designs: The fridge door does not open correctly for maximum utility.
Yes, I got a side-by-side fridge recognizing that I did not have the space for a full-open swing door. I also placed the fridge in a location where, when I opened the fridge while cooking, the fridge was open to my working area (rather than blocked by the door).
Erik says
RE: refrigerator door swing.
Carolyn’s existing refrigerator can very easily be changed to left hinge/right open doors. For the past 35 to 40 years, refrigerators with a top or bottom freezer are designed so they can be either right hinge/left opening or left hinge/right opening. Changing the door swing is a simple matter of removing the hinges and handles and moving them to the opposite side. If you look at a typical refrigerator you will see that there are provisions that will allow to change the door swing and it is usually covered in the instruction manual. For example: see that white plug on the right hand side of Carolyn’s refrigerator door? That covers the mounting hole that would be utilized if the handle was mounted on the right. When refrigerators leave the factory, they are typically set up as right hinge. When purchasing a refrigerator from an appliance dealer, you should specify whether you need it set up right hinge or left hinge and they will set it up accordingly prior to or at delivery. If you go the discount route, if you need a left hinge set up you will need to make that change yourself. Google the following for more details: change refrigerator door swing. If you are going the vintage route, be aware that refrigerators from the 1940s and 50s are typically right hinge/left opening. Left hinge/right opening refrigerators from that era are hard to find.
jay says
Absoutely right! I bought a bottom freezer with pull out drawer for the exact reason, much easier and way more convenient. Both my brother and sister thought I was nuts to buy a bottom freezer fridge but since then they have both bought them. However mine is a big a** unit and extends out beyond the counter, certainly not retro.
Carolyn says
When Kate sent me a copy of this blog, I became like a frenzied teenager. Remember Beatlemania? That’s about the feeling I am trying to come down from. I found all your comments extremely helpful, especially the notes abou the Fischer Paykel fridge.
I am re-considering my “solid surface” choice. I know that my kitchen would look much more retro with tile counter and backsplash. My only worry has been the grout becoming stained. I am a hopeless dribbler. Still, I think you all have persuaded me to stick with my initial instinct mimic the existing tile counter and backsplash with yellow and black. I have samples from B&W. I have wallpaper samples from Bradbury as a result of another beloved kitchen remodel on this site. My floor? Prolly Marmoleum to match the brick patterned Lino in our laundry room…maybe with some artistic water jet drawing included. Refrigerator? I have thought of the Big Chill studio size but would need to knock out a portion of a wall to our living room to sink it. Any other counter-depth refrigerator ideas out there? Also, due to our septic system.’s age, we took out our garbage disposal but that little switch remains. We do not have a dishwasher or a microwave. I have lived without these conveniences however, I am considering a small dishwasher to the left of our sink and a microwave tucked away inside a cabinet in our gut remodel.
Please keep your helpful comments coming! In a few months time, I will post “After” pictures. If there’s interest, I’ll also post “during” pictures.
One last note, to the kind person who mentioned working with a professional, I am on it. I had an architect draw my kitchen for wiring and building permits. I am working with a wonderful contractor (our second bidder was the charm).
With great appreciation and respect,
Carolyn
Cara says
I love your old kitchen & hope you just re-create it. I think the cabinets are quintessentially 40’s. They have the rounded edge, right? I found a 1947 home decorating book on bulk trash day years ago. Our house was built that same year & almost all the cabinets are the same rounded edge ones. I would NEVER have glass– too much hassle to keep it clean & also what’s behind it.
If you must have the fridge & stove line up, could you save the cabinets & have them built deeper?
One question– what is prolly linoleum?
Carolyn says
I meant “probably” linoleum. Sorry.
Susie Q. says
I’d just googled “Prolly Marmoleum.” LOL!!
Jean says
I have this exact fridge and I LOVE it! It’s not a typical bottom door freezer as Wendy describes, which I’ve had in the past. Once you open the door, there are three drawers you can pull out and see your stuff. No getting on the ground and rooting in the depths. It’s all very accessible (assuming you have the door clearance, as mentioned), even more so than the bottom drawer freezer because you don’t have the big front panel to go over and around. I agree with Wendy- see one in person!
It fits beautifully in my 1952 kitchen and the curved doors and smooth surface add a nice touch.
Christina says
I also have that exact fridge and LOVE it. The drawers on the fisher and paykel pull out in the freezer and the baskets actually lift out as well so it is super easy to get to everything in the freezer. However it is smaller, especially the freezer section so it may not be a good choice for a large family unless you have a secondary freezer or do not need a lot of freezer space.
The fisher and paykel was not my first choice. I actually bought a 1957 GE combination fridge with a wonderfully pink interior and lazy susan shelves. Sadly though it did not keep the proper temperatures and ran constantly when I tested it. I was told it was likely bad insulation. Being in a bind since my other fridge had died I found the fisher and paykel one met my needs for a smaller counter depth model with a sleek and simple design that did not cost an arm and a leg. It looks nice paired with my vintage stove too.
I do still have hopes of getting the 57 GE up and running properly one day- it really is a gem!
Mary Elizabeth says
Yes, this kitchen has great potential! And I love Pam’s suggestions. But do talk to your “licensed professional,” as Pam would say, about how to guarantee that your new counter-top, whether linoleum or whatever, doesn’t let water get under the surface, which is what most likely rotted and warped your old one.
Eric says
You are right about making things as water tight as possible. I recently installed new linoluem on my countertops and also used it for the backsplash. If you use the metal angle cove that fills the seam from the countertop to the backsplash, caulk the gaps (i ordered color matched silicone caulking that was made by the same maker of the linoleum). when I tore the old countertops out, all the areas of damage were where the water had gotten under the angle cove.