

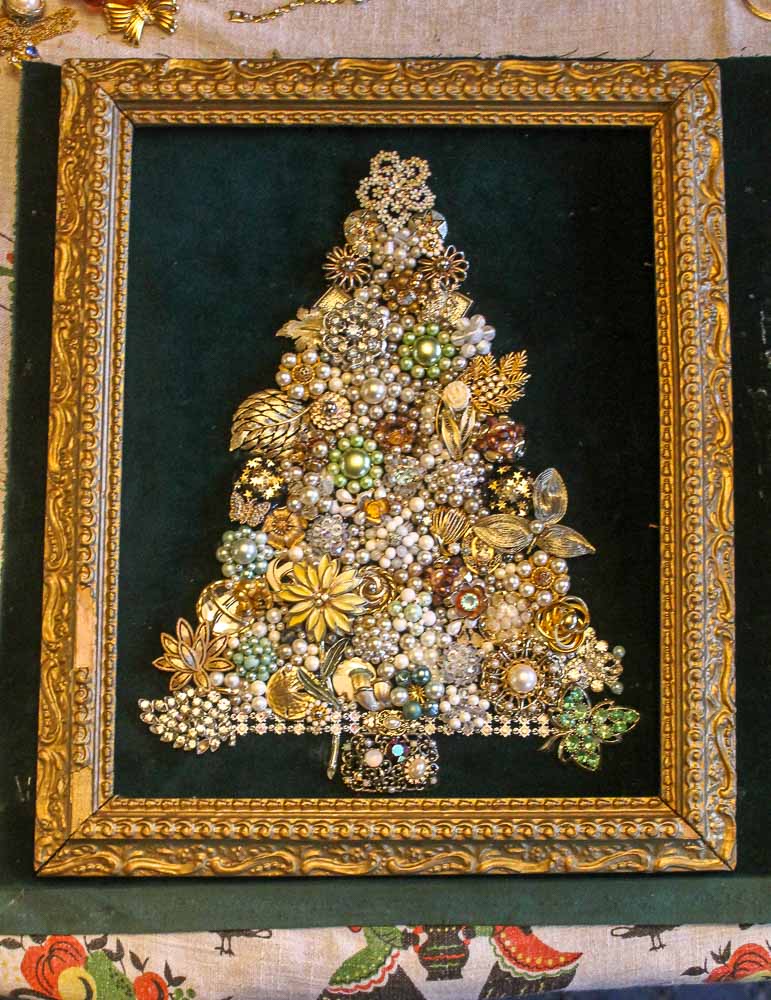
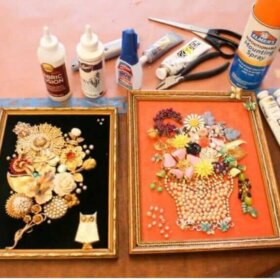
I’ve been collecting broken vintage costume jewelry for several years — with the goal to make a lifetime-achievement crafty: A costume jewelry Christmas tree. This weekend I gathered all my supplies, took over the dining room, and got down to gluing. This project was not easy — like making ornament wreaths, it’s another effort in juggling colors and shapes in three dimensions — made all the more stressful by the fact that it takes a lot more jewelry than you think. That said, I’m pretty darned happy with the result!

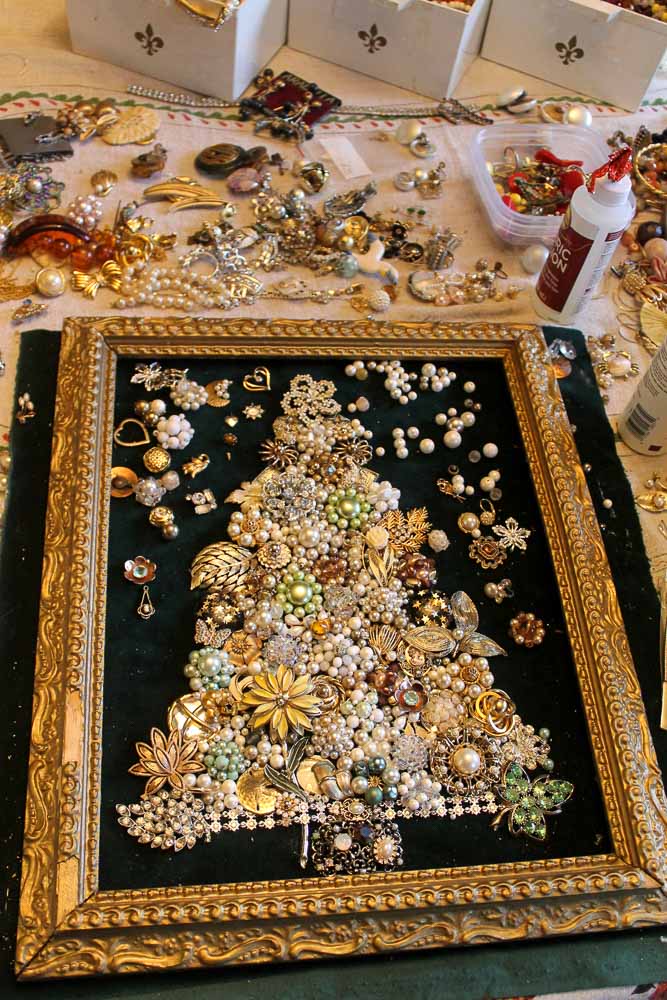
Scene of the crime. Things to collect over time to make this project possible:
- Broken costume jewelry.
- Vintage picture frames.
- Vintage velvet.
Artsy fartsy.
Story and tips continue >>
Meanwhile, you might also enjoy our famous tutorial how to make a Christmas ornament wreath + video:
Voila! My weebit has a new mommy-heirloom!
My tips to make a costume jewelry Christmas tree:
- Start by reading my DIY story from earlier this year (it includes the glue I used): Making art from broken costume jewelry.
- Jewelry pliers or a set of very wide tweezers are important to have on hand. Note: Links to Amazon net me a wee commission if ya end up buying something.
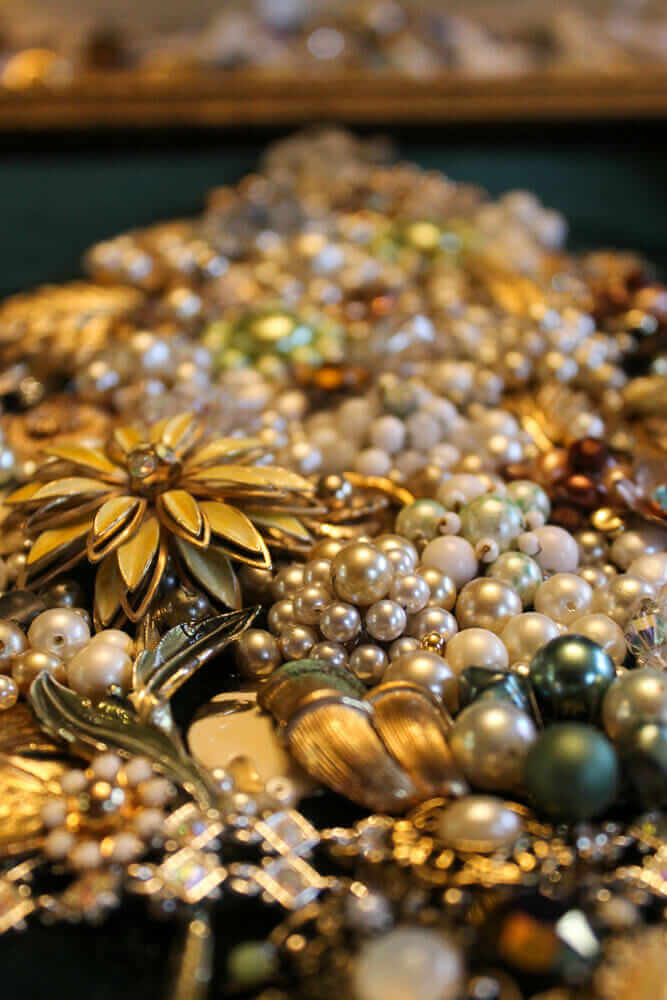
- Golly, you never knew how handy it would be to have so many old broken pearl necklaces in your stash. I find these at most every estate sale. Use the pearls — all sizes, all designs, all colors and sheens — to fill in the in-between spots.
- I thought about it first and decided I preferred to not have a “straight” edge to the right- and left-hand sides of the tree. I think it’s more interesting that way. To start, I created my “outline”. Then, I filled in from there.
- Think about your colorway: I wanted the tree to be primarily gold. But then, I realized that I did not have enough jewelry — big pieces — to fill in the tree. So I began to add light green, which I thought worked well because gold has some green in it.
- As you go, keep scanning the tree clockwise, starting at the bottom left, to ensure you are creating focal points, combining colors, “breaking your edge”, and then “building up” in a way that keeps your eyes moving — in way that gives the piece visual dynamism.
- Take it slow. I came back to my wreath probably 10 times over three days to keep working on it. I’ll bet that I worked at least 10 hours on it. My goal-mode when I do projects like this is to Enjoy The Process. So I take my time. It’s cheaper than therapy.
- Next: I am going to paint up the frame a bit more, and probably add some bling to it, too. And, I will reorganize all the jewelry left into colors and decorative pieces so that I can assess what I need to look for in the coming year as I prowl estate sales.
- Throw out all my rules — and make your own!
More link love:


Cheryl says
Just amazing how creative you are Pam. I will now be on the hunt for broken jewelry in my town of Brimfield.
Mary says
A really beautiful art piece – nice job! I have been collecting the light green vintage (depression era) jewelry, because many of the pieces are made from “uranium” glass. If you use a black light and shine it on those light green pieces, it would be interesting to see if they glow – which is the uranium in the glass!
Carolyn says
I’m not grasping why you need calipers (former machinist).
I know I really don’t have the patience for something like this but I do enjoy efforts by others. If you’ve never seen one before and stumble upon one, your brain just does not know how to process what your eyes are seeing. And if you don’t buy it, you’ll regret it.
Pam Kueber says
Maybe I am using the incorrect term. My tool looked like large tweezers. I picked it up in my estate sale travels. It was indispensible in helping me to pick up and place the fake pearls, including the tiniest ones. Now I will go look up “caliper”.
Mary Elizabeth says
Calipers are used to measure things. What you are talking about is jewelry pliers, I think. I have a set and DH has a set, and between the two sets I can usually handle the small stuff without dropping it or getting my fingers glued together. 🙂
Carolyn says
Aw…I thought it was going to be an martini olive/onion picker outer or some such use of a tool in a manner for which it was not intended.
Carolyn says
Snap a pic and add it and we’ll all give our opinion of what that tool is.
Karin says
This is lovely. You have a great eye. I especially like the way you arranged the jewelry with leaves to jut out and break up the long triangular edges. Have you ever considered making larger non-Xmas images as art? I think it has real potential as an art form.
Pam Kueber says
Yes, click to the link from earlier this year — we made other designs.
Pam Kueber says
Thank you! Yes, I like to ‘break the grid’ by going outside the lines. Same as with ornament wreaths; I think they are more interesting — although harder to execute — if one leaves the ‘interior ring’ of round balls out of the center.
Elizabeth says
Just lovely.
Linda says
This is the prettiest costume jewelry piece I’ve seen. Amazing you can channel your creativity when the Mahalo Lounge is in the home stretch!
I inherited a good number of rhinestone pieces that belonged to my mother and grandmother. I’m thinking a snowflake …
Pam Kueber says
Thank you!
Emma says
Few weeks ago i was in New Jersey. Friend took me to a flea market. I was amazed at how many booths features great loads of costume jewelry. Should have bought it by the pound, but too few days left to do too many unfinished projects. Instead, I bought crystals to replace those broken /lost on a table lamp, so have finished off that project. Feelgood moment.
Melanie says
That is downright gorgeous!!!
Jacqueline Rudig says
What a wonderful idea. Think of all the people from days gone by who are now represented so beautifully in your art.
tammyCA says
Wowed, nice work..looks very renaissance. I still haven’t made one with all the broken vintage jewelry I have but I do think I need to make a mini one this week for the dollhouse.