Creating a 1936 bathroom from scratch — Graham and Monika tackle another remodel
Pam Kueber - Updated: February 4, 2019
Retro Renovation stopped publishing in 2021; these stories remain for historical information, as potential continued resources, and for archival purposes.
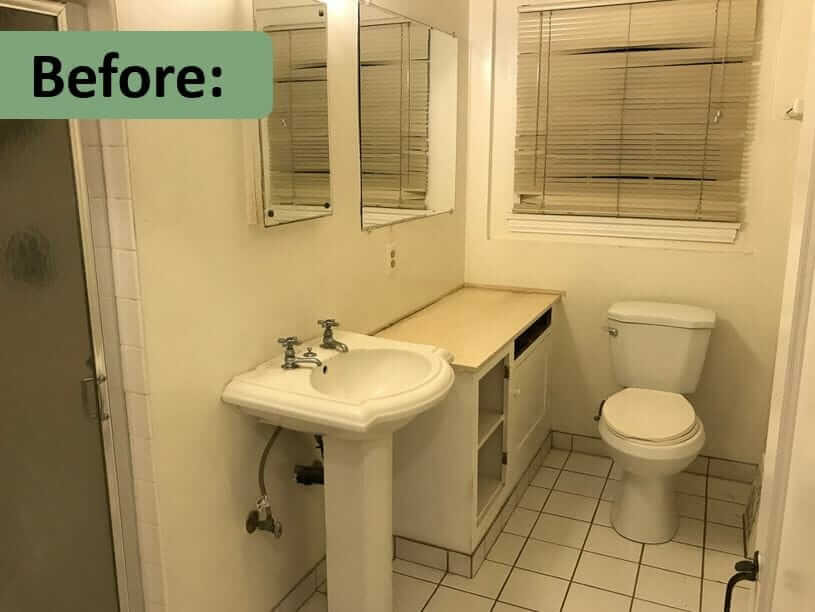
It’s kind of thrilling to see a “before” photo like the one above, don’t you agree? Because you know: A Retro Renovation reader has been hard at work, and we’re about to see an amazing transformation. Indeed: Graham and Monika are back for a second time on the blog, with this lovely remodel. I first featured their handiwork eight years ago, when they Retro-Renovated a small apartment bathroom — cool tile work!. They are now in a 1936 house, and they tackled the bathroom renovation accordingly, with help from B&W Tile. Let’s get to the big reveal >>
Graham tells the story (lightly edited for flow):
Hi Pam,
I’m the Graham from Long Beach… About 5 years ago we had the condo where did 1″X6″ BW Tiles and Terrazzo tile floors and you featured our remodel.
Pam looks, then breaks the news: That was in 2010, Graham — eight years ago! — time flies when we’re having fun, doesn’t it!
He continues:
The story on our new bathroom is we bought our house in April of last year. It was built in 1936 and is traditional in style, but the layout is very much ranch. The house is U shaped and surrounds a central courtyard. It feels like an early Cliff May ranch without all the windows, but this would have been almost 20 years prior to that so it’s very interesting.
It was a rental for a few years so they did some very minor renovations to update include paint everything white and install very cheap tile in the bathroom and kitchen. The main bathroom was my least favorite room in the house so it became our first priority to renovate. As you can see we stayed with the basic format of the room, we didn’t have to move any of the plumbing which was nice and helped our budget.
We live in Long Beach so we are lucky to be close to B&W Tile in Gardena as all the tile is from there, and I was able to pick it up.
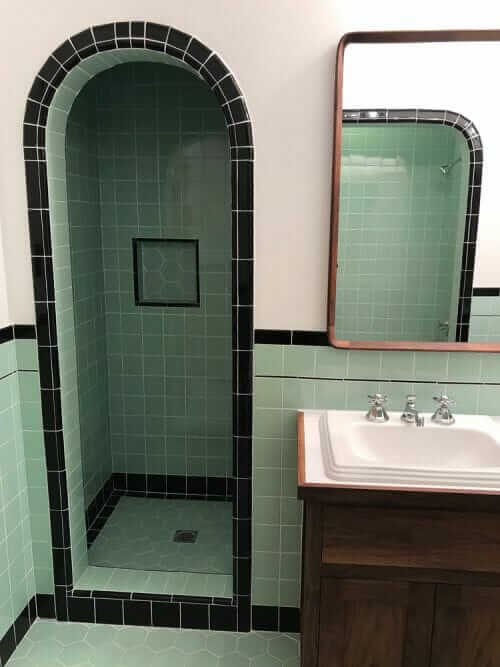
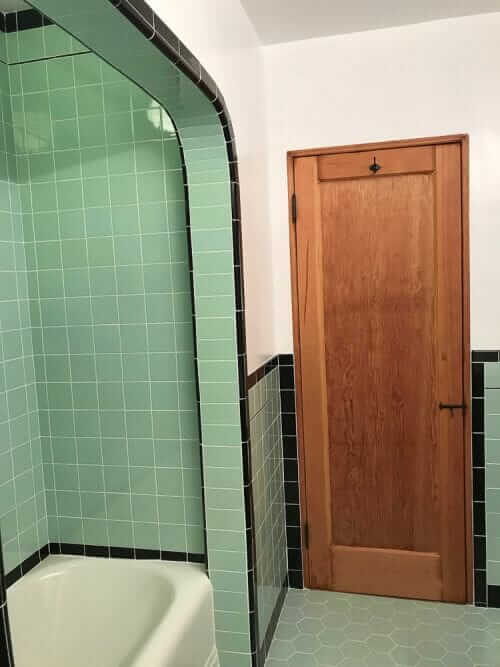
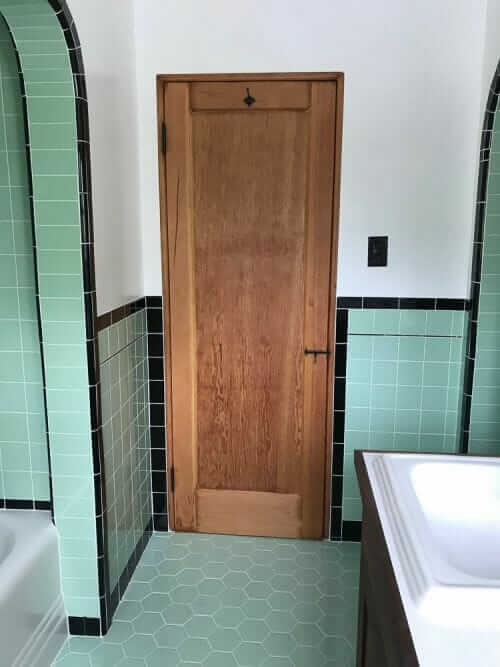
The arch above the bathtub is original so we followed that design cue and created an arch for the shower as well.
The tiles shapes and sizes run the gamut, 4X4 for the majority, 3X6’s for the arches, bull nose topping the wainscoting, hex for the floor and shower floor, pencil line 1/4″ decorative tile, cap tiles for the edges of the arches, and finally 3/4″ rounds for the shampoo box and arches.
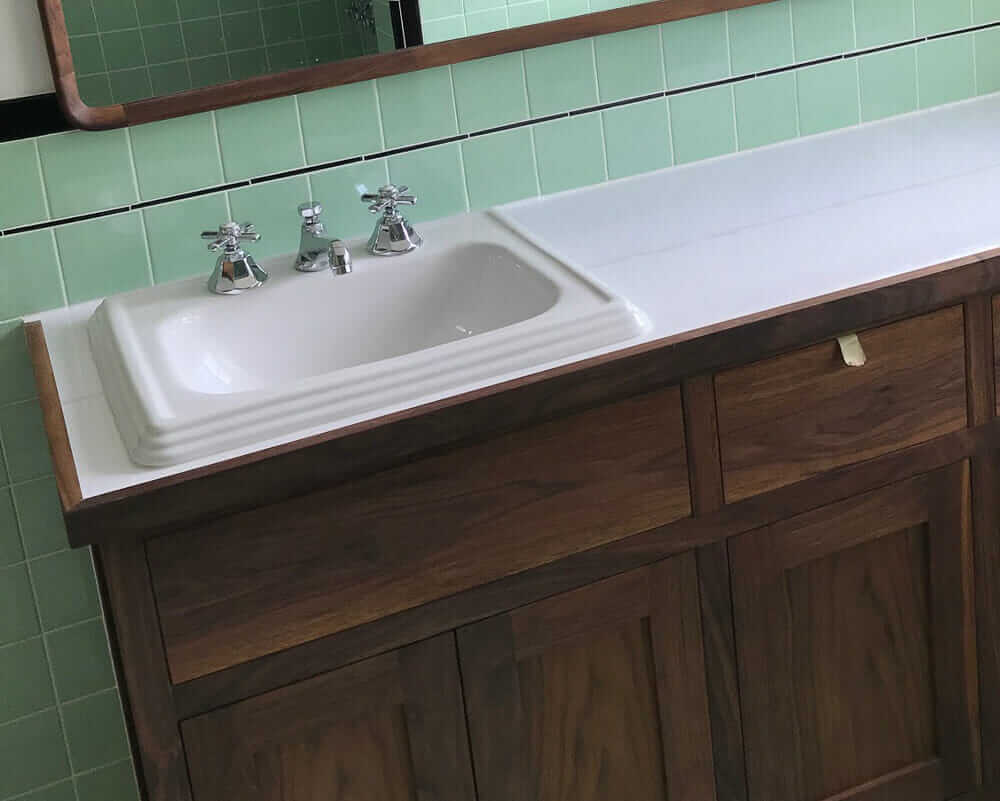
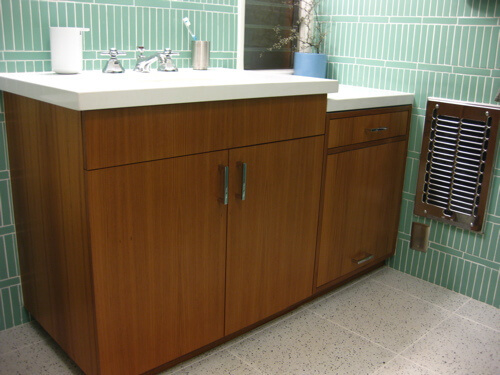
The cabinetry, mirror frame, and edging for the cabinetry is all walnut, and the countertop is a white Formica.
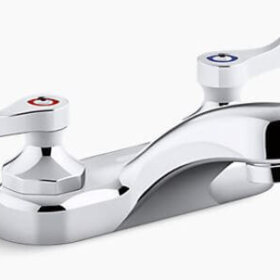
Solid Walnut for the mirror and edging and veneer for the cabinet face. The toilet is the Kohler Highline, the fixtures for the tub, shower, sink are Strom Plumbing Mississippi Series, [affiliate link – earns RR a wee commission if ya click and buy] and the sink is a Toto.
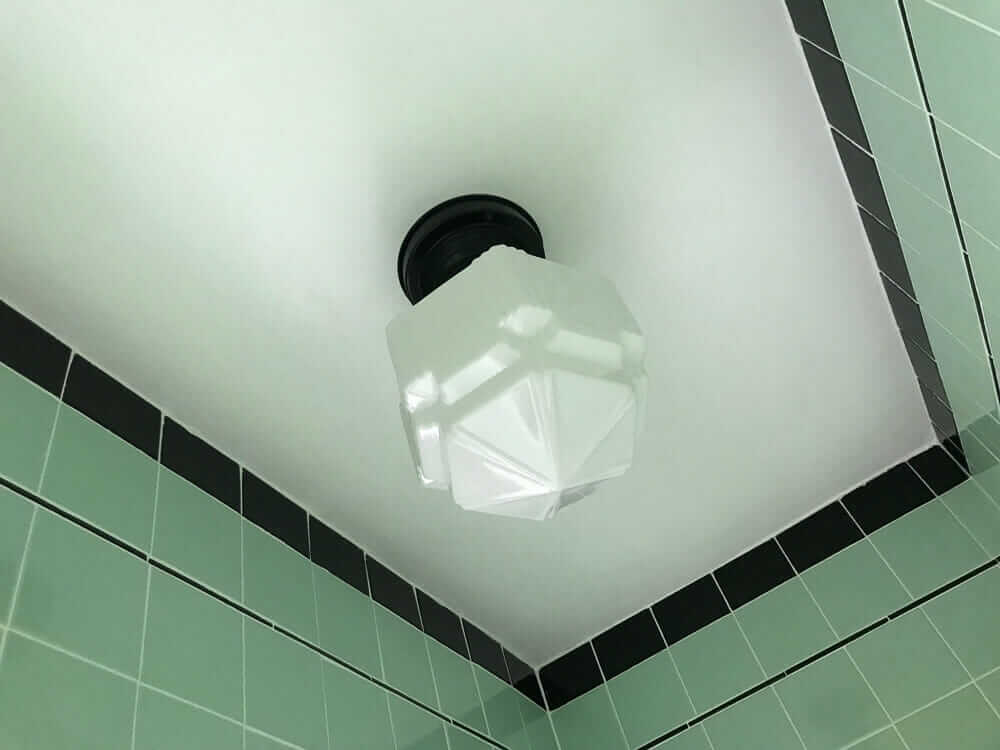
What’s nice about our house being built in the 30’s is we felt like we could get away with mixing architectural periods, during that transitional period people were using Art Deco, traditional, and some early modern fixtures. We still have several of the original light fixtures in the house and there isn’t a set style. So for the lighting above the bathroom we chose an Art Deco style reproduction light from Rejuvenation and a very basic Hollywood Vanity light fixture that we got cheap from Home Depot.
One of my favorite aspects of our house is that they kept all the original double hung wood frame douglas fir windows and douglas fir doors. They painted over everything, but they’re still there and in really good shape. I have been refinishing all the doors, windows, and trim in the whole house this room included. Surprisingly, they never changed out the original door hardware so there aren’t any door knobs for the interior doors it’s all the latch type hardware you see on this door which we kept in the bathroom as well as the rest of the house.
The whole remodel took about a month and a half mostly due to how much tile needed to be set, luckily we have another bathroom to use in the house. We’re extremely happy with how good it all turned out and functions. As with before I used your site to do research and find appropriate materials and fixtures. Thanks as always. We are doing a sensitive renovation to our entire house, and I try to post as many pictures of the progress as possible on my Instagram account so if you readers are interested my handle name is gannogram.
Thanks, Graham
Thank you, Graham and Monika. Lovely bathroom — nicely done!
Beautiful reno!! Congratulations on your new home and great renovation of the bathroom.
Cathleensays
Love it! Looks just like my 1949 green tile with black border bathroom. When I moved in 20 years ago and people were all about “modernizing”, I wanted to keep my vintage tile and use the art deco feel by accenting the style. So happy to see people going back to the classics!
Beautiful tile! My favorite tile color combination of that era.
Annsays
I LOVE it !!! Are there any more before photos? The arches are the best.
Annsays
Wow! I absolutely love it! What a dream!
Lynnsays
Love the green and black tile! Great job!
Juliasays
Beautiful tile work and the restored window is gorgeous. I can’t wait to see the rest of your projects!
Jane of the green and pink bathroomsays
Absolutely fab!! Wonderful job!! The curves are the bomb!
Mary Elizabethsays
Graham and Monika, what a good job you did! Black and mint green are great colors to span the 1930s through the 1950s and beyond. The arches in the bath alcove and between rooms are typical of a 1930s house (I lived in one that had the original green and black tile in the bath). My shower also had an arched entry and a glass door.


 It’s kind of thrilling to see a “before” photo like the one above, don’t you agree? Because you know: A Retro Renovation reader has been hard at work, and we’re about to see an amazing transformation. Indeed: Graham and Monika are back for a second time on the blog, with this lovely remodel. I first featured their handiwork eight years ago, when they Retro-Renovated a small apartment bathroom — cool tile work!. They are now in a 1936 house, and they tackled the bathroom renovation accordingly, with help from B&W Tile. Let’s get to the big reveal >>
 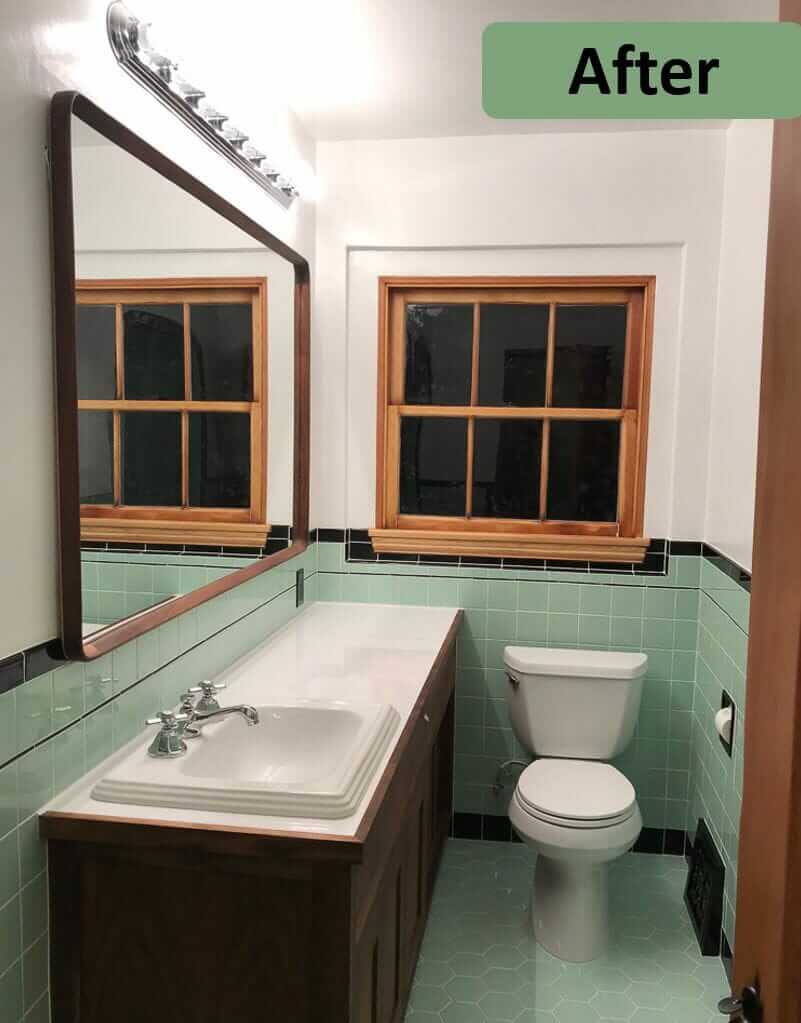 Graham tells the story (lightly edited for flow):
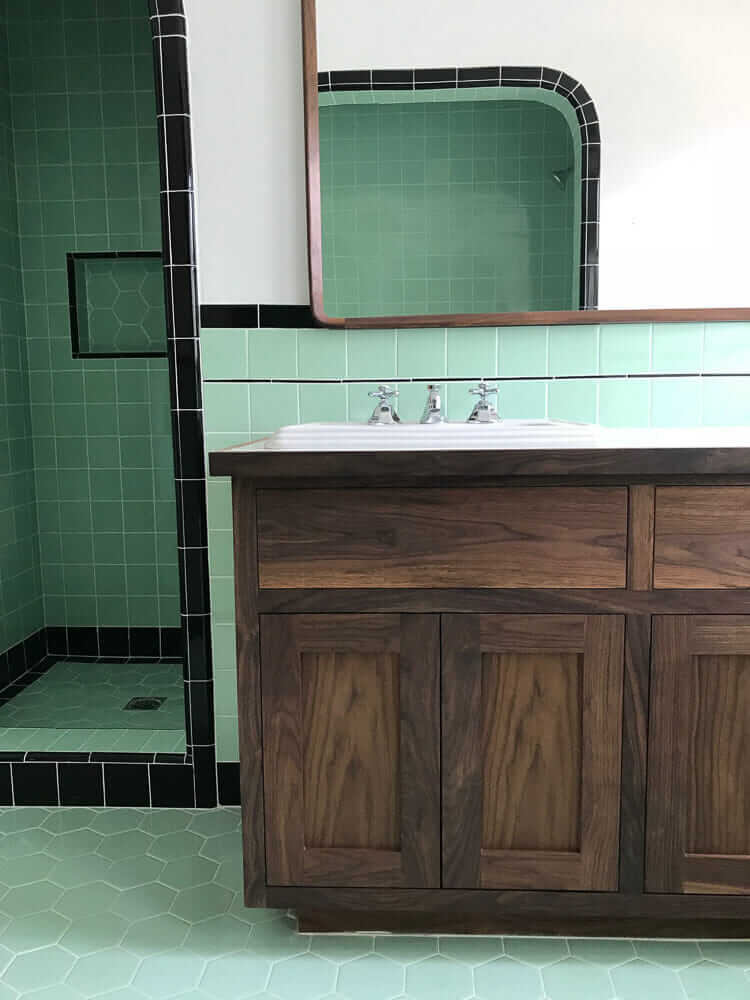


Sonja says
Great job!
Angela says
Beautiful reno!! Congratulations on your new home and great renovation of the bathroom.
Cathleen says
Love it! Looks just like my 1949 green tile with black border bathroom. When I moved in 20 years ago and people were all about “modernizing”, I wanted to keep my vintage tile and use the art deco feel by accenting the style. So happy to see people going back to the classics!
Ed Murchison says
Beautiful tile! My favorite tile color combination of that era.
Ann says
I LOVE it !!! Are there any more before photos? The arches are the best.
Ann says
Wow! I absolutely love it! What a dream!
Lynn says
Love the green and black tile! Great job!
Julia says
Beautiful tile work and the restored window is gorgeous. I can’t wait to see the rest of your projects!
Jane of the green and pink bathroom says
Absolutely fab!! Wonderful job!! The curves are the bomb!
Mary Elizabeth says
Graham and Monika, what a good job you did! Black and mint green are great colors to span the 1930s through the 1950s and beyond. The arches in the bath alcove and between rooms are typical of a 1930s house (I lived in one that had the original green and black tile in the bath). My shower also had an arched entry and a glass door.