

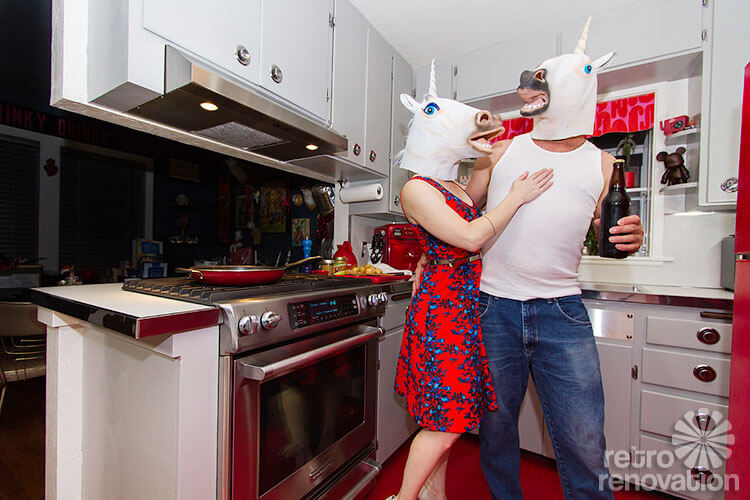
 Readers Jenny & Bob have lived in their 60 year old home for 13 years. Since the day they moved in, the duo has been lovingly decorating and remodeling, giving the house long overdue TLC. The final room left on their to do list was their tiny vintage kitchen, which had both benefited and suffered from a 1991 partial makeover. Since the couple’s budget didn’t allow for a complete gut remodel, the two decided to fix the biggest unicorns — err — elephants in the room: the missing cabinet doors, dingy counter tops and lack of natural light. With a lot of hard work and some help from the resources available on Retro Renovation, it wasn’t long before life in Jenny and Bob’s kitchen was coming up rainbows.
 Jenny writes:
I discovered Retro Renovation a few years ago and truly it was the best thing to happen to our house. I have learned so much from Pam and the community, and it really helped educate me and focus my intentions with this renovation. A million thanks!
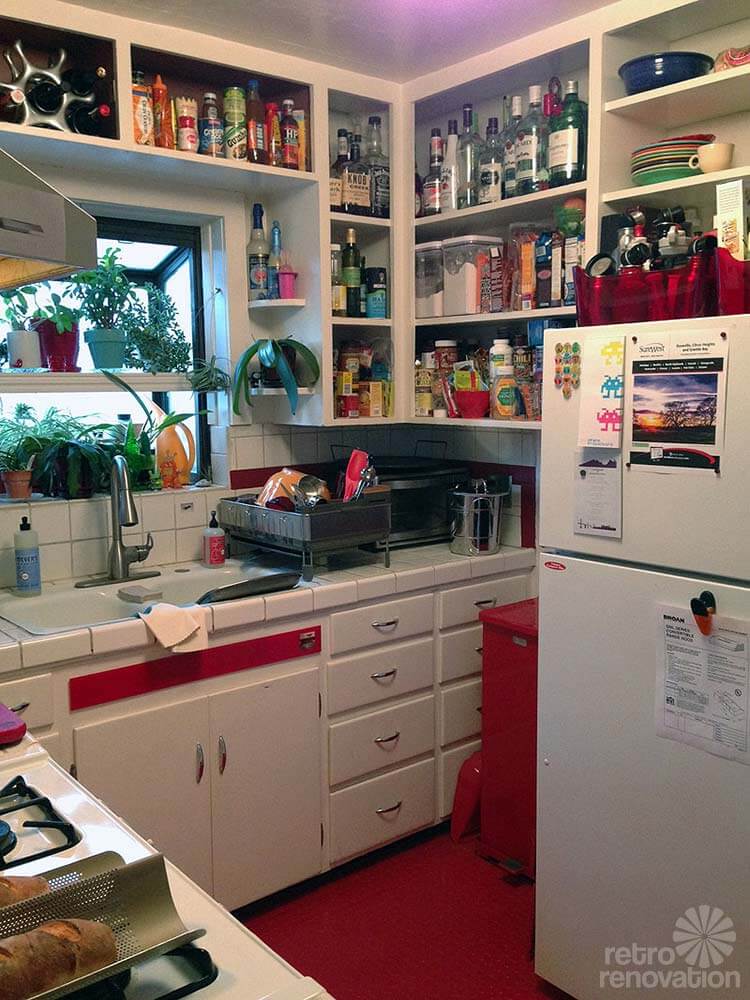
Our little house turned 60 last year. We have enjoyed living in it for 13 of those years and in that time have touched nearly every surface of the house inside and out. It was finally time to bring the kitchen (previously renovated in 1991) back to its roots. The previous owners had done some good things (open up the wall between the kitchen and dining room) and some not so good things (removed upper cabinet doors, and painted over wallpaper, outlets, hinges, and handles) to the the kitchen. Our goal was to help the kitchen better express its heritage and blend in a few shiny metallic modern updates too (apologies to the purists, I could not resist a new gas range with all the bells and whistles).
A total gut remodel was out of the question given our modest budget. Instead we focused on what we really bothered us most about the kitchen. Surprisingly, it was not our lack of a dishwasher. Mainly it was the missing upper cabinet doors, the cracked/dirty white tile counter tops, the tired gas range, and an overall lack of light.
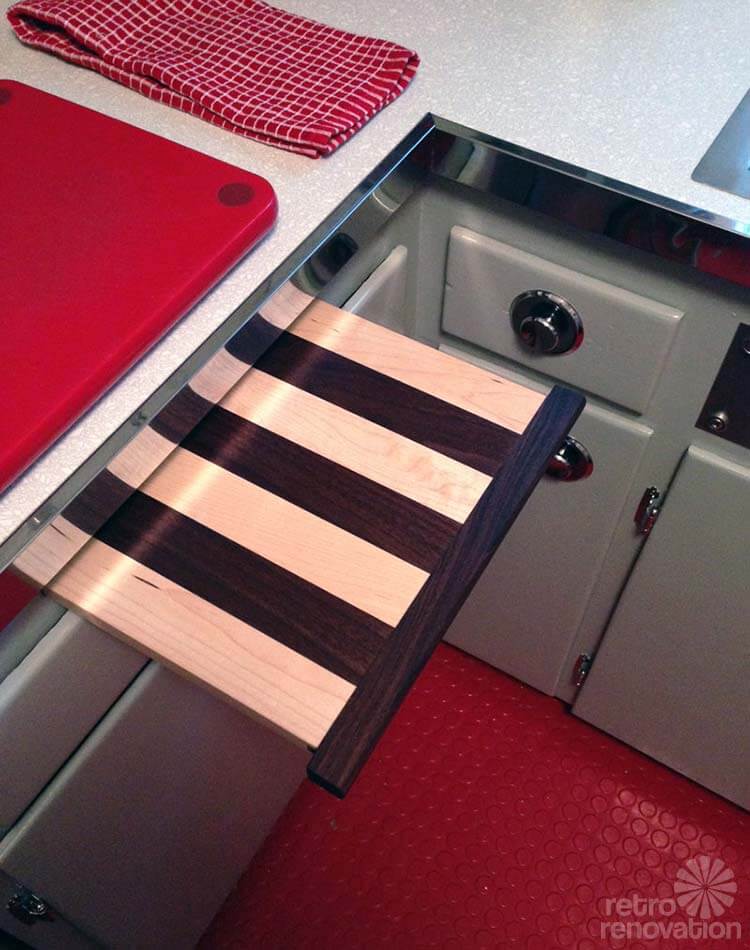
We embarked upon a total do-it-yourself kitchen restoration project. My husband, Bob, was game to try anything. Plus he had some excellent ideas on how to improve the space, like extending a bit more counter top into the dining room. There were some surprises along the way too. Like two spots for slide-in cutting boards hiding under the old tile border. Bonus!
We spent more weekends than we want to admit working on this kitchen project, but we are both quite pleased with the results. What I love most about my “new” kitchen is that is a much more open, light-filled, and relaxing space to be in.
What we did:
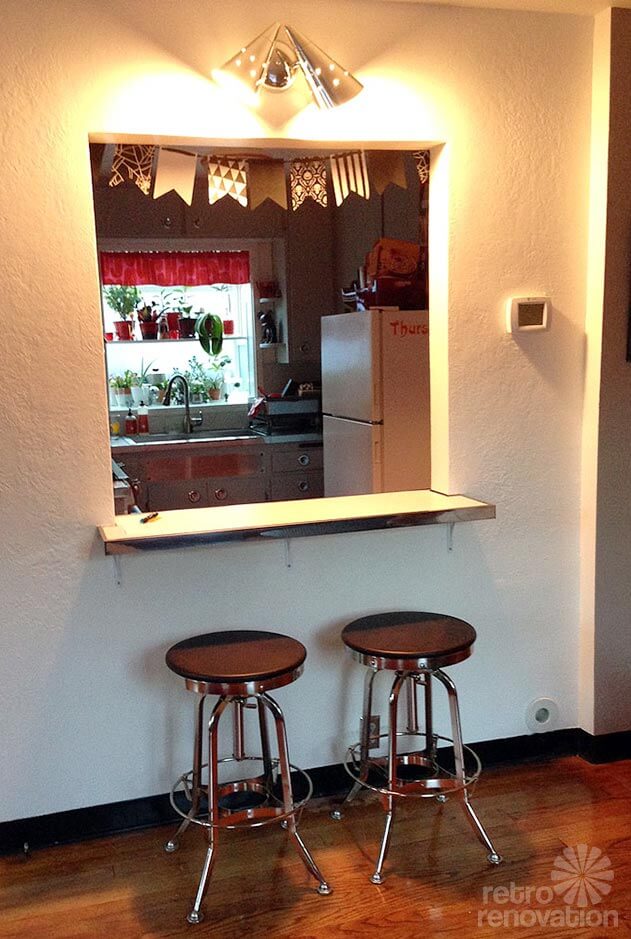
- Create a pass-through bar/seating area between the kitchen and the living room
- Remove the wallpaper hiding under layers of paint
- Texture and paint the walls and ceiling
- 2 new Rejuvenation light fixtures
- New larger more energy efficient garden window
- Upped cabinet doors created
- Repaint kitchen cabinets gray
- New drawer and cabinet pulls (thanks Kate – great idea!)
- New laminate — ‘Geo’ pattern Formica — counter tops with stainless steel edging (New York Metals)
- New kitchen sink
- New gas range
- 2 new counter stools
- 2 new cutting boards
- A simple curtain made of repurposed Alexander Girard placemats in the ‘January’ (1963) pattern.
- Paint knife block shiny white
- Paint refrigerator red
- Note: We put the floor in when we got the house. Unsure if it is still commercially available. It is studded rubber tile from Congoleum in ‘Cherry Red’ and has aged well. Having an existing red floor presented me with the largest design challenge for the kitchen project. It ruled out a lot of possibilities for laminate and cabinet colors.
Great ideas that came from RetroRenovation:
- New drawer and cabinet pulls (thanks Kate – super idea!)
- New laminate (Formica) countertops with stainless steel edging (New York Metals) – Bob especially loved Pam’s tutorials.
- Budget: $6,000
Thanks for everything!
Jenny & Bob
Jenny and Bob — you two did a fantastic job “Loving the house you’re in” and maintaining the original character of your adorable kitchen while also making it more functional and beautiful. Kudos to you for all your hard work. Mega thanks for sharing your story, your awesome “after” photos taken by hobby photographer Bob himself and your unique sense of humor with all of us.
Update/addition: Pam’s video on her counter tops and New York Metals edging, which Jenny mentions in the comments and please — click here to see this story — for what pieces Pam ordered.


Georgann says
This kitchen is the same size as my 66 year old kitchen…and organized the same way. I have only 8 cupboards (including under the sink) and nowhere to put anything! Your pictures give me great ideas on maximizing my very small space! Great job!
Connie says
You did a fabulous job! I have been trying to find the countertop….wondering if it is available in other colors but not having any luck. Help if you can, but either way, I so enjoyed the tour!
pam kueber says
See Formica’s website. The name of the pattern is Geo. We have a link in the story — in the bulleted area at the end. Also see our category Kitchens / Countertops in the blue navigation area up top.
tammyCA says
Great job! I love the small charming kitchens…it’s incredible that years ago huge meals were produced from these tiny kitchens, yet today the “masses” think you need a warehouse size kitchen with every high tech gadget. Just watch Rachael Koo on yt in her tiny French kitchen cook up gourmet meals.
I always like the open cabinets with colorful products & dishes…reminds me of “Friends”.
Kkmk says
Love your re-do! It’s a guud reminder that you do not have to spend big bucks to make a big difference. I am curious about the backsplash. I could not tell what you did from the photos. What did you do use?
Kkmk says
Sorry about the typo for “good.” It got set in my auto-correct and now I sound like the Swedish Chef from the Muppets.
Jenny says
Hi Kkmk! Since we did not have very much backsplash area to cover, we used the Formica there too. Didn’t make sense to do anything fancier as most of it is hidden by small appliances, etc.
pnutlaf says
Looks great! I see you used MDF board to glue the laminate to. While MDF is much cheaper than 3/4″ plywood I think you should have used a quality plywood instead. It looks like you only needed 2 or 3 sheets.
If you weren’t installing around a sink it would probably be ok, but MDF as a substrate choice seems penny wise, pound foolish for long term durability.
Cheryle Hadfield says
Kudos on a great job by my son and daughter-in-law…very creative..
Jan says
I really love it and love that you did it yourself, apparently enjoying it. I love ALL of it, but believe it or not, my favorite thing is the metal edging around the countertops. I remember those from when I was a little girl and would be thrilled to find a kitchen that had them.
Congratulations on doing so much and having such a cheery result!!
Femme1 says
What a great remodel! And I love that you did it yourselves…by the way, did you install the stainless steel edging yourselves? This is a job I’ve been putting off for years, but yours look so good that I’m considering trying it.
Jenny says
Hi Femme1! Yes. Bob did the edging himself. Pam’s videos were a great help!
Jonny says
I like it! The light over the pass through is a cool touch.
I also painted my refrigerator red to match my red floors. Mine had big plastic handles on the front that I replaced with some chrome ones from an old car and a big gold V emblem. If/when the right vintage unit comes along, I might replace it, but for now, it fits in so much better than a big wall of white.
I like the pull knobs and back plates too, my bathroom has the same ones, original to 1960. Well done.
Deb Cerrone says
Congrats on a job well done! I love it all, from the rubber floor to the counter top to your retro pulls! We did metal rimmed counters too (red Linoleum) and I love them. Enjoy your new kitchen!