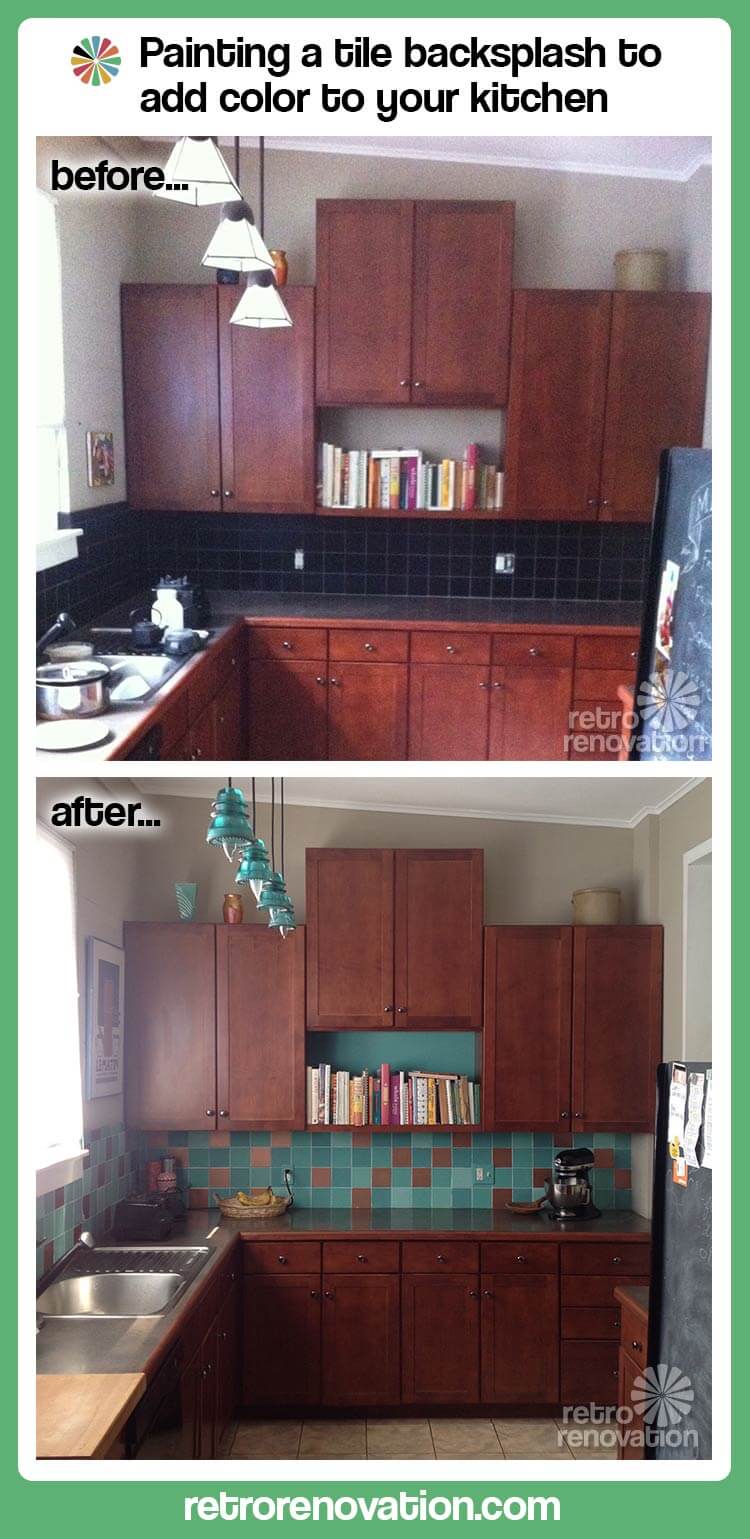
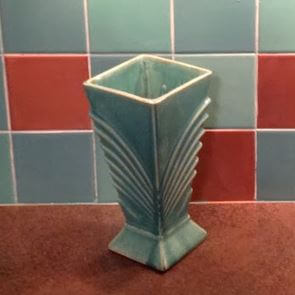
Lori paints her tile backsplash, using a vintage McCoy vase as her color inspiration
Kate - Updated: August 22, 2020
Retro Renovation stopped publishing in 2021; these stories remain for historical information, as potential continued resources, and for archival purposes.
“…From dour to fun” for less than $100
Reader Lori has been slowly making changes to her 1949 mid-century ranch house since she moved in about a year ago. She was featured in a Retro Design Dilemma asking for ideas for the window treatments in her living room last January. Now, she’s back to return the favor and share her secret for adding color to a tiled kitchen back splash — no hammer or chisel required. Taking her color cues from a treasured vintage McCoy vase, Lori inexpensively changed the color of black ceramic tiles using paint — with great success.
Lori writes:
Hi Pam and Kate!
I’m a long time lurker, sometimes commenter and have even been a Design Dilemma (pinch pleat curtains)!
I thought maybe your readers would be interested in a cheap DIY that I recently did in my mid-century modern house. I painted our tile back splash from black to turquoise and copper in a random retro pattern. Totally changed the vibe in our kitchen from dour to fun and made our kitchen, which is not retro, fit in with the rest of our retro house. I’m not sure what I spent since I had many of the things I needed but it was under $100.
Lori took her color cues from a treasured McCoy vase
I’m planning on painting the walls. The current paint is what was there when we bought the house. Note the wood trimmed laminate counters. Even though my kitchen isn’t vintage that was one of the vintage laminate counter top edging treatments that was mentioned in one of your articles!
In the after the pendant light shades are made from glass telegraph insulators. They went with the turquoise tiles 🙂
Wow, Lori — what a difference some color makes. Bravo to you for coming up with a solution to add some retro flair to your kitchen and “Love the House You’re In!”
Hi All,
I’m always so happy when I check my email and find news from Retro Renovation! Great way to start the day… thank you Pam and Kate! Lori, you did an amazing job painting your backsplash. It transforms your entire kitchen. If you do plan on painting your cabinets, or anything else in your home, I’d suggest Annie Sloan paints. You can paint ANYTHING with this paint, but I must warn you though, it’s addictive! I painted my bathroom cabinets(no priming required) in less than one hour. The paint is expensive, but worth every penny because you don’t have to use any primer!
I love my home, which is a ranch that was built in 1955. Lori, we are practically neighbors. I’m in Woodbridge!
Thank you again Pam and Kate for all the information you supply. I can’t wait to get started on my next project.
pam kuebersays
Thank YOU for this nice note, Betsy! What a nice way to start Monday morning!
Thank you, Betsy! I quite agree that getting news from Retrorenovation is a great way to start the day. I always enjoy reading the articles and stories and LOVE the house tours!
I’m aware of Annie Sloan paint but have never used it. I will check it out, thanks for the reminder.
You’re in Woodbridge? (Waves) We are neighbors! I’ve just moved to CT a couple years ago and find it to be a mid century heaven. Between Craigslist and thrift stores I have found so many awesome things.
Joe Felicesays
I have never heard of Annie Sloan, although I have heard of chalk paint. Here, all this time, I thought it was the paint on which you can write! Maybe Annie should have coined a better name. I checked out the website, and find the paint very interesting. I did note that the paint has a dull finish. Wouldn’t this make it inappropriate in certain situations, tile being one of them?
Joe Felicesays
Now, this I really like! (Not sure, but maybe it’s because they are the same colors I used in my kitchen and dining room.) Before I redecorated, I had painted tile on my backsplash. I took two shades of brown and one shade of gray, mixed them with equal parts of water. Not thoroughly mixed, just “intertwined.” (For lack of a better word.) Then I took a rag and just wiped the paint & water mixture onto the wall. When it dried, I marked off 7″ squares, and painted those white, to mimmick grout lines. No prep-just did this right over the existing white wall. People would come in and say, “Oh, I just love your quarry-tile backsplash!” They were astounded when I told them it was painted on, and had to go over and feel it for themselves. I don’t think I’d do it that way again, though; painting the grout lines was too tedious, especially for my nervous hands. Yet and still, I did this on a lark of a Sunday morning, using paint I had in the garage. So, $0 cost.
oh Hollandsays
Beautiful results from simple changes. Hope to see more of this kitchen as new wall color, valance and cab hardware come on the scene.
Carolsays
Those pendant lights are fantastic!!!
Sharasays
That is very nice, I love to see all these cool ideas out here. I can spend hours just looking through everything. I still do not think I have seen everything yet. Thank you for doing this blog for all us MCM lovers out there.
tammyCAsays
Looks terrific..love those colors together. I have a few vintage pottery pieces in aqua shades and they inspire me, too. Yep, my immediate thought was move the vase from up high, ha,ha..living in earthquake country we always think it that way. It’s a drag to have everything tacked down with “earthquake hold” and large tall furniture bolted to the walls.
Mariasays
Great idea and so well done. Love the colors and the lights also. Really like the wall colors and the trim. Thanks for the inspiration. I sigh whenever I see these 1949 kitchens in such good order too. I have one and, though I work hard to keep it tidy, it is chock-a-block, including improvised pantries because there is just so little room.
PS — Lovely McCoy vase!
Lori Dsays
Thanks, Maria. Our house is from 1949 but our kitchen is only about 10 yrs. old. So it has all the modern niceties like slide-outs inside the lower cabinets. I’d love to have seen the original cabinets, though. We have the plans for the house and they show cabinets that go almost up to the ceiling. There was an original built in desk, too. Pity that didn’t get saved.
@Mary Elizabeth,thats pretty wild about the earthquakes! Hmm, maybe I should move those vases.
Anne-Mariesays
I forgot to mention the lights!! I see those things so often and drool over the color and feel. Now I have an idea of WHAT to do with them. Love it.
Anne-Mariesays
There is a lot to love and be inspired by here. The colors are fantastic and manage to be both cheery and relaxing at the same time.
The vase is amazing!
It looks like you painted your fridge with chalkboard paint? Very cool.


 Reader Lori has been slowly making changes to her 1949 mid-century ranch house since she moved in about a year ago. She was featured in a Retro Design Dilemma asking for ideas for the window treatments in her living room last January. Now, she’s back to return the favor and share her secret for adding color to a tiled kitchen back splash — no hammer or chisel required. Taking her color cues from a treasured vintage McCoy vase, Lori inexpensively changed the color of black ceramic tiles using paint — with great success.
 Lori writes:
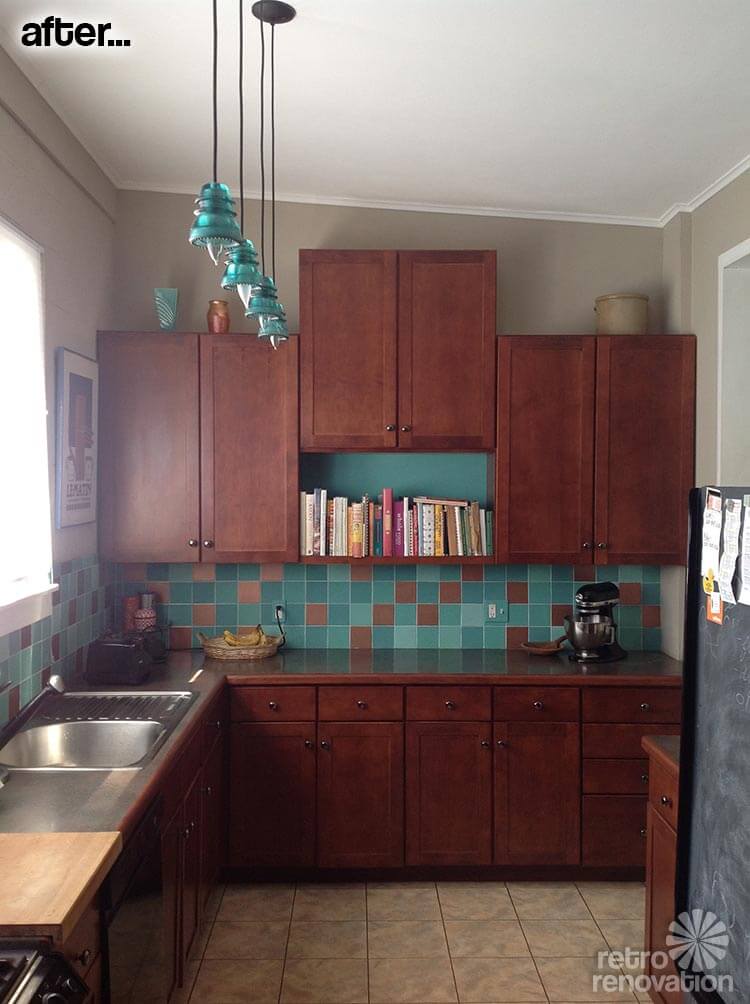


Betsy F says
Hi All,
I’m always so happy when I check my email and find news from Retro Renovation! Great way to start the day… thank you Pam and Kate! Lori, you did an amazing job painting your backsplash. It transforms your entire kitchen. If you do plan on painting your cabinets, or anything else in your home, I’d suggest Annie Sloan paints. You can paint ANYTHING with this paint, but I must warn you though, it’s addictive! I painted my bathroom cabinets(no priming required) in less than one hour. The paint is expensive, but worth every penny because you don’t have to use any primer!
I love my home, which is a ranch that was built in 1955. Lori, we are practically neighbors. I’m in Woodbridge!
Thank you again Pam and Kate for all the information you supply. I can’t wait to get started on my next project.
pam kueber says
Thank YOU for this nice note, Betsy! What a nice way to start Monday morning!
Lori D says
Thank you, Betsy! I quite agree that getting news from Retrorenovation is a great way to start the day. I always enjoy reading the articles and stories and LOVE the house tours!
I’m aware of Annie Sloan paint but have never used it. I will check it out, thanks for the reminder.
You’re in Woodbridge? (Waves) We are neighbors! I’ve just moved to CT a couple years ago and find it to be a mid century heaven. Between Craigslist and thrift stores I have found so many awesome things.
Joe Felice says
I have never heard of Annie Sloan, although I have heard of chalk paint. Here, all this time, I thought it was the paint on which you can write! Maybe Annie should have coined a better name. I checked out the website, and find the paint very interesting. I did note that the paint has a dull finish. Wouldn’t this make it inappropriate in certain situations, tile being one of them?
Joe Felice says
Now, this I really like! (Not sure, but maybe it’s because they are the same colors I used in my kitchen and dining room.) Before I redecorated, I had painted tile on my backsplash. I took two shades of brown and one shade of gray, mixed them with equal parts of water. Not thoroughly mixed, just “intertwined.” (For lack of a better word.) Then I took a rag and just wiped the paint & water mixture onto the wall. When it dried, I marked off 7″ squares, and painted those white, to mimmick grout lines. No prep-just did this right over the existing white wall. People would come in and say, “Oh, I just love your quarry-tile backsplash!” They were astounded when I told them it was painted on, and had to go over and feel it for themselves. I don’t think I’d do it that way again, though; painting the grout lines was too tedious, especially for my nervous hands. Yet and still, I did this on a lark of a Sunday morning, using paint I had in the garage. So, $0 cost.
oh Holland says
Beautiful results from simple changes. Hope to see more of this kitchen as new wall color, valance and cab hardware come on the scene.
Carol says
Those pendant lights are fantastic!!!
Shara says
That is very nice, I love to see all these cool ideas out here. I can spend hours just looking through everything. I still do not think I have seen everything yet. Thank you for doing this blog for all us MCM lovers out there.
tammyCA says
Looks terrific..love those colors together. I have a few vintage pottery pieces in aqua shades and they inspire me, too. Yep, my immediate thought was move the vase from up high, ha,ha..living in earthquake country we always think it that way. It’s a drag to have everything tacked down with “earthquake hold” and large tall furniture bolted to the walls.
Maria says
Great idea and so well done. Love the colors and the lights also. Really like the wall colors and the trim. Thanks for the inspiration. I sigh whenever I see these 1949 kitchens in such good order too. I have one and, though I work hard to keep it tidy, it is chock-a-block, including improvised pantries because there is just so little room.
PS — Lovely McCoy vase!
Lori D says
Thanks, Maria. Our house is from 1949 but our kitchen is only about 10 yrs. old. So it has all the modern niceties like slide-outs inside the lower cabinets. I’d love to have seen the original cabinets, though. We have the plans for the house and they show cabinets that go almost up to the ceiling. There was an original built in desk, too. Pity that didn’t get saved.
@Mary Elizabeth,thats pretty wild about the earthquakes! Hmm, maybe I should move those vases.
Anne-Marie says
I forgot to mention the lights!! I see those things so often and drool over the color and feel. Now I have an idea of WHAT to do with them. Love it.
Anne-Marie says
There is a lot to love and be inspired by here. The colors are fantastic and manage to be both cheery and relaxing at the same time.
The vase is amazing!
It looks like you painted your fridge with chalkboard paint? Very cool.
I like the creativity in this room.