


 After purchasing her 1960s split-level house, Jessica wanted to dial up the retro in the relatively plain kitchen. Owner of J. Paris Designs, a furniture refinishing and repurposing business, she used her refinishing skills and design know-how, the resources on Retro Renovation, and some help from her husband Dan and dog Harlow to enliven the space.
 Jessica writes:
Our home is an average 1960s split level. It had been stripped down and painted white when we bought it at the beginning of this past summer, with very little original character left.

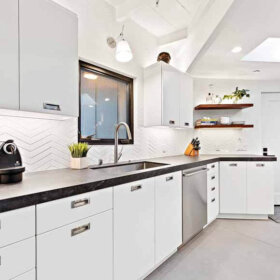
The kitchen was worn and grimy and none of the (original) appliances worked.


We replaced everything except the cabinets, which I painted with a mixture of Annie Sloan Chalk Paint and water with a spray gun. I finished them with Polycrylic. The finish has held up wonderfully!


We built and laminated the countertops ourselves with the Formica Charcoal Boomerang laminate purchased from Home Depot. I had ordered a few samples of the Wilsonart styles you have advertised, but none of the colors were right. The charcoal is just enough retro without being overpowering.

The cabinet knobs, hinges, and porcelain on steel sink (complete with Hudee ring) all came from HD Supply (thanks, Kate, for the affordable knob recommendation!) As you know, finding a white sink with a hudee ring is kind of difficult. I couldn’t accept the high cost of the Kohler ones you had written about, but the HD Supply one was very affordable! I will say, it is much shallower than most sinks, which is why we went with the high goose neck industrial style faucet.

The countertop trim molding (both front piece and cove base in back) came from Eagle Mouldings. They were very helpful answering any of my questions. I did realize after I purchased the trim that I had bought aluminum, not stainless like Pam’s kitchen. Aluminum can’t be bent at a 90 degree angle around corners like stainless can. We ended up having to cut and miter the edges ourselves, which was incredibly challenging. The new stove ended up being six full inches wider than the original built-in one (something you don’t always think about) so we had to adjust that area accordingly.


I reused the existing NuTone range hood by taping off the chrome and painting it with a can of Rust-Oleum Appliance Paint from Home Depot. It looks spectacular and brand new!


I researched different flooring patterns for the VCT and ended up using the basketweave pattern with three different colors. The brand is Vinylasa, and the colors are Ebony (VT569), Steel Works (VT522), and Shooting Star (VT557). I purchased the flooring from a local independent flooring store because they had more color options than Home Depot or the like. I was worried it would be too busy, but once it was done, I was in love!

The funky Sputnik style light was purchased at Menard’s for around $170 – which I thought was an awesome price! The teardrop shaped pendant was the only cool part of the original kitchen, and I was happy to keep it.

I made the pendant over the sink using an inexpensive pendant kit and a collander from Home Goods. The backsplash is just simple white subway tile with grey grout.

Jessica, your kitchen looks fantastic! It’s interesting to see someone use Annie Sloan Chalk Pain to finish cabinets. This paint can sand down to such a smooth finish, we can see why it could be great for cabinetry, assuming the adhesion holds. Can you give us your opinion on how you think it will hold up long term, given that you that you work with this paint professionally?
Thanks so much for sharing your project with us — way to go, DIY squad!

I think Harlow likes it too!


Eric says
Good idea with the paint and poly, you get the look you want and the wear resistance. Holds up really well and resists chipping and flaking off due to the Poly is adding another barrier to hold all in place. Did the same with my kitchen around a year ago. Cleans easy and the Poly adds an additional depth and more expensive professional feel than painting only.
Amber says
Where did you get the curtain valance from? I love it!
Jessica@JParisDesigns says
I made it myself! The fabric is from a local distributor…I don’t know the name off hand.
Tom says
WOW!
Looks incredible!
Jesse says
I’ve never heard of using chalk paint on kitchen cabinets, but the color is fantastic!
Rickie says
FABULOUS!!!!!!
Rebecca - Madison WI says
Great job. It looks great. On the hood how did you keep paint off the Nutone metal sign? It looks great and brand new.
Jessica@JParisDesigns says
I was able to pry it off with a flat head screwdriver prior to painting. I accidentally snapped it in half, but was able to hide that fact once I reattached it.
Rebecca - Madison says
Ok. Thanks for the info.
sherree says
I love it all! The floor is just stunning and goes so well with your counter top. Great job 🙂
Jolie-Jeanne says
ho my. Love it !
Barbara says
Looks beautiful! I love the color. I’ve been considering doing this in my split level. My cabinets are 80s oak, though.
Mr Kim says
With proper sanding and priming there shouldn’t be any problem.
Elizabeth says
Does paint that has primer in it work for this kind of thing? I just stripped the bathroom vanity and door because the previous owner’s paint job was peeling off (the original paint under that is still there). Everything is sanded now and my husband thinks we will be fine using the combined paint/primer but I don’t want to see peeling paint again in six months!
Jessica@JParisDesigns says
For a project of this magnitude, you really might want to consider using chalk paint. You can search online for local retailers in your area. They always are very knowledgable. I used a mixture of 2 colors to make a custom blend. So that was 2 quarts at about $40 each. I mixed it with 20% water in my sprayer and used every last bit if it on the cabinets. I really hope this helps!!
Mr Kim says
I’ve never used the primer-paint myself. But I’m very wary of combined products.
Jessica comments later on «I’m usually a latex fan all the way. But that does require sanding and priming before painting for maximum adhesion». I always do that. I used a water based primer on sanded wood, and then paint. For a relatively small surface like the one you’ve got, doing the primer, sanding, painting doesn’t really take that much time considering durability.
Perhaps, you might consider searching on the Internet some forum where people comment on the durability of the primer-paint combination you mentioned and then decide after you’ve done some research.
lynda says
Good for you for being brave and just jumping in. I love DIY stories. Kitchen looks great. You will love it for many years, I am sure!