


 After purchasing her 1960s split-level house, Jessica wanted to dial up the retro in the relatively plain kitchen. Owner of J. Paris Designs, a furniture refinishing and repurposing business, she used her refinishing skills and design know-how, the resources on Retro Renovation, and some help from her husband Dan and dog Harlow to enliven the space.
 Jessica writes:
Our home is an average 1960s split level. It had been stripped down and painted white when we bought it at the beginning of this past summer, with very little original character left.

The kitchen was worn and grimy and none of the (original) appliances worked.


We replaced everything except the cabinets, which I painted with a mixture of Annie Sloan Chalk Paint and water with a spray gun. I finished them with Polycrylic. The finish has held up wonderfully!


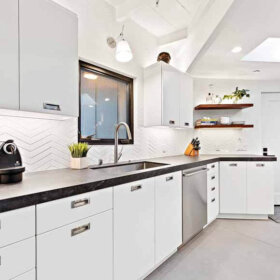
We built and laminated the countertops ourselves with the Formica Charcoal Boomerang laminate purchased from Home Depot. I had ordered a few samples of the Wilsonart styles you have advertised, but none of the colors were right. The charcoal is just enough retro without being overpowering.

The cabinet knobs, hinges, and porcelain on steel sink (complete with Hudee ring) all came from HD Supply (thanks, Kate, for the affordable knob recommendation!) As you know, finding a white sink with a hudee ring is kind of difficult. I couldn’t accept the high cost of the Kohler ones you had written about, but the HD Supply one was very affordable! I will say, it is much shallower than most sinks, which is why we went with the high goose neck industrial style faucet.

The countertop trim molding (both front piece and cove base in back) came from Eagle Mouldings. They were very helpful answering any of my questions. I did realize after I purchased the trim that I had bought aluminum, not stainless like Pam’s kitchen. Aluminum can’t be bent at a 90 degree angle around corners like stainless can. We ended up having to cut and miter the edges ourselves, which was incredibly challenging. The new stove ended up being six full inches wider than the original built-in one (something you don’t always think about) so we had to adjust that area accordingly.


I reused the existing NuTone range hood by taping off the chrome and painting it with a can of Rust-Oleum Appliance Paint from Home Depot. It looks spectacular and brand new!


I researched different flooring patterns for the VCT and ended up using the basketweave pattern with three different colors. The brand is Vinylasa, and the colors are Ebony (VT569), Steel Works (VT522), and Shooting Star (VT557). I purchased the flooring from a local independent flooring store because they had more color options than Home Depot or the like. I was worried it would be too busy, but once it was done, I was in love!

The funky Sputnik style light was purchased at Menard’s for around $170 – which I thought was an awesome price! The teardrop shaped pendant was the only cool part of the original kitchen, and I was happy to keep it.

I made the pendant over the sink using an inexpensive pendant kit and a collander from Home Goods. The backsplash is just simple white subway tile with grey grout.

Jessica, your kitchen looks fantastic! It’s interesting to see someone use Annie Sloan Chalk Pain to finish cabinets. This paint can sand down to such a smooth finish, we can see why it could be great for cabinetry, assuming the adhesion holds. Can you give us your opinion on how you think it will hold up long term, given that you that you work with this paint professionally?
Thanks so much for sharing your project with us — way to go, DIY squad!

I think Harlow likes it too!


Lori Scott says
Absolutely beautiful!! Esp. like the trim around the counter top. The sputnik light looks perfect! Great job!!!
Kristin says
This is beautiful!!! I love how everything looks bright and cheery even though there aren’t really any windows or anything. My husband and I are looking into buying our first home and the one we have our eye on (a 1959 midmodest ranch) has a very similar kitchen. You’ve given me lots of ideas!
CB says
As you know VCT is difficult to keep clean and shiny.
I’m on a landlord forum, a particularly smart guy uses a couple of coats of polyurethane after installing a VCT floor.
I think it’s worth a test area, in an other part of the house.
The entire kitchen is gorgeous.
pam kueber says
I just have mine polished, or polish it myself. It really hasn’t been an issue…
Allen says
I’ve had my VCT for about 6 years now and it is just now getting to where I need to polish it. I used a commercial mop on acrylic coating (6 layers) meant for VCT (same stuff the church uses). I also am a no shoes inside household which helps dramatically with the cleaning and upkeep of all my floors. I know that is not practical for everyone but the commercial finishes are quite durable.
Catherine says
How did you strip the cabinets to prep them for painting?
Joyce says
Beautiful job. Looks very inviting!
Olive Mondello says
Spectacular remodel! I love the valance over the sink! Would love
to know if the fabric is available. I’m so inspired by this makeover.
Maureen says
I love it! Awesome job! We are about to start working on our 1965 kitchen and this has given me a lot of inspiration 🙂 One question for you, once you removed the old vinyl on the floor, what did you have to do to prep the floor for the new VCT? thanks!
Jessica@JParisDesigns says
We used a product called Ardex to prep the floor. It’s kind of like a thin cement that you mix up and spread with a trowel to even out the floors. It was a pain, and I’m definitely not an expert on it 🙂
kathy burgess says
Love your kitchen and you have answered a question I had. I bought a beautifully made but in serious need of redoing, 2 piece cabinet to use for a kitchen pantry. My 1940s cottage has NO storage and this piece also has deep drawers for my small appliances. Now, I can confidently use chalk paint for the redo and choose a great color. The cabinet is presently black. Thanks for you information and really helping me to make this decision.
Eric Bauer says
Nice job with your kitchen, I’m seeing more of a 1950’s look. I especially like the floor.
Linda says
Excellent job!!!!!! I absolutely love your choices!